

I still remember standing on my cracked, sun-bleached concrete deck last June, iced coffee sweating in my hand, thinking “this looks like a parking lot, not a backyard oasis.”
My pool was gorgeous.
My deck was, well, sad.
And I almost called a contractor for a full tear-out until I saw the quote and nearly choked on my coffee.
So I did what I always do when my budget says no but my Pinterest board says yes.
I got creative, a little scrappy, and honestly kind of obsessed with proving that “expensive-looking” and “expensive” don’t have to be the same thing.
Here’s everything I tried, what actually worked, and the little tricks that make my deck look like it belongs in a magazine.
Skip the Full Pour, Add a Pea Gravel Border

Okay, this one is my ride-or-die tip and I tell everyone who will listen.
Instead of repouring my entire deck, I framed the edges with pea gravel and simple metal edging.
It instantly softened the whole space and made the concrete look intentional instead of tired.
The sound it makes under bare feet is honestly so soothing, kind of like a tiny zen garden moment before you jump in the pool.
It’s cheap, it’s fast, and it hides a multitude of cracks and stains along the border where they’re most noticeable.
If I had a small deck with a tight budget, this is the very first thing I’d do.
You can find bagged pea gravel at basically any hardware store for pennies compared to new concrete.
I went with a warm beige tone because it played nicely with my existing pavers.
But there’s a soft gray option too, if your style leans more coastal or modern.
Honestly, the contrast alone makes old concrete look like a designed feature instead of a mistake you’re trying to hide.
It’s one of those projects you can knock out in an afternoon.
And the payoff is so much bigger than the effort, which is basically my favorite kind of home project.
Stain, Don’t Replace, Your Existing Concrete

When I realized my concrete itself was structurally fine, just ugly, something clicked.
I didn’t need new concrete, I needed a new attitude toward the concrete I already had.
Concrete acid stain became my best friend that summer.
It seeps into the surface and creates this rich, mottled, almost stone-like look that genuinely fools people.
My neighbor asked me who I hired, and when I told her it was a weekend DIY, she didn’t believe me.
I went with a warm terracotta stain because it echoed the tile around my pool.
But there are gorgeous charcoal and slate blue options if your vibe is more modern coastal.
The trick is applying it in sections and working quickly, because it dries faster than you’d think.
I also added a matte sealer afterward, which gave it this soft, expensive sheen without looking glossy or plasticky.
Sort of like the difference between a fresh manicure and one that’s a few days old, you know what I mean.
This project made me realize how much of “looking expensive” is really just about intention and finish, not the price tag underneath it.
Layer in Outdoor Rugs to Create Zones

This one feels almost too simple to mention, but it changed everything for me.
I laid two oversized outdoor rugs, one near the lounge chairs and one by the shaded dining area.
Suddenly my deck didn’t feel like one flat slab of gray, it felt like an actual outdoor living room with rooms inside it.
And that’s the secret, honestly, zoning is what expensive backyards do that budget ones skip.
I chose a striped indigo and cream rug for the lounge zone because it felt breezy and coastal.
For the dining area, I went with a more textured jute-look rug for warmth underfoot.
They’re synthetic, mold resistant, and honestly hold up so much better than I expected after a full season of pool splashes.
My tip: go one size bigger than you think you need.
A too-small rug makes furniture look like it’s floating, and that’s the opposite of cozy.
I learned that one the hard way with my first attempt, which I quietly returned a week later.
Rugs are also the easiest thing to swap out seasonally if you want a refresh without touching the deck itself.
String Lights Change Everything After Sunset

I am, without exaggeration, obsessed with what happens to my deck after the sun goes down now.
I strung warm white bistro lights in a zigzag pattern across two posts and it completely transformed the mood.
During the day, sure, it’s a nice deck.
But at night, it feels like a boutique hotel patio somewhere warm and far away.
The trick is using the thicker, commercial-grade bulbs, not the thin fairy light strands, because they give off a richer, golden glow.
I also added a couple of solar lanterns tucked along the gravel border for extra ambiance without extra wiring.
My honest hack: dim, warm light hides imperfections better than bright light ever could.
It’s basically a filter for your backyard.
If you’re hosting anyone this summer, even just for a quiet dinner, this is the one upgrade I’d tell you not to skip.
It costs so little compared to the difference it makes.
And there’s something so soothing about sitting under those lights with your feet still damp from the pool.
Try a Stenciled Concrete Pattern

I’ll be honest, this project intimidated me at first.
But once I tried it on a small hidden corner of my deck, I was hooked.
Using an outdoor-safe stencil and porch paint, I created a subtle Moroccan-inspired tile pattern along the deck’s edge.
From a few feet away, it genuinely reads as tile, not paint.
I chose a soft blue and white combo because it echoed my pool tile perfectly.
But there are gorgeous terracotta and cream patterns too, if your style leans more Mediterranean.
The emotional payoff here is huge, because every time I walk past that corner I feel like I actually designed something.
My tip: always test your stencil on cardboard first.
Paint bleeds more than you’d expect on textured concrete.
And use painter’s tape generously, because clean lines are what sell the illusion.
It took me one weekend, and honestly, it’s the section of my deck guests comment on the most.
Upcycle Furniture Instead of Buying New

My lounge chairs are secondhand, and I will shout that from the rooftops.
I found two teak chairs on a local marketplace app for a fraction of retail price, a little weathered but structurally solid.
A light sanding and a coat of teak oil later, they looked brand new, almost better than new honestly.
There’s something so satisfying about giving furniture a second life instead of buying something mass produced.
My tip: look for solid wood or metal frames, because those are the pieces worth saving.
Skip anything with rusted metal joints or rotted wood, that’s usually not worth the effort.
I also swapped out the cushions for new outdoor fabric in a soft sage green, which instantly modernized the whole look.
New cushions are honestly the cheapest facelift you can give old furniture.
It’s kind of wild how much a $40 cushion set can transform a $20 thrifted chair.
If I had unlimited time, I’d hunt secondhand furniture every single weekend, it’s basically a treasure hunt now.
Potted Plants Instead of Built-In Landscaping

I didn’t have the budget for a full landscaping overhaul around my deck.
So I leaned hard into oversized potted plants instead, and it worked better than I expected.
Tall potted grasses along the deck’s edge gave it privacy and movement without a single dollar spent on hardscaping.
I mixed in some trailing plants near the steps, which softened the hard concrete edges beautifully.
My favorite combo is a tall fountain grass paired with a lower, bushy rosemary pot, the textures play off each other so nicely.
And rosemary smells incredible in the heat, it’s such a small detail but it makes the whole space feel intentional.
My tip: use a few statement-sized pots rather than lots of tiny ones.
Bigger pots read as more expensive and more cohesive, even if the plants inside are budget picks from a big box store.
I also grouped mine in odd numbers, threes mostly, because it just looks more natural that way.
This is the project I’d tell any renter to try first, since it’s fully portable if you move.
Build a Simple Shade Corner

The turning point for how “finished” my deck felt came when I added a small shaded corner.
I used a basic cantilever umbrella paired with a few tension curtain panels strung between two posts.
It created this little defined nook that feels like its own private cabana.
Honestly, shade is underrated when it comes to making a space feel luxurious.
Without it, you’re just squinting through lunch, and with it, you’re lounging like you’re on vacation.
I chose white curtain panels because they billow so beautifully in the breeze.
My tip: use outdoor-rated curtain rods, not indoor ones, because humidity will warp anything not built for it.
I also added battery-powered clip lights to the curtain corners for extra glow at night.
This corner has become my actual favorite spot in my entire yard, more than the pool itself some days.
And I still can’t believe how little I spent to make it feel this good.
Interlocking Deck Tiles Over Old Concrete

For the area right by my pool steps, I used interlocking composite deck tiles instead of resurfacing.
They click together like puzzle pieces, no tools, no mess, no contractor required.
I went with a warm gray wood-look tile that instantly upgraded that whole section.
It hides stains and imperfections in the concrete underneath completely.
My tip: measure twice before ordering, because these tiles are sold in sets and running short mid-project is so annoying.
I learned that one myself and had to wait a week for a reorder, which tested my patience.
They’re also removable, so if you’re renting or just want flexibility, this is such a smart low-commitment option.
The texture underfoot feels warmer than bare concrete too, especially barefoot on a hot day.
It genuinely feels like a real wood deck from a few feet away.
And for the price of a few boxes of tile, that illusion is honestly kind of magical.
Repurposed Pallet Loungers

This one is a little more hands-on, but stick with me.
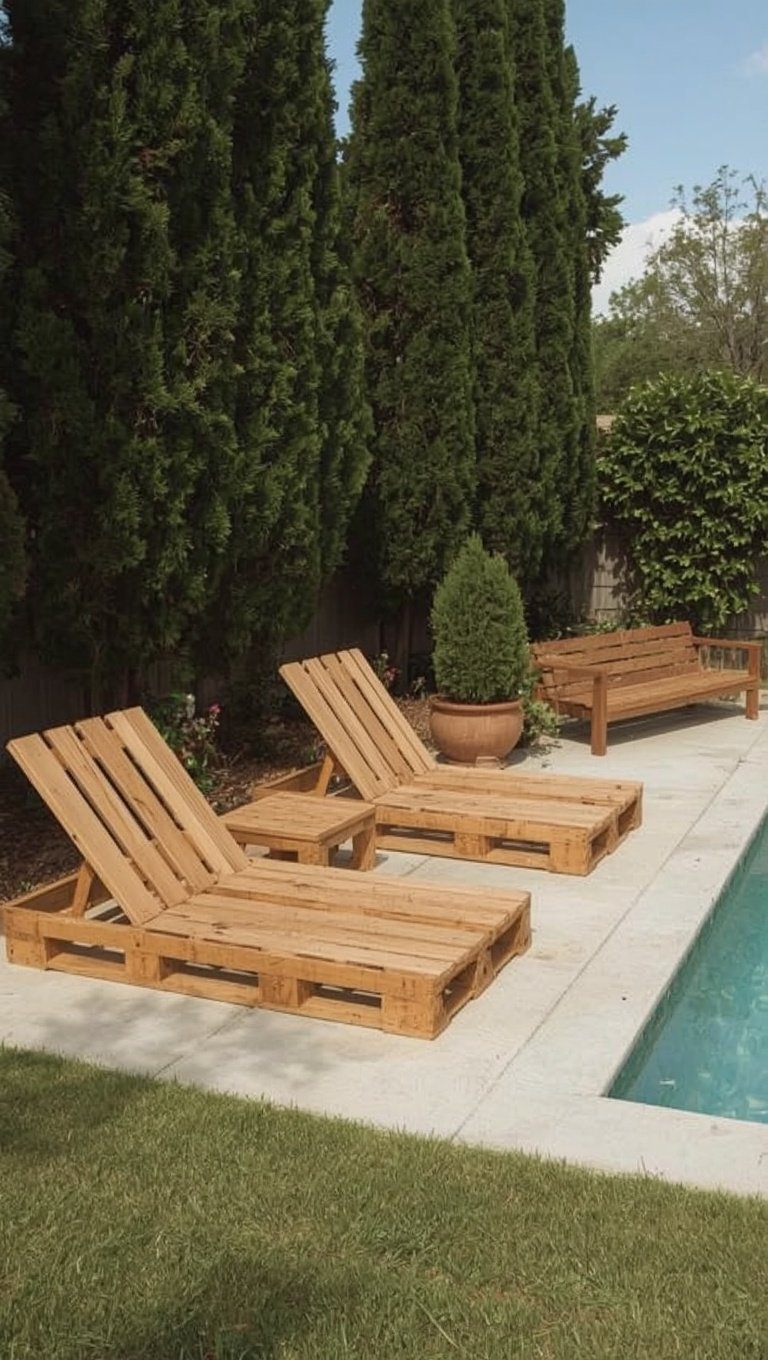
I built a simple daybed lounger using two stacked pallets, sanded smooth and sealed against moisture.
Topped with a thick cushion and a few throw pillows, it became the coziest spot on my whole deck.
It has this laid-back, coastal-cabin feel that store-bought furniture just doesn’t replicate.
My tip: always use heat-treated pallets, marked HT, never chemically treated ones, especially near a pool.
Safety first, always, no exceptions there.
Sanding takes patience, more than you’d think, but it’s so worth it for that smooth, splinter-free finish.
I sealed mine twice for extra protection against pool splashes and sun exposure.
The cushion is honestly the star of the show, so don’t skimp there even if you skimp elsewhere.
This project cost me less than one new patio chair from a big box store.
Color-Blocked Textiles Tie It All Together

Once my furniture was sorted, I realized the real magic was in the textiles.
I picked three colors, a warm terracotta, a soft cream, and a muted sage, and repeated them across every cushion and towel.
Suddenly my whole deck felt curated instead of thrown together.
That’s honestly the secret most people miss, cohesion costs nothing extra.
My tip: buy a few extra throw pillows in your palette and rotate them seasonally for a quick refresh.
I keep mine in a weatherproof storage bench so they’re always dry and ready.
Quick-dry outdoor fabric is worth the slightly higher price, trust me on this one.
Regular fabric holds moisture and gets that musty smell so fast near a pool.
This little color discipline is honestly the cheapest styling trick in my entire toolkit.
And it photographs so beautifully too, if that matters to you like it does to me.
Add a Fire Bowl or Lanterns for Ambiance

A small tabletop fire bowl became one of my favorite impulse purchases, genuinely.
It sits on my side table and gives off this flickering, cozy glow every evening.
There’s something about firelight near water that just feels expensive, romantic even.
I paired it with a couple of oversized glass lanterns holding thick pillar candles.
My tip: go for varying heights when grouping lanterns, it creates a much more dynamic, layered look.
Uniform heights read as generic, varied heights read as designed.
I cluster mine in odd numbers too, following that same rule from my potted plants.
Citronella candles tucked into pretty vessels solve the bug problem without looking like bug spray solutions.
This is such a small, affordable addition that makes evenings by the pool feel like a whole event.
Honestly, some of my favorite summer memories happened around this tiny fire bowl.
Vertical Greenery for Privacy and Polish
The last piece of my puzzle was privacy, without a fence, without a huge budget.

I installed a simple trellis panel along one side of the deck and let a fast-growing vine take over.
Within a few months, it created this lush, green privacy wall that feels so intentional.
My tip: choose a vine suited to your climate, mine loves full sun and barely needs watering once established.
It also muffles noise from the neighboring yard, which I did not expect but deeply appreciate.
The green backdrop makes every photo taken on my deck look ten times more polished.
I added a few hanging planters along the trellis too, for extra texture and movement.
This is the project that made my deck feel finished, like it wasn’t missing anything anymore.
And it cost me one trellis panel and a six dollar vine from my local nursery.
Sometimes the cheapest fixes end up being the most transformative ones of all.
Related read: Things I Wish I Knew Before I Decorated My First Home — Instant PDF + Kindle download. Secure checkout by Stripe

