

I spent $340 on a coastal mirror from a boutique.
Hated it within a month.
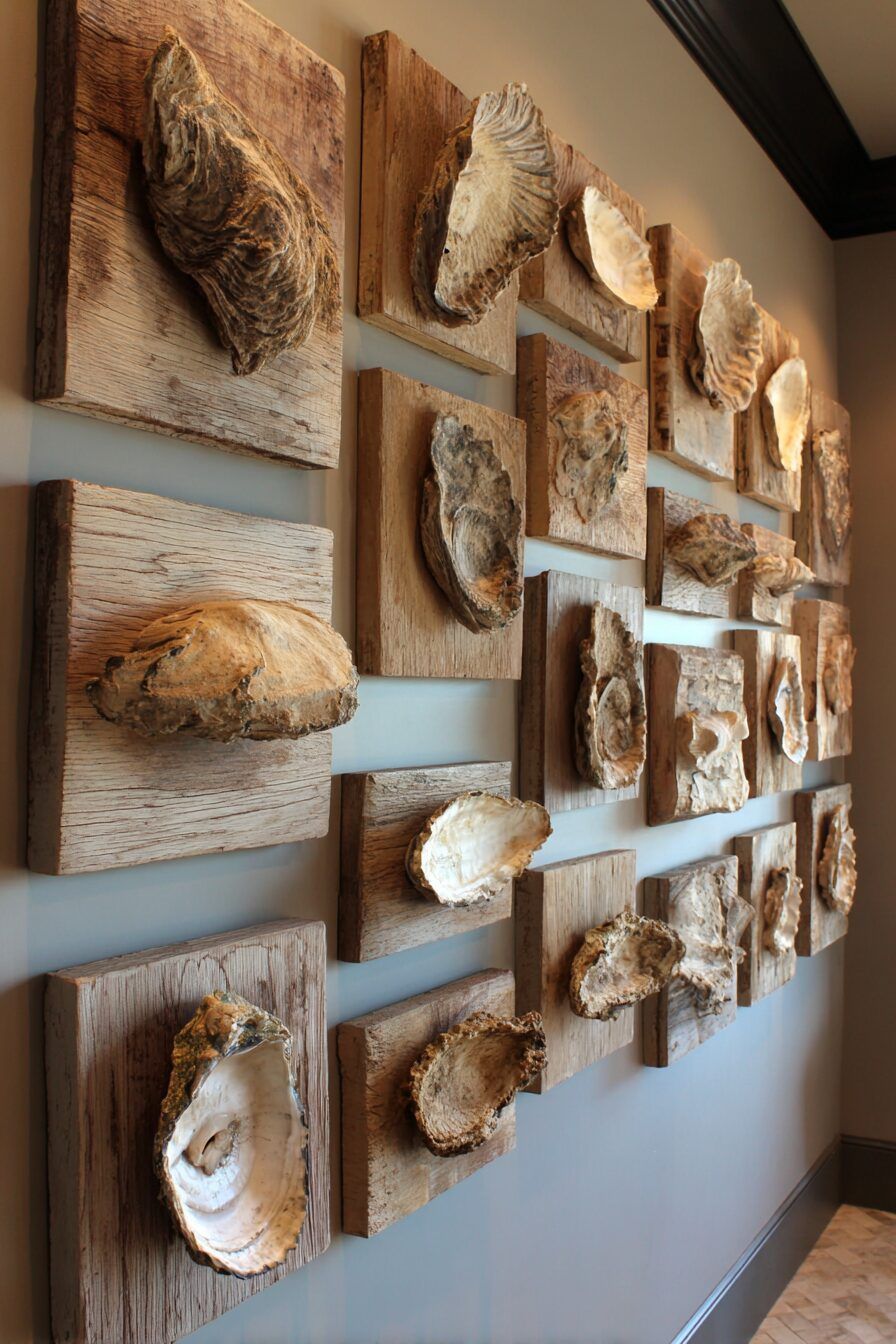
The oyster shell version I made for $11 in supplies is the one people actually stop and stare at.
Oyster shells are honestly one of the most underused decor materials out there, and I’ve been obsessed with them since I dragged home a garbage bag full from a seafood restaurant (the owner thought I was unhinged, for the record).
Below I’m going to walk you through every project I’ve actually done, including what went wrong, what I’d do differently, and the ones that are genuinely worth your time.
The cabinet hardware section alone changed my whole kitchen.
Keep scrolling.

First: How to Clean and Prep Oyster Shells (Skip This and Everything Falls Apart)
Before any project, you need clean shells.
I cannot stress this enough.
I made a wreath my first year without properly cleaning them and my entryway smelled like low tide for three weeks.
Biscuit loved it.
I did not.

Here’s the process I use now:
- Soak shells in a solution of one part bleach to three parts water for 20 to 30 minutes
- Scrub with an old toothbrush, especially inside the ridges
- Rinse thoroughly and let them air dry completely — at least 24 hours, ideally outside in the sun
- Optional: a very light coat of clear satin spray sealer will keep them from getting chalky over time, especially for anything near moisture
For drilling, use a diamond-tipped drill bit and go slow.
Like, embarrassingly slow.
I cracked probably 15 shells before I figured that out.
Keep a little cup of water nearby and dip the bit occasionally — it prevents heat cracks.
Drill near the hinge end where the shell is thickest.
That’s it.
Now the fun part.

The Oyster Shell Chandelier That Costs Under $50 and Looks Like It Didn’t
Okay.
This is the project.
The one that made my dining room look like a completely different house.
You need a lot of shells for this — I used around 200, which sounds insane until you realize seafood restaurants will often save them for you if you ask nicely.
(Call ahead.
Bring a box.
Be prepared for weird looks.) I sourced mine from two restaurants and paid exactly nothing for the shells themselves.
The frame I used was a $14 metal wreath ring from the craft store, about 18 inches across.
You could also use a repurposed wagon wheel, a hula hoop sprayed in matte black, or a circular piece of driftwood if you can find a good one.
Cut fishing line (I used 20-lb test) in lengths ranging from about 12 inches to 24 inches for visual variety.
Thread one shell per strand, knotting it at the bottom so it can’t slip off.
I did some strands with two or three shells spaced about 4 inches apart, which adds a lot of movement.
Tie strands around the frame at roughly 1-inch intervals until it looks full.
For lighting, I wove a warm-white LED string light set (the kind with the tiny bulbs, not the big globe ones) through the frame before attaching shells.
Plug-in style, so no electrician needed.
I honestly think the plug-in version looks better anyway because you can move it.
Mine hangs over my dining table, about 30 inches above the surface.
In the evening when the lights hit the pearlescent interiors, the shadows it throws on the ceiling are genuinely stunning.
My friend Amanda asked me where I bought it and I felt deeply smug telling her I made it.
One caveat: this takes a full weekend.
Don’t start it the night before a dinner party.
I speak from experience.
The Gallery Wall That Finally Fixed My Awkward Living Room Corner


I had this corner in my living room with weird 3pm light that made everything look dingy.
Framed art looked flat.
Plants died.
It was a problem corner.
A shell gallery wall fixed it.
Not because shells are magical (well, sort of), but because the three-dimensional texture actually works with the harsh light instead of fighting it.
Shadow boxes are your best tool here.
I picked up six of them from the craft store during a 50% off sale — paid around $4 to $7 each.
The ones that are about 8×10 inches with roughly 2 inches of depth give you room to layer shells and add small objects around them.
My arrangement includes:
- Two boxes with just shells arranged by size, smallest at the top
- One box with a cluster of shells and a small piece of sea glass I’ve had since college
- One box with a single large shell mounted on a piece of linen-colored fabric
- Two frames with simple coastal prints I made at home and printed for about $2 each
The mixing of shadow boxes and flat frames is what makes it feel intentional rather than random.
If everything’s the same depth, it reads as a collection.
Mixed depths read as a gallery.
Color palette note: I kept my shells natural — creamy white, grey-silver, hints of purple in some of the interiors.
I tried painting a few seafoam green once and it looked craft-fair-ish to me.
That said, a light whitewash (thin white paint, wipe off most of it immediately) looks genuinely beautiful if you want a more unified, beachy-white look.
Oyster Shell Planters That My Succulents Actually Survived In


Full honesty: I killed the first round.
Overwatered, poor drainage, RIP little guys.
Here’s what actually works.
For succulents in shells, you need the deepest shells you can find — look for ones that are at least an inch and a half deep in the bowl.
Put a small layer of pebbles in first (about a half inch), then cactus mix soil.
Don’t pack it.
Plant your succulent, press lightly, done.
The trick is placement.
These can’t sit in water.
I put mine on a shallow tray of pebbles on my kitchen windowsill, and I water maybe once every ten days in summer, less in winter.
The shell itself is actually helpful here — once you learn how your specific shell holds moisture, you can basically use it as a gauge.
Air plants are honestly the easier option if you’re nervous about killing things.
No soil needed.
Just nestle them in the shell, mist lightly once a week (twice in summer), and give them indirect bright light.
I have four on a piece of driftwood on my coffee table right now and they’ve been alive for over a year.
Wins all around.
For a centerpiece grouping, I use 5 to 7 shells of graduating sizes arranged on a 12-inch weathered wood round (found mine at a thrift store for $3).
Varies heights slightly by tucking a flat pebble under some of the shells.
The whole thing cost me under $15 to put together and it’s on my coffee table year-round.
Shell Candle Holders That Are Actually My Favorite Thing I’ve Ever Made


These are stupidly easy and they look incredible.
I make them as gifts now.
People lose their minds over them.
For the poured wax version: melt soy wax flakes (I buy a 10-lb bag on Amazon for about $18 and it lasts forever), add fragrance oil if you want — I like a driftwood-and-sea salt scent, obviously — and pour into your cleaned, dry shell.
Press a wick tab into the center before it sets.
Let it cure 24 hours before you light it.
The shell’s natural curve creates this irregular, organic candle shape you couldn’t mold if you tried.
Every single one looks different.
Some of mine have this slight tilt to the wax surface because the shell wasn’t perfectly level when I poured, and honestly it makes them look more artisan, not less.
If you don’t want to mess with wax, a small tea light dropped into a medium shell works just as well for ambiance.
The pearlescent interior amplifies the flame in a way that’s genuinely prettier than most candle holders you’d pay money for.
Arrange five or six of the tea-light version down the center of your dining table for a dinner party and I promise someone will ask where you got them.
I line mine up on my mantel too, mixed with a few pillar candles at different heights.
The whole setup cost me maybe $20 total including the wax supplies.
Safety note: don’t leave these unattended, obviously.
And the poured-wax shells get warm on the outside when burning — set them on a small ceramic dish or tile, not directly on wood.
The Shell Mirror Frame That Cost $11 and Replaced a $200 Boutique Purchase


I bought a round mirror from IKEA (the LOTS mirror, $10, roughly 12 inches diameter) and turned it into the thing people comment on most in my bathroom.
Here’s exactly what I did.
Lay the mirror face-down on a protected surface.
Sort your shells into size groups: large for the outer edge, medium for a middle layer, small to fill gaps.
Dry-arrange them first — spend time on this, it makes a huge difference.
I typically do one full pass without glue just to figure out the composition before committing to anything.
Use E6000 adhesive.
Not hot glue (it lets go in humid spaces), not regular craft glue, not whatever’s in your junk drawer.
E6000.
It’s about $5 at any hardware store and it actually holds.
Apply it to the shell, press for 30 seconds, then let everything cure for at least 24 hours before you hang it.
My technique: start with the large shells evenly spaced around the outer edge, then fill in between them with medium shells slightly overlapping.
The small shells and broken pieces fill the remaining gaps and make the whole thing look intentional rather than sparse.
Face some shells inward (showing the pearly interior), some outward (showing the ridged exterior).
That variation is what gives it depth.
Finished size on mine ended up about 18 inches across including the shell frame.
Hangs in my bathroom where the steam actually makes the shells look even better — they develop this slightly dewy look that’s very spa-ish.
The same technique on a larger rectangular mirror would be stunning in an entryway.
I’m planning that one for this fall.
Oyster Shell Serving Pieces That Make Your Dinner Party Table Look Intentional

I first tried this for a New Year’s Eve oyster roast and now I literally keep a dedicated box of “serving shells” in my cabinet.
They’re that useful.
For food use, the cleaning process matters more here.
Boil shells for 5 minutes or run them through the dishwasher on the sanitize cycle in addition to the bleach soak.
Let dry completely.
Food-safe, no coating needed — they’re shells, they’re already inert.
The best uses I’ve found:
- Shrimp cocktail in individual shells (set each one in a small pile of crushed ice on a platter — this is stunning and costs nothing)
- One perfect appetizer bite per shell — a little compound butter with bread, a cheese bite, a chocolate truffle
- Mignonette sauce or cocktail sauce in larger shells as dipping bowls alongside a seafood spread
For non-food purposes, these are my favorite small-dish solution.
I have one on my nightstand holding my rings and earrings.
One by the kitchen sink as a soap dish (genuinely perfect for this — the ridges let water drain).
One in my entryway as a key-and-change catch-all.
They’re functional in a way that actually improves the surface they’re sitting on rather than just cluttering it.
Bathroom Accessories That Make My Morning Feel Less Like a Chore

My bathroom is small and it used to feel chaotic.
Adding shell accessories didn’t add more stuff — it made the existing stuff look considered.
That’s the distinction that matters.
The setup I have now: one large shell as a soap dish on the sink, two medium shells on a small tray holding cotton rounds and hair ties, one extra-large shell on the back of the toilet holding a small succulent.
All sitting on a weathered wood tray I found at Goodwill for $2.
The tray is actually what makes this feel designed rather than collected.
Everything has a home.
It takes up the same amount of counter space as a random array of products, but now it looks like I tried.
One thing I’ll add that the standard advice never mentions: spray the underside of shells being used as soap dishes with a light coat of clear acrylic sealer.
Otherwise they can leave faint marks on certain countertop surfaces over time.
Learned that the hard way on my tile counter (it was fine) and again on a friend’s marble counter (less fine).
Seal the bottom.
Two minutes of work.
Combine your shell accessories with one or two pieces of sea glass or a smooth river stone and suddenly your bathroom counter looks like a lifestyle photo shoot instead of a CVS checkout line.
I’m not exaggerating.
Texture and scale variety do most of the work.
Wind Chimes That Sound Nothing Like the Metal Ones I Used to Hate

I grew up with those loud metal wind chimes that bang against each other and I genuinely found them stressful.
Oyster shell wind chimes are a completely different experience.
They make this soft, hollow clicking sound — more like someone slowly shuffling a deck of cards than actual chiming.
It’s calm.
I have mine on my back porch and I didn’t even realize how much I liked the sound until I took it down to fix it and missed it immediately.
The supplies for this are almost free.
You need:
- 10 to 15 shells of varying sizes (bigger difference in sizes = more tonal variety)
- A piece of driftwood about 12 to 14 inches long (mine came from a beach trip, but craft stores sell them)
- 30-lb braided fishing line — don’t go lighter, it’ll snap in wind
- A drill with a diamond bit (same one from the prep section)
Drill two holes in each shell near the hinge, about half an inch apart.
Thread fishing line through both holes and tie it off so the shell hangs horizontally and will swing freely.
Make strands ranging from 6 inches to 16 inches long so they hang at different levels — this is what ensures contact between shells in a breeze.
Tie strands to the driftwood about 2 inches apart.
Add a longer loop at both ends of the driftwood for hanging, making sure it’ll balance level.
Hang it somewhere with gentle air movement but some protection from direct wind.
A covered porch is ideal.
Mine faces the back yard and catches the afternoon breeze perfectly.
It’s one of those small things that makes sitting outside feel significantly better and I can’t fully explain why.
Table Centerpieces I Change Every Season Without Buying Anything New

My base centerpiece has been the same shells and driftwood tray for two years.
I just swap what’s around them.
This is the most budget-friendly decorating principle I know and it actually works.
The bones: a 16-inch piece of driftwood as the base, seven large oyster shells arranged in a loose cluster in the center, a small mirror tile underneath everything to bounce light upward.
That cost me maybe $8 to set up and it’s been on my dining table ever since.
What changes seasonally:
- Spring: small bud vases with stems tucked between shells, a few dried flowers
- Summer: a pillar candle in a hurricane glass at one end, some sea glass scattered around
- Fall: small gourds or dried botanicals, warm amber tea lights in the shells
- Winter: white LED fairy lights loosely draped, some pinecones, maybe a sprig of eucalyptus
The shells themselves read as neutral.
They go with everything.
That’s honestly why I love them as decor — they don’t fight with other materials, they support them.
You can make a shell centerpiece feel formal or casual just by what you put next to it.
For height variation, I prop one end of my driftwood up slightly on a smooth river rock.
It’s a subtle thing but it makes the whole arrangement feel more dynamic than if everything sits flat.
Cabinet Hardware That Turned My Builder-Grade Kitchen Into Something With Actual Character


This is the project I was most skeptical about and now I think it’s one of the best things I’ve done to my house.
My kitchen had the most generic brushed-nickel hardware imaginable.
It wasn’t offensive.
It was just nothing.
Oyster shell pulls are something.
You need shells that are roughly 2 to 3 inches across and have some depth to them so there’s gripping surface.
Sort through your collection and find the ones with the most similar size — they don’t need to match perfectly, but too much variation looks accidental rather than intentional.
The hardware itself: I used Chicago screws (also called binding posts) from the hardware store, about $6 for a pack of 20.
Drill one hole through the shell about a half inch from the top edge, thread the screw through from the back of the cabinet door through the shell, tighten the binding post on the front.
That’s it.
No special tools beyond a drill.
I did 14 cabinet doors and 8 drawers.
Total cost including new drill bits, screws, and the shells (which I already had) was about $22.
The before and after is actually dramatic — it’s one of those small changes that makes the whole room look considered instead of builder-grade.
For renters: yes, this works for you.
You swap back to the original hardware when you move out (keep it in a bag in your closet), patch the holes if needed, and no deposit problem.
The shell pulls take maybe 20 minutes to reinstall in a new place.
Absolutely worth doing even in a temporary home.
One honest note: these aren’t for everyone.
If your kitchen is very modern — like glossy white cabinets, very minimal — the organic irregular shapes might feel at odds with the vibe.
But in a kitchen with any warmth to it, wood tones, or existing texture, they’re incredible.
Mine is white cabinets with butcher block countertops and they’re perfect together.
The thing about oyster shell decor is that it rewards patience.
You collect slowly, you learn which projects are worth the effort (the mirror frame, the hardware, the chandelier — yes to all three), and you end up with a home that looks specific to you rather than assembled from a shopping cart.
That’s what I’m always chasing.
A house that couldn’t belong to anyone else.
Related read: The IKEA Kallax Bible — Instant PDF + Kindle download. Secure checkout by Stripe

