
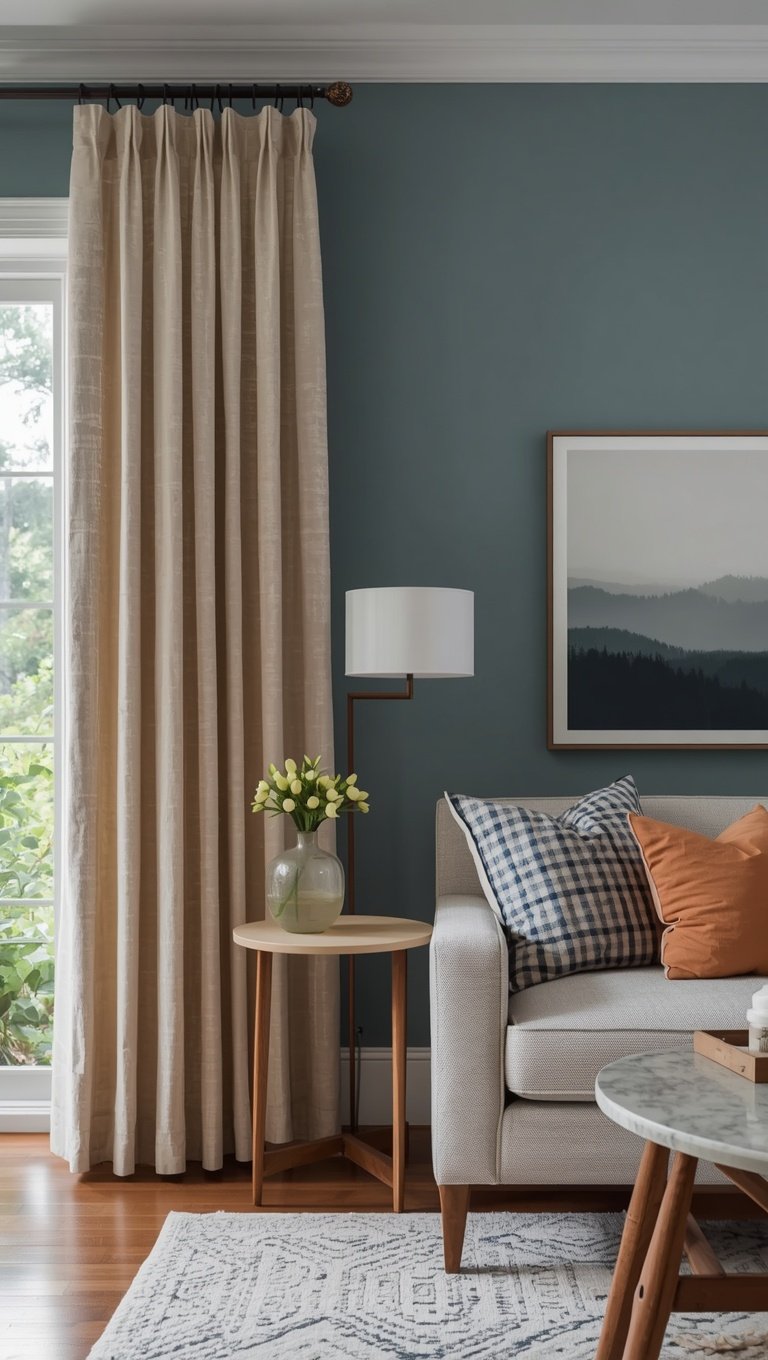

I used to hang my curtains right on top of the window frame.
Every single room in my first apartment.
And I genuinely thought it looked fine.
Then a friend came over, glanced up, and said “why does your ceiling feel so low in here?”
It wasn’t the ceiling.
It was the curtains.
That one comment sent me down a rabbit hole, and once I fixed it, I could not unsee the difference.
So today we’re talking curtain rods — the height, the ideas, the little tweaks that make a window (and honestly, a whole room) feel completely different.
Grab your coffee, this one’s a game for your eyes as much as your walls.
The Mistake I See in Almost Every Home

Hanging the rod directly above the window frame is the number one thing that ages a room.
It just visually chops the wall in half.
Your eye stops right there instead of traveling up.
And a room where your eye stops early always feels smaller, no matter the square footage.
I did this for years without knowing better.
Nobody tells you this stuff, you just sort of absorb “curtains go above the window” and leave it at that.
But there’s a difference between technically above the window and intentionally placed.
When I finally moved my rods up in my old living room, my husband asked if we’d raised the ceiling.
We hadn’t touched a thing structurally.
It was purely the curtain rod.
That’s the kind of change I live for, honestly — free-feeling, dramatic, and it costs you a few extra screw holes at most.
If you take nothing else from this post, take this one lesson.
Height is everything.
It’s the difference between a window that just exists and a window that makes the whole room feel considered.
The Formula I Actually Use

Here’s my rule of thumb, and it’s stupidly simple once you know it.
Hang the rod four to six inches above the window frame, minimum.
If your ceilings are tall, or you’re going for that airy, boutique-hotel feeling, go higher.
I’ve hung rods as close to the ceiling as six inches down and it looked incredible.
The trick is that the eye reads the fabric, not the actual window opening.
So the taller your curtains appear, the taller your whole room feels.
In my dining room, I hung the rod almost at ceiling height and used floor-length panels, and it’s genuinely the room guests comment on most.
Not because the window itself is anything special.
It’s an ordinary builder-grade window, nothing fancy.
But the illusion of height completely transforms it.
I’m kind of obsessed with how much impact this has for basically zero dollars.
You already own a drill.
You already own curtains, probably.
This is just moving hardware a few inches, and it changes everything.
Width Matters Just as Much as Height

This one surprised me too.
Extend your rod six to ten inches past the window frame on each side.
Not just an inch or two, really commit to it.
When curtains hang right at the edge of the window, they cover part of the glass when open, which blocks light.
But when you extend the rod wide, your curtains can fully clear the window during the day.
That means more natural light pouring in, which, if you’re like me and crave sunlight in your space, is a huge win.
It also makes the window itself look bigger than it is.
I did this in my bedroom last year and the window practically doubled in visual size.
My small guest room has a tiny window, almost apologetically small, and extending the rod wide was the single best fix.
Suddenly it didn’t feel like a window that got left out of the design plan.
If I had one universal tip for anyone renovating on a budget, it would be this.
Wide and high.
Say it in your head every time you install a rod from now on.
It costs nothing extra and it’s the difference between amateur and intentional.
Choosing a Finish That Feels Like You

Rods aren’t just functional, they’re jewelry for your window.
I know that sounds dramatic, but it’s true.
Matte black feels moody and current, and I love it in spaces with Warm Wood Tones.
Brushed brass feels warm and a little glam, kind of old-world without trying too hard.
Wood rods feel cozy and grounded, perfect for a more relaxed, lived-in vibe.
In my kitchen nook, I went with a slim brass rod and it instantly felt more “finished.”
Before that it was just a rod I grabbed on sale, nothing intentional about it.
The finish should talk to your hardware elsewhere in the room.
Cabinet pulls, light fixtures, even picture frames.
If everything’s brushed nickel and you throw in a gold rod, it can feel a little off, sort of like one guest showed up in the wrong outfit.
Doesn’t mean you can’t mix metals, I do it all the time.
Just do it on purpose, not by accident.
My personal favorite right now is a thin, almost architectural black rod with simple round finials.
It disappears just enough to let the fabric be the star.
Layering Two Rods for That Boutique Hotel Feel

This is the upgrade that made my bedroom feel like a hotel suite.
Two rods, one in front of the other.
The back rod holds a sheer, airy panel.
The front rod holds a heavier blackout or linen-look curtain.
During the day I keep the sheers closed for privacy and soft light.
At night I pull the heavier ones across for full darkness and that cocoon-y feeling.
It’s a small system but it changes how a room functions completely.
When I first tried it, I honestly wasn’t sure it’d be worth the extra hardware.
It absolutely was.
There’s a double rod bracket you can buy that holds both rods on the same mount, which keeps it from looking cluttered.
I’d recommend that over two totally separate rod systems, it’s cleaner visually.
If you’re someone who struggles to fall asleep with any light in the room, this setup might genuinely help you.
It did for me.
There’s something about pulling that heavy curtain closed at night that feels like tucking the whole room in.
Sounds silly, but it’s true.
Try it in a room where you actually spend quiet time, a bedroom or a reading nook, and see how it feels.
Ceiling-Mounted Rods for Maximum Drama

If you really want to go big, mount the rod straight into the ceiling instead of the wall.
This pushes the height as far up as physically possible.
It’s dramatic, it’s a little bit fancy, and it works especially well with tall ceilings.
I did this in a client’s living room with ten-foot ceilings and the floor-to-ceiling curtains made the whole space feel like something out of a design magazine.
Ceiling mounts also work beautifully behind a bed as a soft, curtained headboard wall.
I did this in my own bedroom using inexpensive linen panels and it looks so much more expensive than it actually was.
You do need to find your ceiling joists for this one, so a stud finder is your friend here.
Don’t skip that step, trust me.
A heavy curtain pulling on drywall alone will eventually give you a very unpleasant surprise.
If ceiling mounting feels intimidating, a handyman can usually knock this out in under an hour.
Worth every penny for the payoff.
This is the kind of detail that makes people ask if you hired a designer.
You didn’t.
You just moved the hardware higher than instinct told you to.
Small Rooms and Low Ceilings, I Got You

Not everyone has ten-foot ceilings, and that’s completely fine.
I’ve lived in plenty of apartments with standard eight-foot ceilings myself.
The trick here is proportion, not height alone.
Use a slim, low-profile rod instead of a chunky, oversized one.
A thick rod on a low ceiling can visually eat into your headroom.
Stick with lighter fabrics too, heavy drapes can feel like they’re closing in on a smaller space.
I used a thin black rod with a linen-blend curtain in my old low-ceilinged studio and it never felt cramped.
Vertical stripes on the fabric can help too, they trick the eye into reading more height than exists.
And still, even in a low room, hang as close to the ceiling as you comfortably can.
The four to six inch rule still applies, it just matters even more here.
Every inch counts double in a smaller space.
I know it feels counterintuitive to add “more” fabric to a tight room.
But height, done right, never shrinks a space.
Only clutter and low hanging points do that.
Rings, Grommets, or Rod Pocket: The Real Differences

This part feels small but it changes the whole look and feel.
Grommets create clean, structured folds and they slide easily, which I love for everyday use.
Rings with clips give you flexibility, especially if you want to switch curtains seasonally.
Rod pocket curtains have that soft, gathered look, kind of classic and cottage-y.
I personally lean toward rings with clips almost everywhere in my own home.
They’re just so easy to swap out when I get the itch to redecorate.
And I get that itch more often than I’d like to admit.
Grommets are my go-to for a more modern, tailored room.
Rod pocket is lovely in a cottage or vintage-inspired space, there’s a softness to it I really adore.
None of these are wrong, it’s genuinely about the feeling you’re chasing.
One small hack: rings glide so much quieter than rod pocket fabric dragging across a rod.
If you open and close your curtains daily, that little detail matters more than you’d think.
I switched a bedroom from rod pocket to rings purely for that reason.
Small change, surprisingly big quality-of-life win.
Finials: The Tiny Detail With a Big Personality

Finials are those little end caps on your rod, and I used to totally ignore them.
Huge mistake, honestly.
A simple round finial feels clean and modern.
A fluted or urn-shaped one feels more traditional, almost European.
A raw wood ball finial feels earthy and relaxed.
Swapping finials is one of the cheapest updates you can make to an existing rod.
I did this in my home office, kept the same rod, just changed the ends.
It looked like an entirely new piece of hardware for maybe fifteen dollars.
My favorite right now is a simple, slightly oversized round finial in matte black.
It feels sculptural without trying too hard.
If your current rod feels dated but you don’t want to redo the whole thing, start here.
Finials are the earrings of your window situation.
Small, but they finish the whole look.
I promise once you notice finials, you’ll start noticing them in every home you visit.
You’re welcome, and I’m sorry.
Bay Windows and Corner Windows, Solved
Bay windows intimidate people, I get so many questions about them.

The good news is there are flexible curtain rods made specifically to bend around the angles.
They’re adjustable, so you can shape them to fit your exact window configuration.
I used one in a client’s breakfast nook with a beautiful bay window and it completely transformed the space.
For corner windows, where two windows meet at a wall corner, you can use two separate rods that nearly touch at the corner.
Or a custom-bent rod if you want one continuous line.
I tend to prefer the two-rod approach, it’s more forgiving and easier to install yourself.
One thing I always recommend: keep the fabric lighter in bay and corner window setups.
Heavy curtains in a bay window can feel bulky and hard to manage when opening and closing daily.
A soft linen or cotton blend moves so much more gracefully in that curved setup.
I learned this the hard way with a too-heavy fabric that basically never got opened because it was such a hassle.
Lesson learned, and now I pass it on to you.
Bay windows are a gift architecturally, don’t let the curtain situation intimidate you out of enjoying them.
Special Cases: Bathrooms, Kids’ Rooms, and Rentals

Bathrooms usually need tension rods, since you’re often working inside a niche or alcove.
No drilling required, which is honestly such a relief in a humid space.
I used a tension rod for a small bathroom window and it’s held up for years.
Kids’ rooms are a great place to have fun with color and pattern on the rod itself, not just the fabric.
A colorful rod can feel playful without overwhelming the whole room.
For rentals, tension rods and adhesive-mounted brackets have come a long way.
I did an entire rental bedroom without a single drill hole using a quality adhesive bracket set.
It held a lightweight linen curtain with zero issues for the full two years I lived there.
Just double check the weight limit on adhesive hardware before committing, heavier fabrics need actual drilling.
My tip for renters: keep a small tube of spackle on hand for move-out day regardless.
Even careful installs sometimes leave tiny marks.
Better safe than losing part of your deposit.
Don’t let renting stop you from doing the height and width tricks we talked about earlier.
Command-strip and tension hardware has genuinely caught up to real installation in the last few years.
My Favorite Budget Hacks
You do not need to spend a fortune on curtain hardware, I promise you.

Conduit pipe from a hardware store makes a surprisingly chic, industrial-style rod for basically nothing.
Spray paint a plain rod in a new finish instead of buying new hardware entirely.
I’ve done this with cheap thrifted rods more times than I can count.
A can of matte black spray paint can transform a dated brass rod completely.
Wooden dowels, sanded and stained, make a lovely rustic rod for a farmhouse-style room.
Thrift stores are secretly full of decent curtain rods, just check they’re sturdy before buying.
I found a beautiful vintage wood rod at a estate sale for four dollars once.
Best four dollars I’ve ever spent, hands down.
For finials, wooden beads from a craft store, glued onto a dowel end, look shockingly expensive.
I did this exact trick in my son’s room and multiple people have asked where I bought it.
Related read: Things I Wish I Knew Before I Decorated My First Home — Instant PDF + Kindle download. Secure checkout by Stripe

