

I almost dropped four hundred dollars on a faucet last spring.
I had it in my cart, I had my card out, and I was one click away from checking out.
And then I stopped and asked myself why I was about to spend that much money on the one piece of my bathroom nobody actually looks at first.
Your eyes go to the vanity.
They go to the color, the hardware, the little details that make a room feel loved.
So I closed the tab, and I spent that same afternoon transforming my vanity instead.
It cost me under forty dollars and it changed the whole room.
If you have been eyeing a fixture upgrade because your bathroom feels tired, I want you to pump the brakes with me for a second.
There is so much you can do first.
And it is so much more fun than you think.
Paint the Vanity a Color That Actually Has Personality

Okay, this is where I always start.
A can of cabinet-grade paint is one of the cheapest transformations in your entire house.
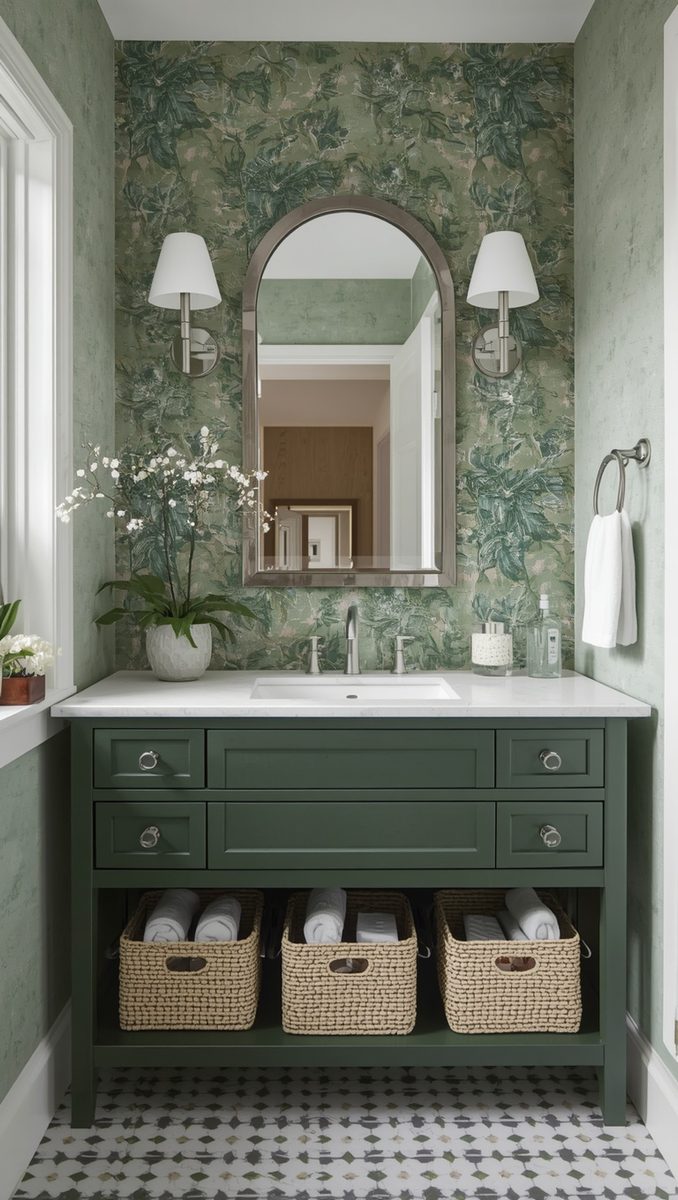
I went with a soft sage green on mine, and I remember standing back after the second coat and just grinning at it.
It felt like the room finally had a personality instead of just being beige and forgettable.
You do not need white.
White is safe, and safe is fine, but it is not exciting.
Try a deep navy if your bathroom gets good light.
Try a warm terracotta if you want it to feel sunny even in February.
I always tell people to test the color on the inside of a cabinet door first.
Live with it for a day or two before committing to the whole piece.
The finish matters just as much as the color, so go with a satin or semi-gloss so it wipes clean easily.
Bathrooms get humid and messy, and a flat finish will not hold up the same way.
My honest tip is to remove the doors and paint them flat on a drop cloth.
It gives you a so much smoother finish than trying to paint them while they are hanging.
And honestly, the color alone can make an old vanity look like it was custom built for the space.
That is the emotional payoff here.
It stops looking like a builder-grade box and starts looking like yours.
Swap the Hardware for Something With a Little Sparkle

This one takes maybe twenty minutes and it is kind of shocking how much it does.
New knobs and pulls are the jewelry of your vanity.
I switched mine from plain brushed nickel to a warm unlacquered brass, and it instantly felt more collected, more intentional.
You know that feeling when you put on the right earrings and suddenly your whole outfit clicks?
It is that, but for your bathroom.
I love mixing metals a little too, so do not be afraid to pair brass pulls with a chrome mirror or matte black light fixture.
It reads as designed, not mismatched, as long as there is some repetition of that metal somewhere else in the room.
A towel bar, a soap dish, something small.
My favorite hack is checking the hole spacing on your existing hardware before you fall in love with a new style online.
Standard spacing is usually three inches on drawer pulls, but older homes can be weird about it.
If your holes do not line up, look for pulls with a backplate.
It will cover the old holes without any patching or drilling new ones.
Budget-wise, this is maybe fifteen to thirty dollars for a full set if you shop sales.
And it is the kind of change guests notice without knowing exactly why the room feels nicer.
That is sort of the magic of small details, honestly.
Add a Peel and Stick Backsplash Behind the Sink

I was so scared to try this the first time.
It felt like one of those Pinterest projects that looks amazing in photos and disastrous in real life.
But I promise you, the technology has gotten so much better.
I used a textured tile-look sheet behind my sink, and from three feet away you genuinely cannot tell it is not real tile.
It gives the whole vanity area a finished, built-in look instead of just a mirror floating above a counter.
The trick is prepping your wall first.
Clean it, dry it completely, and if your walls have texture, know that the smoother ones will adhere so much better.
I like a small herringbone pattern if your vanity area is narrow, because it draws the eye up and makes the ceiling feel taller.
A classic subway pattern works if you want something timeless that will not feel dated in a few years.
My tip here is patience, not skill.
Go slow, use a credit card to smooth out bubbles, and do not rush the corners.
If you mess up a piece, you can usually peel it and try again within the first few minutes.
This project cost me about twenty five dollars for the whole sheet.
And it made my sink area look like something out of a renovation show.
Reface the Cabinet Doors With Simple Trim Molding

This is the project that made my husband ask if we hired someone.
We did not.
I bought a few strips of flat trim molding from the hardware store, cut them to size, and glued them onto the flat cabinet doors in a simple rectangle pattern.
It is called shaker-style paneling, and it is the difference between a boring flat-front cabinet and one that looks like it belongs in a designer home.
You do not need a saw with fancy angles for this.
A miter box and a hand saw will get you through it in an afternoon.
I painted the trim the same color as the door so it blends as one cohesive piece rather than looking like an add-on.
If your vanity has two doors, keep the pattern identical on both so it reads intentional.
My honest recommendation is to dry-fit the pieces with painter’s tape before you glue anything.
It saves you from measuring twice and gluing once, which I learned the hard way on my first drawer front.
This whole project cost less than thirty dollars in trim and wood glue.
And it added so much texture and shadow play to a flat surface that used to feel a little sad.
Light catches those little ridges differently throughout the day, and I love that this cheap little project gave my bathroom something that actually feels architectural.
Wrap or Paint the Countertop Instead of Replacing It

I know this one sounds intimidating, but stay with me.
If your laminate countertop is chipped or just plain ugly, you do not need a stone slab to fix it.
There are epoxy countertop kits made specifically for this, and there are also textured vinyl wraps that mimic marble surprisingly well.
I tried the vinyl wrap route on a rental bathroom, and it held up for over a year with zero issues.
The marble veining tricked basically everyone who used that bathroom.
If you go the epoxy route, know that ventilation is everything.
Crack a window, run a fan, and give yourself more curing time than you think you need.
Rushing this step is the number one reason these projects go wrong.
My tip is to practice your epoxy pour technique on a scrap piece of wood first.
It is genuinely different from painting, and the pouring motion takes a little getting used to.
For the wrap option, a hairdryer is your best friend for smoothing it around curves and edges.
Either way, you are looking at somewhere between fifty and a hundred dollars, which still beats a new countertop install by a mile.
And there is something so satisfying about running your hand over a surface you transformed yourself.
It feels expensive even though you know exactly what it cost.
Change Out the Mirror Frame or Add One

A plain builder-grade mirror is such a missed opportunity.
I added a peel and stick frame kit around mine in an afternoon, and it instantly gave the whole vanity wall a finished, boutique-hotel kind of feel.
These kits come in wood tones, black, and even a soft gold that I am kind of obsessed with.
If your mirror already has a frame you do not love, you can paint it.
I did this with a gold leaf paint pen on a thin black frame and it took maybe an hour total.
The little imperfections in the brush strokes actually add character, so do not stress about perfection here.
A bigger mirror also does wonders if your current one feels small for the space.
Going wall to wall, or hanging a round mirror slightly oversized for the vanity, changes the proportions of the whole room.
It makes a small bathroom feel so much more open.
My tip is to measure your vanity width and aim for a mirror that covers about two thirds to three quarters of that width.
Anything smaller starts to feel like an afterthought.
This swap runs anywhere from twenty dollars for a frame kit to around eighty for a full mirror replacement.
And honestly, the mirror is the piece you look into every single morning.
It deserves to make you feel a little bit pretty while you brush your teeth.
Add Open Shelving Above or Beside the Vanity

I did this in my downstairs bathroom and it solved two problems at once.
It gave me storage I desperately needed, and it gave the wall some visual warmth that a blank stretch of paint never could.
Two simple wood brackets and a stained board, and you have a shelf that looks like it was always part of the design.
I styled mine with a small stack of folded hand towels, a little plant, and one candle.
That is it.
You do not need to fill every inch, and honestly, restraint is what makes it look curated instead of cluttered.
If you are renting, look for shelves that use adhesive strips instead of drilling.
The weight limits are lower, but for towels and small decor, they hold up just fine.
My favorite part of this project is how much personality it adds without touching the actual vanity.
It is the accessory, not the outfit, if that makes sense.
You can change it seasonally too, swapping in a cozy candle for winter or a little vase of fresh flowers in spring.
Materials for this ran me about twenty dollars total, mostly for the wood stain.
And it made my guest bathroom feel like it had a story instead of just being functional.
Organize the Inside of the Drawers and Cabinets

This one costs almost nothing and I genuinely think it is underrated.
I bought a few acrylic drawer dividers and some small woven baskets for under the sink, and opening my vanity now feels like a tiny reset every single time.
There is something so calming about a drawer where everything has a place.
You know that chaotic drawer everyone has, the one with three half-used lotions and a hair tie graveyard?
Fixing that is basically free therapy.
I like grouping by category instead of by person, so all the skincare lives together and all the hair tools live together.
It makes mornings faster, honestly, because you are not digging around half asleep.
For under the sink, a lazy susan turntable is a game changer for reaching things in the back corner.
I wish I had bought one years ago.
My tip is to do this project with a trash bag next to you.
You will find so many expired products you forgot you owned.
This whole refresh cost me around fifteen dollars in bins and dividers.
And it is the kind of makeover nobody sees when they walk in, but you feel it every single day.
That is a quiet kind of luxury, if you ask me.
Add a Runner Rug for Softness and Color

A cold tile floor in front of your vanity can make the whole space feel a little clinical.
I added a slim runner rug in a soft rust tone, and it warmed the whole room up instantly.
Your feet feel it first thing in the morning, and honestly that small comfort sets the tone for your whole day.
I know that sounds dramatic for a bath mat, but I stand by it.
Go for something with a bit of texture, like a woven cotton or a vintage-style print.
It reads so much more expensive than a plain white bath mat, even at the same price point.
My tip is to size it to your vanity width rather than grabbing whatever is cheapest at the store.
A rug that is too short just looks like an accident.
If you have kids or pets, look for a washable option, because bathroom floors see a lot of action.
I learned that lesson after one too many toothpaste spits landed exactly where I did not want them.
Color-wise, this is a low-risk way to bring in a bold pattern you might be scared to commit to elsewhere.
A bathroom rug is easy to switch out if you change your mind in six months.
This project cost me about twenty five dollars.
And it might be the coziest, most personal upgrade on this whole list.
Bring in Greenery to Soften All the Hard Surfaces

Every hard, glossy surface in a bathroom needs something soft to balance it out.
A little plant does that job better than almost anything else.
I keep a small pothos on my vanity corner, and it trails down the side in a way that just feels alive and unfussy.
Bathrooms with some natural light are perfect for plants that like humidity, like pothos, ferns, or a small peace lily.
If your bathroom has no windows, a faux stem in a good ceramic pot still adds that same softness without the maintenance stress.
I am not going to judge you for going faux, I promise.
My tip is choosing a pot that matches your hardware finish so it feels connected to the rest of the design instead of randomly placed.
A little brass pot next to brass pulls just makes everything feel considered.
This is maybe a ten to twenty dollar addition depending on the plant and pot you choose.
And it is genuinely one of those things where the emotional impact outweighs the cost by a mile.
Green next to your morning coffee-tired face is just a nicer way to start the day.
I did not expect a plant to change my mood, but here we are.
Style the Countertop Like You Would Style a Coffee Table

This is the step people skip, and it is kind of the secret sauce.
An empty countertop just holds your toothbrush and looks unfinished.
A styled countertop tells a little story.
I use a small tray to corral my everyday products, a hand soap in a glass dispenser instead of the plastic bottle it came in, and one small object that has nothing to do with function at all, like a little dish for rings.
That one useless, pretty object is honestly what makes it feel like a real design choice instead of just tidy.
My tip is decanting your soaps and lotions into matching bottles.
It is such a small thing, but it visually calms down a cluttered counter instantly.
You can find glass pump bottles for just a few dollars each, and refilling them takes thirty seconds.
Keep your daily-use items close and stash the rest in a drawer, because a countertop with fifteen products on it will never look styled no matter how nice each individual item is.
This whole refresh runs maybe fifteen dollars for a tray and some bottles.
And it is the difference between a bathroom that functions and a bathroom that feels like a little retreat.
I redo mine seasonally now, and it is honestly one of my favorite five minute resets.
Update the Lighting Fixture Above the Mirror

I am not talking about rewiring anything scary here.
Plenty of vanity light fixtures are a simple swap if you turn off the breaker and follow the existing wiring.
I replaced a dated brass bar light with a simple black and glass globe fixture, and the whole room felt instantly more current.
Lighting changes color temperature too, which matters more than people realize.
If your old bulbs run cool and blue, swapping to warm white bulbs alone can soften your whole reflection in the mirror.
You will notice it the second you flip the switch.
My tip is measuring your mirror width before buying a new fixture, because a fixture that is too narrow looks stingy above a wide mirror.
Aim for something close to seventy five percent of your mirror width for the best proportions.
If electrical work makes you nervous, and it is okay if it does, plenty of plug-in sconce options exist now that just need an outlet nearby.
No wiring required at all.
Fixtures in this range run anywhere from thirty to eighty dollars depending on style.
And good lighting is honestly one of those things you do not appreciate until you have it.
It changes your makeup routine, your skin tone in photos, your whole morning mood in that mirror.
That is worth so much more than the price tag.
Related read: Things I Wish I Knew Before I Decorated My First Home — Instant PDF + Kindle download. Secure checkout by Stripe