Creating a magical Christmas village display doesn’t have to break the bank or require professional design skills.
With some creativity and modern twists on classic themes, you can craft stunning holiday centerpieces that will become the talk of your neighborhood and social media feeds.
LED Light Base Village with Translucent Platforms

Picture this: your Christmas village literally glowing from within, creating an ethereal winter wonderland that looks like it belongs in a fairy tale.
Start by purchasing clear acrylic sheets or plexiglass from your local hardware store, cutting them into various platform sizes to create different levels for your village buildings.
Drill small holes underneath each platform and thread battery-powered LED strip lights through them, securing the lights with clear tape on the underside.
The translucent platforms will diffuse the light beautifully, creating a soft, magical glow that illuminates your village from below while casting enchanting shadows on surrounding surfaces.
Choose cool white LEDs for a crisp winter feel, or mix warm white with pale blue for a more dynamic lighting effect that mimics natural winter light.
Position your village buildings on top of these glowing platforms, arranging them at different heights to create depth and visual interest.
The light will shine through any translucent parts of your buildings, making windows glow warmly and creating the illusion that tiny residents are home for the holidays.
Add frosted spray paint to some areas of the acrylic for a more diffused light effect, or leave sections completely clear for maximum brightness.
Surround the platforms with artificial snow or white batting material, which will catch and reflect the LED light, amplifying the magical effect throughout your entire display.
This modern approach combines technology with traditional village charm, creating a display that looks stunning both during the day and becomes absolutely breathtaking when the lights come on in the evening.
The battery-powered LEDs mean you can place this display anywhere in your home without worrying about electrical outlets, making it perfect for mantels, dining room tables, or even outdoor covered porches.
Tap to Explore These Beauties
See my ideas in action 👇 Tap any image to explore full details.
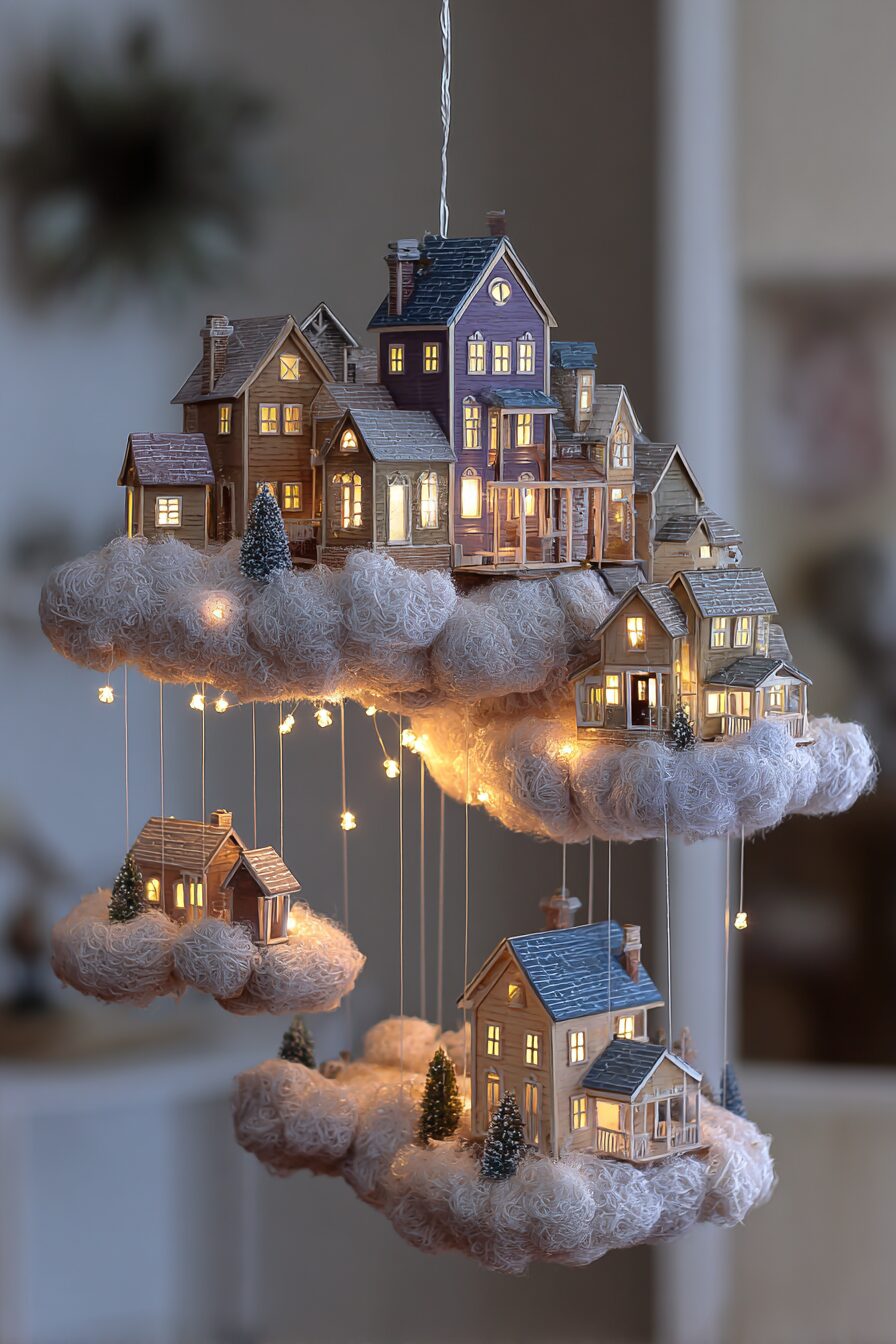
Floating Cloud Village Suspended Above Your Display

Imagine your Christmas village existing on multiple levels, with some buildings appearing to float magically in mid-air among fluffy white clouds.
Create this stunning effect by using clear fishing line or thin metal wire to suspend lightweight village pieces from the ceiling or a overhead framework.
Build a simple wooden frame using thin dowels or PVC pipe that sits above your main village display area, providing anchor points for your suspended elements.
Wrap polyester batting or cotton stuffing around the suspended buildings to create the illusion that they’re nestled in soft, fluffy clouds.
The key to making this look realistic is varying the heights of your floating elements, with some pieces hanging just slightly above your base village and others suspended much higher.
Use lightweight materials for your floating buildings – foam core, balsa wood, or even cardboard work perfectly for this application since they won’t strain your suspension system.
Paint these aerial buildings in slightly lighter shades than your ground-level village to enhance the illusion of distance and atmospheric perspective.
Add tiny battery-powered fairy lights within the cloud batting to make your floating village sections glow softly, creating an otherworldly ambiance that will captivate viewers.
Position a small fan nearby to create gentle air movement that will make your clouds and suspended buildings sway slightly, adding dynamic movement to your display.
This technique works especially well when combined with a mirror base for your ground village, as the reflection will make your entire display appear even taller and more dramatic.
The floating elements draw the eye upward, making your display feel more immersive and three-dimensional than traditional flat village arrangements.

Mirror Lake Reflection Village Creating Double Magic

Transform your village display into a stunning lakeside scene where every building has a perfect reflection, doubling the visual impact of your carefully arranged pieces.
Purchase a large mirror tile or have a piece of mirror cut to fit your display area – most glass shops can do this affordably and will polish the edges for safety.
Position this mirror as the “lake” in the center or to one side of your village, angling it slightly if you want to create the illusion of gentle ripples on the water surface.
Arrange your village buildings around the mirror’s perimeter, positioning them so their reflections create a complete, symmetrical village scene that appears to extend infinitely downward.
Add thin strips of clear acrylic or glass rods across portions of the mirror to simulate ice formations or create interesting light refractions that enhance the winter lake effect.
Sprinkle artificial snow around the mirror’s edges, leaving the center clear to maintain the reflection while creating the illusion of a frozen lake surrounded by snowy banks.
Use small LED spotlights positioned above your village to enhance the reflections and create dramatic lighting effects that bounce off the mirror surface.
Place tiny ice skating figurines on the mirror surface to bring your winter lake scene to life, positioning them carefully so they don’t obstruct the building reflections.
Create depth by using buildings of varying heights around your mirror lake, with taller structures positioned further back to maintain clear sight lines to all reflections.
The mirror surface also amplifies any lighting in your display, making everything appear brighter and more magical while creating interesting light patterns on your ceiling and surrounding walls.
This technique works particularly well in evening lighting, when the combination of village lights and their reflections creates a romantic, peaceful winter evening ambiance that feels incredibly realistic.
Find Your Room's Color Palette
Tap a vibe — get a curated 5-color palette with hex codes you can copy ✨
Terraced Mountain Village Built on Multiple Levels

Create a dramatic Alpine-inspired village that cascades down multiple levels, mimicking the charming mountain towns found in European Christmas markets.
Build your base structure using stacked wooden boxes, sturdy cardboard, or foam insulation boards arranged in a stepped pyramid formation that creates natural terraces for your village.
Cover each level with different textured materials – white felt for snow-covered areas, brown burlap for rocky mountain paths, and green felt for any evergreen forest sections.
Position your largest, most impressive buildings on the highest tier to create a focal point, then arrange progressively smaller structures as you move down each level.
Connect the different terraces with winding pathways made from fine gravel, sand, or brown felt strips that snake between buildings and create visual flow throughout your display.
Add miniature evergreen trees clustered at different levels to enhance the mountain village atmosphere and provide natural-looking breaks between building groups.

💭 I Wrote a Book About My Biggest Decorating Mistakes!
When I decorated my first home, I thought I knew what I was doing. Spoiler: I didn't. 😅
💸 I bought a sofa way too big for my living room. Paint colors that looked amazing in the store but terrible on my walls.
Install small LED strip lights under the edges of each terrace to create subtle uplighting that defines each level without overpowering the overall display.
Use varying shades of white and gray spray paint on your base materials to simulate rock faces and snow-covered slopes, adding realistic texture and depth to your mountain setting.
Position tiny figurines throughout the levels – skiers, hikers, or villagers – to bring life to your mountain community and create interesting storytelling opportunities.
The multi-level design allows you to incorporate more buildings in a smaller footprint while creating dramatic visual interest that draws viewers’ eyes throughout the entire display.
Add small battery-powered candles or warm LED lights in building windows to create the cozy, inhabited feeling that makes mountain villages so appealing during winter months.
Glass Cloche Mini Villages Creating Intimate Scenes

Transform individual glass cloches or bell jars into enchanting mini Christmas villages that can be scattered throughout your home or grouped together for maximum impact.
Source various sizes of glass cloches from thrift stores, antique shops, or online retailers – the variety in sizes will create visual interest when you group multiple villages together.
Create individual bases for each cloche using wooden rounds, mirror tiles, or decorative plates that complement your home’s existing decor style.
Build tiny villages inside each cloche using the smallest scale buildings and figurines you can find, creating intimate scenes that invite close inspection and discovery.
Each cloche can tell a different story – one might feature a tiny ice skating rink, another a miniature Christmas market, and a third could showcase a peaceful snow-covered church scene.
Add artificial snow or white sand to each cloche base, using different amounts and textures to create unique landscapes within each individual village scene.
Install battery-powered micro LED lights inside each cloche, hiding the battery packs underneath the base or disguising them as part of the landscape.
The enclosed nature of the cloches creates a mysterious, magical quality that makes each village feel like a precious, protected world unto itself.
Group cloches of different heights together on a mantel, bookshelf, or dining table to create a collection of related but distinct village scenes.
Change out the contents seasonally or add small seasonal elements throughout the winter months to keep your display fresh and engaging.
The glass protection means these displays can last throughout the entire holiday season without dust accumulation, and they’re safe from pets or small children who might disturb open displays.
What's Your Decor Personality?
5 questions · 30 seconds · Instant style match 🏡
✦ You Might Love This
Crafters Are Shocked How Expensive These Budget Diy Christmas Ornaments Look! Keep Reading →Industrial Pipe Frame Village with Modern Edge

Combine Christmas tradition with contemporary industrial design by creating a village display using metal pipes and fittings as your structural framework.
Visit your local hardware store and purchase black iron pipes, copper pipes, or galvanized steel pipes along with elbow joints, T-joints, and end caps to create your custom framework.
Design a geometric grid system that provides multiple levels and platforms for your village buildings while maintaining clean, modern lines that complement contemporary home decor.
The industrial framework becomes part of the aesthetic appeal, creating an interesting contrast between the traditional Christmas village elements and the modern structural components.
Paint the pipes in matte black, brushed gold, or leave them in their natural finish depending on your desired aesthetic and existing home decor style.
Create platforms within your pipe framework using reclaimed wood, metal sheets, or acrylic panels that provide stable surfaces for your village buildings.
Add Edison bulb string lights or industrial-style pendant lights to your pipe framework to enhance the modern aesthetic while providing warm illumination for your village.
This approach works particularly well in loft-style homes, modern farmhouse settings, or any space where you want to blend holiday tradition with contemporary design sensibilities.
The modular nature of pipe construction means you can easily modify or expand your display each year, adding new sections or reconfiguring the layout to accommodate different village pieces.
Position your village buildings within the framework, allowing some pieces to extend beyond the pipes to create visual interaction between the industrial structure and traditional elements.
The height and open design of the pipe framework make this display particularly striking and allows it to serve as a room divider or architectural element rather than just table decoration.
Geometric Acrylic Display with Clean Modern Lines

Create a sophisticated Christmas village display using clear and frosted acrylic panels arranged in geometric patterns that feel fresh and contemporary.
Design your display using triangular, hexagonal, or rectangular acrylic panels arranged at various angles to create a dynamic, sculptural base for your village buildings.
The transparent nature of acrylic allows light to pass through and reflect in interesting ways, creating depth and visual complexity without overwhelming your village pieces.
Cut acrylic panels to different sizes and arrange them in overlapping patterns that create natural platforms and valleys for positioning your buildings at various elevations.
Use both clear and frosted acrylic panels to create visual variety and different lighting effects throughout your display area.
The clean lines and modern materials make this approach perfect for contemporary homes where traditional Christmas decor might feel out of place.
Install LED strip lights along the edges of your acrylic panels to create dramatic edge-lighting effects that make the entire structure appear to glow from within.
Position your village buildings strategically within the geometric framework, allowing the modern structure to frame and highlight each piece rather than compete with it.
The acrylic panels can be easily cleaned and reused year after year, and their modular nature allows you to create completely different configurations each holiday season.
Add small mirrors underneath some acrylic sections to create reflection effects that amplify both your buildings and the geometric structure itself.
This approach appeals to minimalist aesthetic preferences while still maintaining the magical, whimsical quality that makes Christmas villages so beloved and engaging for all ages.
This or That?
Pick your fave — see what other readers chose! 👀
Vintage Suitcase Village for Portable Magic

Transform old vintage suitcases into charming, portable Christmas villages that can be displayed anywhere and easily stored when the holidays are over.
Hunt for vintage suitcases at thrift stores, estate sales, or antique shops – look for pieces with interesting colors, textures, or hardware that add character to your display.
Line the interior of each suitcase with felt, velvet, or decorative paper that complements your village color scheme and provides a soft base for your buildings.
Create multiple levels within each suitcase using small boxes, books, or custom-cut foam pieces covered in coordinating fabric to maximize your display space.
The closed suitcase protects your village during storage and transport, making this perfect for people who move frequently or have limited storage space.
Install battery-powered LED lights inside each suitcase, hiding the wires along the edges and positioning lights to highlight key buildings and create atmospheric effects.
Each suitcase can represent a different area or theme – one might be the residential district, another the commercial area, and a third could feature the town’s church and community buildings.
Add small mirrors to the suitcase lids to create the illusion of sky and clouds above your village while also reflecting light throughout the interior space.
The vintage aesthetic of old suitcases adds nostalgic charm that perfectly complements traditional Christmas village pieces while feeling fresh and unique.
Position multiple suitcase villages at different heights throughout a room to create an immersive experience where visitors discover new village scenes as they move through the space.
The portability factor means you can easily move your villages to different rooms for parties, relocate them for better viewing angles, or even take them to holiday gatherings at friends’ and family’s homes.
Mason Jar Snow Globe Villages Creating Contained Worlds

Create enchanting miniature worlds inside mason jars that capture the magic of snow globes while allowing for more detailed village scenes and storytelling.
Start with various sizes of mason jars – wide-mouth varieties work best for easier access when arranging your tiny village components inside.
Create realistic snow effects using artificial snow, white sand, glitter, or even small white beads that will settle naturally when the jar is moved or shaken.
Build tiny landscapes inside each jar using moss, small stones, artificial trees, and miniature buildings scaled appropriately for the container size.
The transparent glass allows for 360-degree viewing, so arrange your village elements to look attractive from all angles rather than creating a single front-facing scene.
Add battery-powered micro LED lights inside each jar to create magical illumination that makes your villages glow like lanterns when displayed in groups.
Drill small holes in the mason jar lids to allow for LED wires if you want to use external power sources, or stick with tiny battery-powered options for complete portability.
Each jar can tell a complete story – a romantic winter wedding scene, children building snowmen, a cozy fireside gathering, or a bustling Christmas market.
Group multiple mason jar villages together on shelves, mantels, or as table centerpieces to create a collection of related winter scenes that invite exploration and discovery.
The sealed nature of mason jars means your villages stay dust-free and protected, while the removable lids allow you to modify scenes or add seasonal elements throughout the holiday period.
These portable villages make wonderful gifts and can be customized with personal touches that reflect the recipient’s interests, hobbies, or favorite holiday memories.
Quick Design Dilemma
Cast your vote — see what other readers think! 🤔

Minimalist Scandinavian Village with Clean White Aesthetic

Embrace the beauty of simplicity by creating a serene, minimalist Christmas village inspired by Scandinavian design principles and Nordic winter landscapes.
Focus on a monochromatic color palette using pure whites, soft grays, and natural wood tones that create a calm, peaceful atmosphere rather than busy, overwhelming displays.
Select village buildings with clean lines and simple architectural details, avoiding overly ornate or colorful pieces that would disrupt the minimalist aesthetic.
Use natural materials like white birch logs, smooth river stones, and unbleached cotton batting to create organic textures that feel authentic and grounding.
The key to successful minimalist design is intentional spacing – allow plenty of breathing room between elements rather than cramming multiple buildings together.
Add subtle lighting using warm white LEDs hidden within the display elements, creating gentle illumination that enhances the peaceful ambiance without drawing attention to the light sources themselves.
Incorporate simple geometric shapes like clean rectangular platforms or circular bases that provide structure without competing with your village pieces for visual attention.
Choose figurines sparingly, selecting only pieces that contribute to the overall sense of tranquility and winter serenity rather than busy activity or movement.
The minimalist approach creates a sophisticated display that appeals to adult sensibilities while maintaining the magical quality that makes Christmas villages so universally appealing.
Add touches of nature like bare branches, pinecones, or small evergreen sprigs to connect your village to the natural winter landscape outside your windows.
This style works particularly well in modern homes where traditional Christmas decor might feel cluttered or out of place, offering a way to celebrate the season with understated elegance and timeless appeal.
These modern DIY Christmas village ideas prove that holiday traditions can evolve while maintaining their magical appeal.
Whether you’re drawn to high-tech LED displays or minimalist Scandinavian aesthetics, there’s a perfect village concept waiting to transform your holiday decor.
Pick the idea that speaks to your style, gather your materials, and start building memories that will last for years to come.
💭 I Wrote a Book About My Biggest Decorating Mistakes!
When I decorated my first home, I thought I knew what I was doing. Spoiler: I didn't. 😅
💸 I bought a sofa way too big for my living room. Paint colors that looked amazing in the store but terrible on my walls.