our basement doesn’t have to look like a dungeon anymore.
With some creativity and minimal cash, you can turn that overhead eyesore into a stunning focal point that rivals any high-end design magazine.
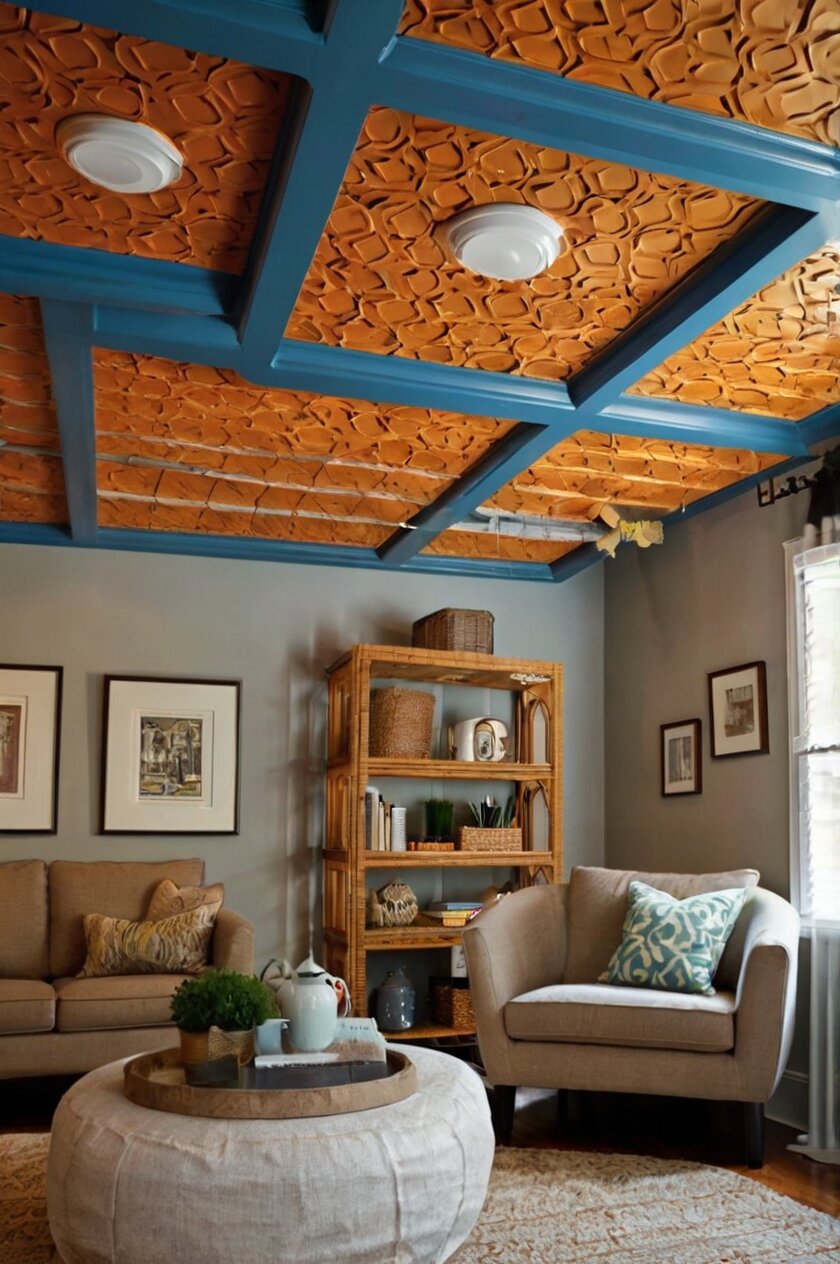
Painted Exposed Beam Drama

You already have structural beams up there, so why hide them when you could make them the star of the show?
Grab a brush and some bold paint colors to transform those utilitarian wooden or metal beams into architectural masterpieces.
Black paint creates an industrial vibe that screams modern sophistication, while white paint gives you that clean Scandinavian look everyone’s obsessing over.
Deep navy or charcoal gray adds drama without being too overwhelming for smaller spaces.
The beauty of this approach lies in its simplicity – you’re working with what’s already there instead of covering everything up.
Start by cleaning the beams thoroughly to remove any dust, cobwebs, or old paint that might interfere with your new finish.
Use a high-quality primer designed for the material of your beams, whether they’re wood or metal.
Apply thin, even coats of your chosen paint color, allowing each coat to dry completely before adding the next one.
The contrast between painted beams and the ceiling surface creates visual interest that draws the eye upward, making your basement feel taller and more spacious.
You can even paint the ceiling between the beams a complementary color to amp up the drama factor.
This technique works especially well if you want to maintain that raw, unfinished aesthetic while still making the space feel intentional and designed.
The total cost typically runs under $50 for most basement spaces, making it one of the most budget-friendly options available.
Plus, if you ever get tired of the color, you can easily repaint without any major demolition or reconstruction work.
The key is choosing colors that complement your overall basement design scheme while still making a bold statement overhead.
Tap to Explore These Beauties
See my ideas in action 👇 Tap any image to explore full details.
Drop Cloth Ceiling Magic

Painter’s drop cloths aren’t just for protecting your floors – they’re your secret weapon for creating a dreamy, cloud-like ceiling that costs almost nothing.
Head to any hardware store and grab several canvas drop cloths in different sizes to create this billowy, romantic effect.
The natural texture and neutral color of canvas drop cloths instantly adds warmth and softness to what’s typically the hardest surface in your basement.
Install a simple grid system using thin wooden strips or wire, then drape the drop cloths loosely between the grid points.
The result is a flowing, organic ceiling treatment that hides all those unsightly pipes, ducts, and wires while creating incredible visual interest.
This technique works particularly well in basements with lower ceilings because the soft, draped fabric doesn’t eat up headroom like traditional drop ceiling tiles.
The canvas material is naturally fire-resistant and durable enough to handle basement humidity without deteriorating quickly.
You can leave the drop cloths their natural cream color for a minimalist look, or dye them with fabric dye to match your basement’s color scheme.

Tea-staining creates beautiful aged effects, while bold colors like deep blue or forest green can make dramatic statements.
The installation process is straightforward enough for most DIY enthusiasts to tackle in a weekend.
Start by mapping out your grid pattern on paper, then transfer those measurements to your ceiling using chalk lines.
Install your support system securely into ceiling joists or concrete, then begin draping the cloths section by section.
The beauty of this approach is that it’s completely reversible – if you ever want to change the look, simply take down the cloths and start over.
Maintenance is minimal since canvas drop cloths can be machine washed when they get dusty or dirty.
Fabric Panel Paradise

Turn your basement ceiling into a textile masterpiece using large fabric panels that create warmth, absorb sound, and hide imperfections all at once.
Choose lightweight fabrics like cotton, linen, or even bed sheets from thrift stores to keep costs minimal while maximizing visual impact.
The key is selecting fabrics with interesting patterns or textures that complement your basement’s overall design aesthetic.
Geometric patterns work beautifully for modern spaces, while natural textures like burlap or canvas create rustic charm.
Install a simple track system using curtain rods or wire cables stretched between opposite walls, then hang your fabric panels like massive curtains.
This approach gives you incredible flexibility to change colors and patterns seasonally or whenever you want a fresh look.
The fabric naturally softens sound, making your basement feel more comfortable and less echo-prone than traditional hard ceiling treatments.
You can create zones within your basement by using different fabric colors or patterns in different areas, defining spaces without building walls.
Ready to Master the Kallax?
Transform your IKEA cube storage into custom furniture. Get my complete guide with 100+ projects, material lists, and pro tips.
“The IKEA Kallax Bible: 100+ Ways to Transform Cube Storage”
Layering sheer fabrics over solid colors creates depth and visual interest that rivals expensive architectural treatments.
The installation process requires minimal tools and can be completed in just a few hours with basic DIY skills.
Start by measuring your ceiling area and calculating how much fabric you’ll need, adding extra for proper draping and overlap.
Hem the edges of your fabric panels to prevent fraying and create clean, finished looks.
Install your track system level and secure, ensuring it can support the weight of your chosen fabrics.
Hang the panels with appropriate hardware, adjusting the draping to create the exact look you want.
This technique works especially well in basements used as family rooms, home theaters, or guest bedrooms where you want maximum coziness and comfort.
Find Your Room’s Color Palette
Tap a vibe — get a curated 5-color palette with hex codes you can copy ✨
Starlight String Light Spectacle

Create your own indoor constellation using string lights and sheer mesh fabric for a ceiling treatment that’s pure magic.
This combination transforms any basement into an enchanting space that feels like sleeping under the stars without the bugs or weather concerns.
Start with battery-operated LED string lights to avoid complicated electrical work and keep your project budget-friendly.
Warm white lights create cozy ambiance, while color-changing LED options let you adjust the mood for different occasions.
Stretch lightweight mesh or tulle fabric across your ceiling using a simple frame system made from thin wooden strips.
The mesh provides a surface for the lights while hiding ceiling imperfections and creating a soft, dreamy canopy effect.
Thread the string lights through the mesh in random patterns to mimic natural starlight, or create organized patterns for more structured looks.
The beauty of this approach lies in its versatility – you can adjust the light density and patterns whenever inspiration strikes.
Multiple layers of mesh create depth and prevent individual lights from being too bright or harsh.
💭 Ever wondered what your room would actually look like rearranged?
I built a free tool that lets you drag furniture around a 2D floor plan. No signup, no catch.
See the Room Planner →This technique works particularly well in basements with existing exposed joists since you can attach your frame system directly to the structural elements.
The total cost typically stays under $75 for most basement spaces, making it accessible for tight budgets.
Installation requires basic tools and can be completed over a weekend with help from family or friends.
Start by planning your frame layout and measuring all dimensions carefully to ensure proper fit and support.
Install the wooden frame securely, ensuring all connections are solid and level.
Stretch the mesh fabric taut across the frame, securing it with staples or small screws along the edges.
Thread your string lights through the mesh, testing the pattern as you go to ensure even distribution and appealing visual flow.
Plywood Panel Perfection

Plywood sheets offer an incredibly affordable way to create sophisticated ceiling treatments that look like expensive wood paneling.
Choose smooth plywood in quarter-inch thickness to keep weight manageable while still providing substantial coverage for your ceiling area.
The natural wood grain adds warmth and texture that transforms cold basement spaces into cozy, welcoming environments.
You can leave the plywood natural and apply clear protective finish, or paint it bold colors for dramatic modern statements.
Install the panels directly to existing joists using construction adhesive and screws for secure, long-lasting attachment.
This approach effectively hides all the mechanical systems running through your basement ceiling while maintaining easy access for future maintenance.
Create visual interest by varying the panel sizes or installing them in different directions to form geometric patterns.
Horizontal installation makes rooms feel wider, while vertical installation creates the illusion of higher ceilings.
The wood surface naturally absorbs sound, reducing echo and making your basement feel more comfortable for conversation and entertainment.
Staining the plywood in rich tones like ebony or mahogany creates sophisticated looks that rival expensive hardwood treatments.
You can even create faux beam effects by installing thin strips of wood over the panel seams.
The installation process requires basic carpentry skills but doesn’t demand professional-level expertise or expensive specialized tools.
Start by measuring your ceiling area and calculating how many plywood sheets you’ll need, accounting for any cuts around obstacles.
Plan your layout on paper first, determining the most efficient way to minimize waste and create appealing visual patterns.
Cut the plywood to size using a circular saw, ensuring clean, straight edges for professional-looking results.
Install each panel systematically, checking for level and proper alignment as you progress across the ceiling surface.
Sand lightly between coats if you’re applying stain or paint to achieve smooth, professional finishes.
What’s Your Decor Personality?
5 questions · 30 seconds · Instant style match 🏡
Acoustic Foam Tile Innovation

Transform those boring acoustic foam tiles into a stunning modern ceiling treatment that proves functional doesn’t have to mean ugly.
Standard foam tiles get a bad reputation, but with creative installation patterns and strategic color choices, they become sophisticated design elements.
Choose tiles in unexpected colors like deep charcoal, forest green, or even metallic finishes to break away from traditional institutional looks.
Install them in geometric patterns rather than standard grid layouts to create visual movement and contemporary appeal.
Alternating colors or textures creates checkerboard effects or more complex patterns that turn your ceiling into artwork.
The sound-absorbing properties make your basement perfect for home theaters, music rooms, or family entertainment spaces.
Diagonal installation adds dynamic energy that makes spaces feel larger and more interesting than traditional straight-line approaches.
You can paint standard white tiles with fabric paint to achieve custom colors that perfectly match your basement’s design scheme.
The lightweight nature of foam tiles makes installation straightforward and doesn’t require heavy-duty mounting systems.
Create zones within your basement by using different tile patterns or colors in different areas, defining spaces without physical barriers.
Ready to Master the Kallax?
Transform your IKEA cube storage into custom furniture. Get my complete guide with 100+ projects, material lists, and pro tips.
“The IKEA Kallax Bible: 100+ Ways to Transform Cube Storage”
Mix different tile sizes for added visual complexity, combining standard squares with rectangles or other geometric shapes.
The affordability factor makes this option accessible for large basement spaces where other materials might become prohibitively expensive.
Installation typically requires only basic tools and can be completed in stages as budget allows.
Start by planning your pattern on paper, using graph paper to visualize how different layouts will look.
Mark your ceiling with chalk lines to ensure straight installation and proper spacing between tiles.
Begin installation from the center of your space and work outward to maintain symmetrical patterns.
Use appropriate adhesive for your ceiling material, ensuring each tile adheres securely without gaps or bubbles.
Step back periodically during installation to verify your pattern is developing as planned and make adjustments if necessary.
Corrugated Metal Modern Edge

Bring industrial chic to your basement with corrugated metal sheets that create stunning modern ceiling treatments for surprisingly little money.
This material instantly transforms boring basement spaces into contemporary lofts that feel sophisticated and intentionally designed.
Choose from galvanized steel for authentic industrial looks, or painted options in colors like matte black or white for softer approaches.
The metal reflects light beautifully, helping brighten basement spaces that typically struggle with inadequate lighting.
Install the sheets directly to ceiling joists using appropriate screws designed for metal applications.
The corrugated texture adds visual interest and depth that flat surfaces simply can’t achieve.
This approach works particularly well in basements designed as workshops, home gyms, or modern entertainment spaces.
The metal surface is incredibly durable and resistant to moisture, making it ideal for basement environments.
You can leave the metal natural for authentic industrial aesthetics, or paint it with metal-specific paints for custom color schemes.
The installation process is straightforward but requires careful measuring and cutting for professional results.
Use tin snips or a circular saw with metal-cutting blade to achieve clean, straight cuts.
Plan your layout to minimize waste and ensure seams align properly for cohesive visual flow.
The lightweight nature of corrugated metal makes it manageable for DIY installation without requiring professional help.
Safety is important when working with metal, so wear appropriate protective gear including gloves and safety glasses.
Start installation from one corner and work systematically across your ceiling, ensuring each sheet aligns properly with the previous one.
Overlap seams slightly to prevent gaps and create weather-tight joints if moisture is a concern.
The reflective properties of metal can help distribute light more evenly throughout your basement space.
This or That?
Pick your fave — see what other readers chose! 👀
Bold Paint Statement Ceilings

Skip expensive materials entirely and create jaw-dropping ceiling treatments using nothing but high-quality paint and creative color choices.
Your basement ceiling becomes a blank canvas for artistic expression that costs less than most people spend on a single light fixture.
Deep, saturated colors like navy blue, emerald green, or rich burgundy create intimate, cozy atmospheres that make basements feel intentional rather than afterthoughts.
Metallic paints in copper, gold, or silver add glamour and light reflection that brightens spaces while creating sophisticated ambiance.
Two-tone treatments using complementary colors create visual interest without requiring complex installation techniques or expensive materials.
Paint techniques like color washing, sponging, or even simple stripes add texture and movement to flat ceiling surfaces.
The beauty of paint lies in its complete reversibility – if you tire of bold colors, simply repaint with something new.
Proper surface preparation ensures your paint job looks professional and lasts for years without peeling or fading.
Use high-quality primers designed for your ceiling material, whether it’s drywall, wood, or concrete.
Multiple thin coats create better coverage and more durable finishes than single thick applications.
Paint the ceiling before tackling walls to prevent drips and splatters on finished surfaces below.
This approach works exceptionally well when you want to make a statement without investing heavily in permanent ceiling treatments.
The psychological impact of bold ceiling colors can completely transform how your basement feels and functions.
Dark colors can make high ceilings feel more intimate, while light colors help low ceilings feel more spacious.
Accent lighting becomes more important with bold ceiling colors, so plan your lighting scheme accordingly.
Test paint colors in small areas first, observing how they look under different lighting conditions throughout the day.
Quality brushes and rollers make significant differences in achieving smooth, professional-looking finishes.
Rustic Wood Slat Character

Create stunning ceiling treatments using reclaimed wood slats that add warmth, texture, and rustic charm to modern basement spaces.
Salvage wood from old pallets, fencing, or construction projects to keep costs minimal while achieving high-end looks.
The natural variations in wood grain, color, and weathering create organic beauty that can’t be replicated with manufactured materials.
Install slats in parallel lines for clean, contemporary feels, or create herringbone patterns for more complex visual interest.
The gaps between slats allow air circulation while still providing visual coverage for unsightly ceiling elements.
This technique works particularly well in basements designed as family rooms, home bars, or rustic entertainment spaces.
Wood naturally insulates and absorbs sound, making your basement more comfortable and acoustically pleasant.
You can stain the wood in uniform colors for consistent looks, or leave natural variations for authentic rustic character.
Mix different wood types like pine, cedar, and oak to create complex color and texture variations.
The installation process requires basic carpentry skills but doesn’t demand professional expertise or expensive specialized tools.
Start by sorting your wood slats by length and quality, setting aside the best pieces for most visible areas.
Sand rough spots and splinters to create safe, smooth surfaces while maintaining rustic character.
Plan your layout carefully, determining spacing between slats and overall pattern before beginning installation.
Install furring strips perpendicular to your planned slat direction to provide solid mounting surfaces.
Attach each slat securely using appropriate screws or nails, maintaining consistent spacing throughout.
The natural aging process means your ceiling will continue developing character over time as the wood settles and changes color.
Regular dusting keeps wood slats looking their best, while occasional conditioning prevents drying and cracking.
This approach creates focal points that draw attention upward, making basement spaces feel larger and more interesting.
Ready to Master the Kallax?
Transform your IKEA cube storage into custom furniture. Get my complete guide with 100+ projects, material lists, and pro tips.
“The IKEA Kallax Bible: 100+ Ways to Transform Cube Storage”
Quick Design Dilemma
Cast your vote — see what other readers think! 🤔
Suspended Cable Grid System

Design a modern suspended ceiling using aircraft cable and simple hardware for an ultra-contemporary look that costs almost nothing.
This minimalist approach creates clean lines and geometric patterns that perfectly complement modern basement designs.
Stainless steel aircraft cable provides strength and durability while maintaining nearly invisible profiles that don’t overwhelm smaller spaces.
Install tensioning hardware at opposite walls to create perfectly straight cable runs that form grid patterns across your ceiling.
The suspended grid provides mounting points for lighting, plants, or decorative elements without permanent ceiling modifications.
This technique works exceptionally well in basements with exposed mechanical systems since it provides visual organization without hiding access.
The industrial aesthetic appeals to anyone wanting contemporary loft-style environments in their basement spaces.
You can hang lightweight panels, fabric, or artwork from the cable grid to create changeable ceiling treatments.
The system requires minimal maintenance and provides incredible flexibility for future modifications or additions.
Installation demands careful planning and precise measurements to achieve professional-looking results.
Use appropriate tensioning hardware rated for the loads you plan to suspend from the cable system.
Start by determining your grid spacing and marking mounting points on opposite walls using level lines.
Install wall anchors appropriate for your wall material, ensuring they can handle the tension loads.
Thread cables through tensioning hardware and adjust gradually to achieve proper tension without over-stressing the system.
The nearly invisible nature of aircraft cable creates floating effects that make suspended elements appear to hover magically.
Safety is paramount when working with tensioned cables, so follow manufacturer guidelines for proper installation and loading.
This approach scales beautifully from small accent areas to entire basement ceilings, adapting to any budget or scope.
Your basement ceiling doesn’t have to drain your bank account to look absolutely incredible.
These ideas prove that creativity trumps cash every single time, giving you the power to transform that overhead space into something truly special.
Pick the approach that speaks to your style, grab your tools, and get ready to fall in love with your basement all over again.