The smell hit me first—that sweet, smoky scent of wood and heat.
I was sitting at my kitchen table with a pyrography pen in my hand, trying not to shake as I traced my very first design onto a plain wooden spoon.
Spoiler: it was absolutely terrible.
The letters were wobbly, I burned one spot way too dark, and I’m pretty sure I held my breath the entire time.
But when I stepped back and looked at what I’d made—this imperfect, handmade thing that didn’t exist an hour ago—I felt this rush of pride.
I was hooked.
Wood burning has this magic way of making you feel like an artist, even if you’ve never considered yourself creative.
It’s meditative, it’s forgiving, and the projects you can make are endless.
So if you’ve been eyeing those wood burning kits online or wondering if this craft is worth trying, let me save you the suspense.
It absolutely is.
And I’m sharing all my favorite projects that are actually beginner-friendly and totally doable.
Personalized Wooden Spoons

Okay, this is hands down one of my favorite beginner projects.
Wooden spoons are cheap, easy to find, and the perfect size for practicing.
I started by buying a pack of plain wooden spoons from the kitchen section, and I burned little phrases onto the handles—things like “stir things up” and “made with love.”
They make the sweetest gifts, especially if you pair them with a homemade cookie mix or a jar of soup ingredients.
The wood is smooth and forgiving, so even if your handwriting isn’t perfect, it still looks intentional and charming.
I also love adding tiny doodles—little hearts, stars, or even a sprig of rosemary.
If you’re nervous about freehand lettering, you can always lightly sketch your design with a pencil first.
The lines will burn away or blend in, so don’t stress about erasing.
One tip I learned the hard way: go slow.
If you rush, the lines come out shaky, but if you take your time and let the pen do the work, it’s way easier than you think.
I keep a set of my decorated spoons in a ceramic jar on my counter, and they make me smile every single time I grab one.
Custom Cutting Boards


This one feels fancy, but it’s honestly not that hard.
I bought a plain bamboo cutting board from a home goods store and burned a monogram into the corner.
It looked so expensive and thoughtful that everyone assumed I paid someone to customize it.
Nope—just me, my wood burning pen, and a YouTube tutorial on script letters.
The trick with cutting boards is to keep your design small and tucked into a corner or along the edge.
You don’t want to burn across the entire surface because, well, you’re actually going to use this thing for chopping veggies.
I also did one with a simple border pattern—little triangles and dots—and it turned out so cute.
If you’re giving this as a gift, you can personalize it with a family name, a wedding date, or even just a sweet phrase like “gather here.”
Make sure you’re using a food-safe cutting board, and remind whoever receives it to hand wash only.
The burned design is permanent, but you don’t want to soak it or run it through the dishwasher.
I made three of these last holiday season, and they were the most requested gift I gave.
Rustic Wall Signs

This is where you can really let your creativity run wild.
I found some old wooden planks at a craft store—those weathered, barn-style ones—and burned a quote onto one.
Mine says “home is where the heart is,” and it’s hanging in my entryway right now.
The beauty of rustic signs is that imperfections actually make them look better.
If your letters are a little uneven or the wood has knots and grooves, it just adds to that cozy, farmhouse vibe.
I’ve also done ones with just single words—”blessed,” “love,” “family”—and they look so good grouped together on a gallery wall.
You can stain the wood before or after burning, depending on the look you want.
I usually burn first, then add a light stain to make the design pop.
If you want a more modern look, try painting the wood a solid color (like white or sage green) and then burning a simple line drawing or geometric pattern.
The contrast is stunning.
These signs are also a great way to use up scrap wood if you have any lying around.
Just sand it down, burn your design, and you’ve got instant decor.
Wooden Coasters

I’m kindda obsessed with wooden coasters.
They’re small, quick to make, and you can experiment with different designs without committing to a huge project.
I bought a set of plain round wood slices (the kind with the bark still on the edges) and burned different patterns onto each one.
One has a mandala, another has a geometric design, and one just says “sip sip hooray” because I couldn’t resist.
They protect my furniture and look adorable stacked on my coffee table.
If you’re new to wood burning, coasters are perfect for practicing because they’re small enough that you won’t get tired halfway through.
You can do them all the same or make each one unique.
I also made a set as a housewarming gift, and my friend still texts me about how much she loves them.
To make them last longer, I sealed mine with a clear coat of polyurethane.
It protects the wood from water rings and keeps the burned design looking crisp.
Just make sure the sealant is completely dry before you use them.
Honestly, once you make one set, you’ll want to make a dozen more.
Wooden Plant Markers

If you have a garden or even just a few potted herbs on your windowsill, you need these.
I used popsicle sticks and burned the names of my herbs onto them—basil, rosemary, thyme, mint.
They look so much cuter than those plastic markers, and they’re way more durable.
I also did a set with little illustrations next to the names—a tiny basil leaf, a sprig of rosemary—and it made my kitchen herb garden feel like something out of a magazine.
You can also use thin wood slices or small wooden stakes if you want something a little sturdier.
I’ve seen people add fun phrases too, like “please grow” or “don’t die on me,” which honestly feels very relatable.
These make great gifts for the plant lovers in your life, especially if you pair them with a small potted plant or a packet of seeds.
They’re quick to make, and you can do a whole set in one sitting.
I keep extras on hand because I’m always starting new plants and needing to label them.
Plus, they’re a fun way to practice your lettering skills without the pressure of a bigger project.
Wooden Ornaments

I started making these last year, and now I can’t stop.
I buy those plain wooden ornament shapes—stars, circles, trees—and burn designs onto them.
Some have snowflakes, some have names, and some just have simple patterns.
They’re so much more meaningful than store-bought ornaments, and they make the sweetest keepsakes.
I gave one to each of my nieces with their names and the year burned into them, and their mom told me they cried when they opened them.
In a good way.
You can personalize these for literally any occasion—birthdays, weddings, new babies, holidays.
I’ve done ones that say “baby’s first Christmas” and ones with little paw prints for pet lovers.
The wood shapes are super inexpensive, so you can make a bunch without breaking the bank.
I usually add a ribbon or twine loop at the top so they’re ready to hang.
If you want to get fancy, you can paint or stain the wood before burning, or add some glitter or sparkle after.
But honestly, I love the natural wood look—it’s simple and timeless.
These also make great gift tags if you’re feeling extra crafty.
Wooden Serving Trays

This project feels a little more advanced, but it’s totally doable.
I found an unfinished wooden tray at a craft store and burned a pattern along the inside edges.
It’s this repeating triangle design that looks way more complicated than it actually was.
Now I use it for serving coffee and pastries when friends come over, and it always gets compliments.
The key is to plan your design ahead of time so it looks intentional and balanced.
I sketched mine out on paper first, measured the spacing, and then lightly drew it onto the tray with pencil.
You can also do something simpler, like a monogram in the center or a border of dots and dashes.
If you’re using the tray for food, make sure to seal it with a food-safe finish.
I used a couple coats of mineral oil, and it looks gorgeous.
The burned design adds so much character, and it makes the tray feel custom and high-end.
I’ve also seen people do these with inspirational quotes or family names burned into the bottom.
It’s a project that takes a little more time, but the result is so worth it.
Wooden Keychains

These are perfect for practicing small, detailed work.
I bought a pack of blank wooden keychain shapes online, and I burned initials, tiny designs, and even little inside jokes onto them.
They’re small enough that you can finish one in under ten minutes, which makes them great for when you just want to burn something quick.
I made a set for my girlfriends with our initials, and we all attached them to our keys.
It’s this sweet little reminder of our friendship every time I grab my car keys.
You can also do custom keychains for teachers, coworkers, or anyone who could use a little personalized gift.
I’ve done ones that say “drive safe” and ones with little heart doodles.
The wood is usually pretty soft, so the pen glides easily, and you don’t have to press too hard.
If you mess up, it’s no big deal—just flip it over and try again, or embrace the imperfection.
I’ve also added paint or stain to some of them to make the design stand out even more.
They’re inexpensive to make and so fun to give away.
Wooden Picture Frames

I had this plain wooden frame sitting in my craft closet, and I decided to burn a pattern around the edges.
Now it holds one of my favorite photos, and every time I look at it, I’m so glad I took the time to customize it.
You can burn anything—floral designs, geometric patterns, names, dates, quotes.
I’ve done frames with wedding dates for anniversary gifts and frames with baby names for new parents.
They feel so personal and special, and they’re way more meaningful than just buying a frame off the shelf.
The trick is to practice your design on scrap wood first so you know exactly how it’s going to look.
Frames have curves and corners, so you want to make sure your pattern flows nicely.
I usually stick to the outer edges or the bottom corner so the design doesn’t compete with the photo.
You can also burn directly onto a wooden photo block if you want something more modern.
Just print your photo, mod podge it onto the wood, and burn a border or design around it.
It’s a fun twist on traditional framing, and it looks amazing on a bookshelf or mantel.
Wooden Recipe Boxes

This is one of my more ambitious projects, but it turned out so beautiful.
I bought an unfinished wooden recipe box and burned “family recipes” onto the lid with a little floral design around it.
Inside, I filled it with handwritten recipe cards, and I gave it to my mom for her birthday.
She still talks about it.
You can personalize these with names, dates, or just a simple design that matches your kitchen decor.
I’ve also done smaller versions for tea bags or for storing special notes and letters.
The box gives you a lot of surface area to work with, so you can really get creative.
I burned a different pattern on each side of mine, and it feels like a little work of art.
It makes the gift feel complete and thoughtful.
These boxes are usually pretty inexpensive, and they’re a great way to practice larger designs without feeling overwhelmed.
You can take your time, work on one side at a time, and really enjoy the process.
Wooden Bookmarks

I love this project because it’s small, useful, and makes a perfect little gift.
I bought a pack of thin wooden bookmarks and burned quotes, names, and tiny illustrations onto them.
My favorites are the ones with book-related quotes like “one more chapter” and “bookworm.”
They slip perfectly into a book, and they’re way sturdier than paper bookmarks.
I’ve given these to teacher friends, book club members, and anyone who loves to read.
You can personalize them with someone’s name or a phrase that’s meaningful to them.
I’ve also done ones with floral designs and mandalas that are just pretty to look at.
The wood is thin enough that it doesn’t add bulk to your book, but thick enough that it won’t bend or break.
I usually sand the edges really well so they’re smooth, and then I seal them with a light coat of finish.
It keeps the wood from getting dinged up in your bag or between the pages.
These are so quick to make that you can do a whole batch in one afternoon.
And honestly, they make me feel fancy every time I pull one out of my current read.
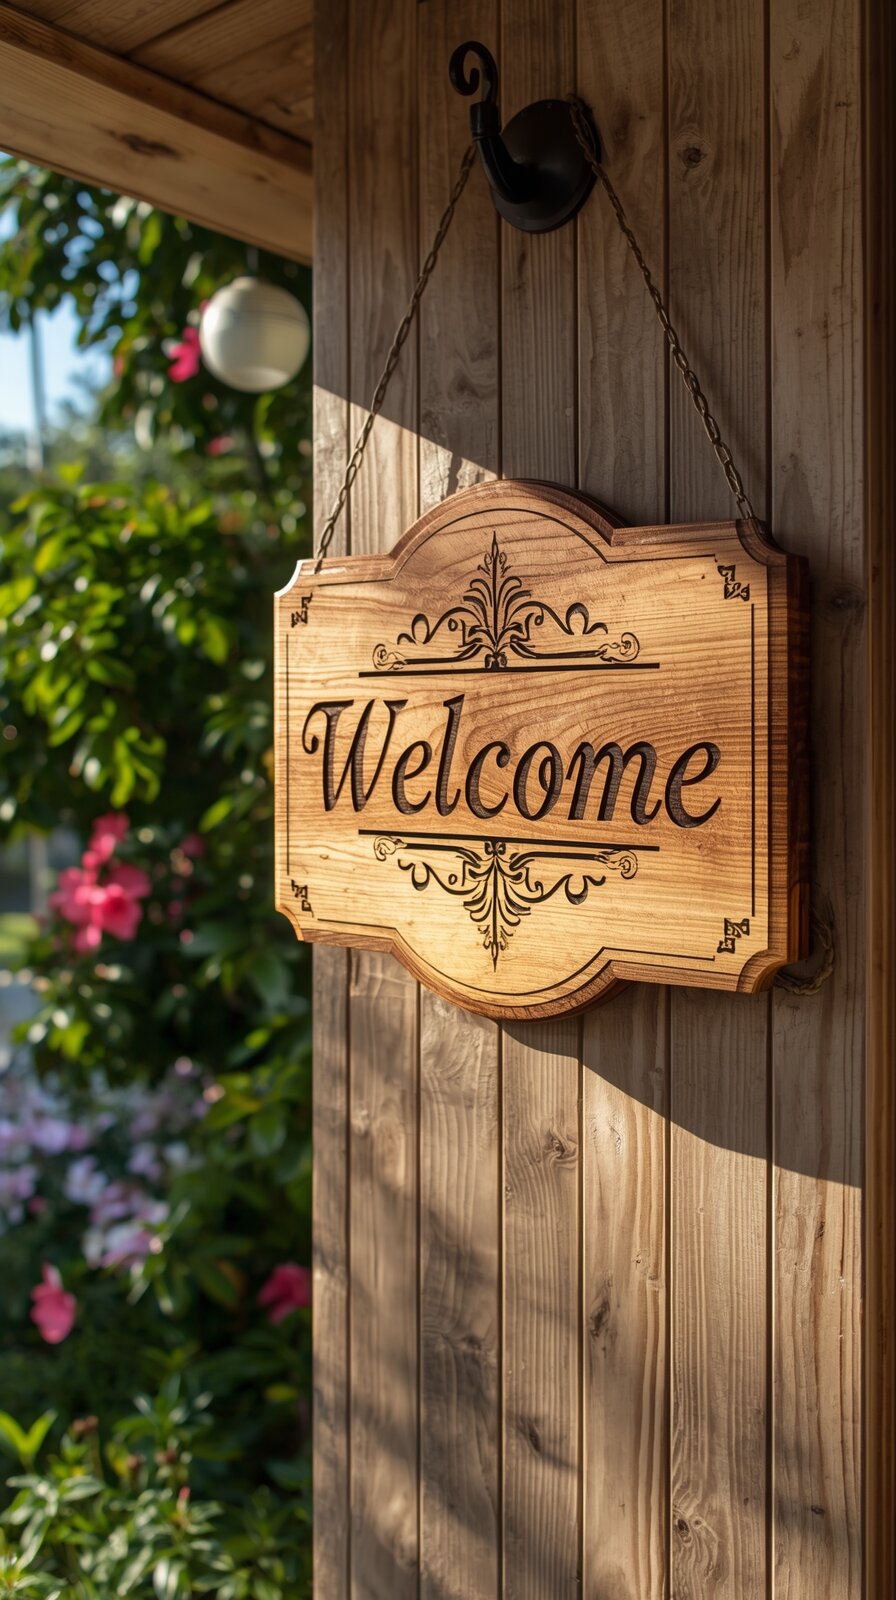
Wooden Welcome Signs for Your Front Door

I made one of these last spring, and it still makes me happy every time I walk up to my house.
I used a long, narrow piece of wood and burned “welcome” in a pretty script font.
Then I added some little floral accents around it, stained the wood, and hung it by my front door with some twine.
It’s rustic and charming, and it makes my entryway feel so inviting.
You can customize these with your family name, your house number, or just a simple greeting.
I’ve seen people do “hello,” “gather,” and even “come on in.”
The beauty of making your own sign is that you can match it to your home’s style.
If you love farmhouse vibes, go for distressed wood and simple lettering.
If you’re more modern, try a sleek piece of wood with bold, clean lines.
I hung mine on a wreath hook, but you could also lean it on a porch shelf or attach it directly to your door.
It’s one of those projects that looks like you spent way more time and money than you actually did.
And every time a guest comments on it, I get to say “I made it,” which never gets old.


