here’s something undeniably special about garden parties that bring people together in the perfect blend of nature and celebration.
When the weather turns warm, outdoor gatherings become the highlight of the social calendar, offering unique opportunities to create memorable experiences under open skies.
Garden parties have evolved from simple afternoon teas to elaborate celebrations that can mark any occasion from birthdays and anniversaries to casual weekend get-togethers with friends.
These decorating tricks will elevate any outdoor event from ordinary to extraordinary.

String Light Canopies That Create Instant Magic


Nothing transforms an outdoor space faster than the warm glow of string lights hung overhead.
You can create a magical light canopy by zigzagging lights across your entire garden space for that fairytale feeling everyone loves.
You’ll want to secure them to sturdy points like trees, fence posts, or the sides of your house using hooks that won’t damage surfaces.
You can also create freestanding light poles using painted PVC pipes pushed into large planters filled with concrete for stability – perfect for spaces without natural anchor points.
You might be surprised how affordable this can be, with weather-resistant LED string lights available at most big box stores for under $15 per strand.
You should aim for lights with warm white bulbs rather than cool white for the coziest atmosphere.
You’ll find battery-operated options work perfectly for areas far from outlets, eliminating the tripping hazard of extension cords.
You can enhance the effect by hanging paper lanterns or lightweight ornaments from some of the wire intersections for added dimension during daytime.
You might consider creating a light “ceiling” over just your dining area if lighting your entire garden feels overwhelming.
You should turn on your lights before sunset to check for any dark spots that might need additional illumination.
You can add a professional touch by connecting your light display to an inexpensive timer so they automatically turn on at dusk.
You’ll want to store your lights properly between parties by wrapping them around empty paper towel tubes to prevent frustrating tangles next time.
You can create dramatic light puddles by bundling extra lights in clear glass jars placed strategically around the garden.
Try covering some bulbs with colored tissue paper secured with twine for a gentle stained-glass effect.
Tap to Explore These Beauties
See my ideas in action 👇 Tap any image to explore full details.
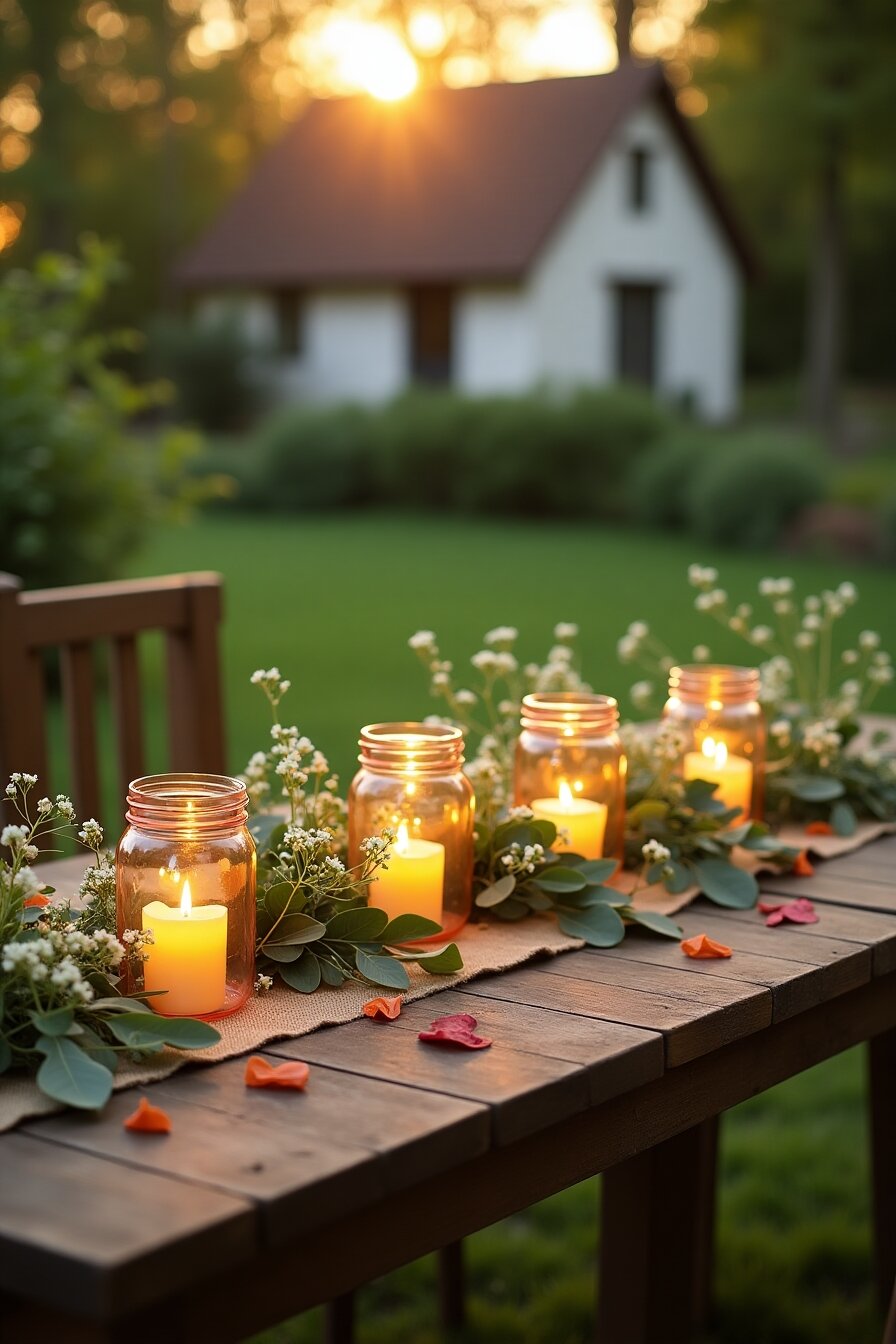
DIY Mason Jar Lanterns That Glow Like Fireflies


Those dusty mason jars hiding in your pantry can become the most charming lighting elements at your next garden party.
You can transform ordinary jars into magical lanterns that cast gorgeous patterns across your garden with just a few simple supplies.
You’ll need mason jars in various sizes, tea lights (regular or LED), some wire for hanging, and optional decorative elements like lace, twine, or colored tissue paper.
You might start by cleaning your jars thoroughly and removing any labels with warm soapy water and a bit of oil for stubborn adhesive.
You can create stunning patterns by wrapping the outside with lace secured with twine, or painting delicate designs using glass paint from craft stores.
You’ll get the most beautiful effect by placing either real tea lights or battery-operated ones inside each jar – the latter being much safer if children are present or if your jars will be hanging.
You should consider making wire handles by wrapping sturdy wire around the rim of each jar, leaving enough length to create a hanging loop at the top.
You might arrange these lanterns along pathways, hang them from tree branches, or cluster them as centerpieces on tables.
You’ll create the most impact by hanging your lanterns at varying heights when grouping them together.
You should make extra jars since guests often ask to take them home as mementos of your spectacular party.
You can repurpose these lanterns indoors after your garden party ends – they make charming bathroom night lights or kitchen window decorations.
Showstopping Floral Centerpieces from Your Own Garden

Those flowers growing right in your garden can become stunning centerpieces that professional florists would charge hundreds for.
You don’t need fancy arranging skills to create gorgeous displays that will have guests asking for your secret florist’s number.
You can start by gathering various vessels like vintage teapots, weathered wooden boxes, or even hollow fruits like watermelons or pumpkins depending on the season.
You’ll want to cut flowers early in the morning when they’re most hydrated and place them immediately in water.
You might include not just flowers but interesting foliage, branches with berries, or ornamental grasses for texture and height variation.
You can create a cohesive look by limiting your color palette to 2-3 complementary shades rather than including every color blooming in your garden.
You should consider using chicken wire crumpled inside your containers as an eco-friendly alternative to floral foam, providing structure while allowing you to position stems exactly where you want them.
You’ll find that mixing flowers of different sizes creates the most visually interesting arrangements – try combining showy blooms like dahlias or sunflowers with delicate fillers like baby’s breath or feverfew.
Try to extend the life of your arrangements by cutting stems at an angle and removing any foliage that would fall below the waterline.
Try the professional trick of creating a grid of clear tape across the top of your container to help hold flowers in place for more structured arrangements.
You should place your centerpieces strategically so they don’t block guests’ view across the table – generally keeping them below eye level or tall and slender enough to see through.
You can incorporate herbs like lavender, mint, or rosemary for wonderful scents that complement outdoor dining.
Impress guests by tucking edible flowers like nasturtiums, pansies, or borage into arrangements on food tables – just make sure they’re pesticide-free.
Find Your Room’s Color Palette
Tap a vibe — get a curated 5-color palette with hex codes you can copy ✨
Budget-Friendly Fabric Canopies That Create Instant Ambiance


Those old bedsheets collecting dust in your linen closet can transform into dreamy overhead canopies that provide shade while adding serious style to your garden space.
You can create stunning overhead structures using inexpensive sheets, curtains, or fabric remnants suspended from trees, pergolas, or temporary poles.
You’ll need some sturdy rope or wire as your support structure, along with sheets or lightweight fabric in colors that complement your garden or party theme.
You might try layering different colored fabrics for a more dramatic effect, or stick with white for a clean, ethereal look that pairs well with any other decorations.
You can secure fabric to supports using large binder clips or curtain rings with clips – both allow for easy installation and removal without damaging your textiles.
You should consider weather conditions when planning your canopy, choosing waterproof options if rain is possible or ensuring everything can be quickly taken down if winds pick up.
You’ll create the most magical effect by allowing some fabric to drape down at the corners, creating the feeling of being inside a luxurious tent.
You might enhance your canopy by weaving string lights or hanging paper lanterns from the supporting structure before adding the fabric overlay.
You can add personality by using fabric paint or stamps to create patterns on plain white sheets before hanging them – simple dots, stripes, or botanical prints work wonderfully.
You should secure the bottom corners with decorative weights like tassels or small potted plants to prevent excessive movement in light breezes.
You’ll find this technique particularly useful for defining different areas of your garden – perhaps covering just the dining space or creating a cozy conversation nook.
Use old lace curtains or crocheted tablecloths for smaller canopies that cast beautiful shadow patterns when sunlight filters through.

💭 I Wrote a Book About My Biggest Decorating Mistakes!
When I decorated my first home, I thought I knew what I was doing. Spoiler: I didn’t. 😅
💸 I bought a sofa way too big for my living room. Paint colors that looked amazing in the store but terrible on my walls.
Upcycled Container Gardens That Double as Conversation Starters


That collection of odd items gathering dust in your garage can become the most unique planters your guests have ever seen.
You can transform practically anything with a hollow center into a charming plant container – think old boots, vintage suitcases, broken bird cages, or even that chipped teapot you can’t bear to throw away.
You’ll want to ensure whatever container you choose has drainage holes or add a layer of pebbles at the bottom to prevent root rot.
Take group containers of different heights and styles together to create visual interest, keeping plants with similar light and water needs together.
You can use these distinctive planters to reinforce a party theme – old toy trucks planted with succulents for a construction-themed child’s party, or vintage teacups with flowering herbs for a garden tea party.
You should consider the mobility of your container gardens, placing heavier ones on plant caddies with wheels if you’ll need to rearrange during your event.
You’ll create instant elevation by repurposing old stepladders as plant stands, placing different containers on each step for a vertical garden effect.
You might try hanging smaller container gardens from shepherd’s hooks or tree branches to draw the eye upward and maximize your ground space for seating.
You can coordinate your container garden color scheme by painting mismatched containers in complementary colors or all white for a cohesive look.
You should incorporate plants with different textures and heights – tall grasses, trailing vines, and flowering showstoppers all combined in your repurposed container display.
You’ll impress guests by including edible elements like strawberry plants, cherry tomatoes, or herbs that they can snip to add to their drinks or meals during the party.
You might use these container gardens to disguise less attractive areas of your garden or to create natural boundaries between different party zones.
What’s Your Decor Personality?
5 questions · 30 seconds · Instant style match 🏡
DIY Drink Stations That Become the Life of the Party

That unused corner of your garden can become the most popular gathering spot with a thoughtfully designed drink station that serves both functional and decorative purposes.
You can transform an old dresser, potting bench, or even a wheelbarrow into a stunning beverage center with minimal effort.
You’ll want to position your drink station in a semi-shaded area that’s easily accessible but not blocking the natural flow of movement through your garden.
You might create height variation by using stacked crates, overturned planters, or cake stands to display different beverages and serving tools.
You can keep drinks cold without constant ice replenishment by freezing water-filled balloons that cool beverages without diluting them as they melt.
You should include self-serve options with pre-batched signature cocktails or mocktails in dispensers, allowing guests to help themselves while you socialize.
You’ll create the most impactful display by grouping drinks by color or type, perhaps arranging bottles on an old wooden ladder or floating flowers in drink dispensers.
Consider theme-appropriate containers – hollowed watermelons for fruit punches, vintage watering cans for lemonade, or mason jars with spigots for iced tea.
💭 Ever wondered what your room would actually look like rearranged?
I built a free tool that lets you drag furniture around a 2D floor plan. No signup, no catch.
See the Room Planner →Incorporate your garden elements by adding edible flower ice cubes or herb garnishes cut fresh from nearby plants.
You should include clear instructions for any DIY cocktail stations, perhaps on small chalkboard signs or decorative cards that match your party aesthetic.
You’ll want to provide plenty of glassware appropriate to your beverages – consider mismatched vintage glasses from thrift stores for an eclectic, budget-friendly option.
You might use weather-resistant fabric as a tablecloth, securing it with decorative weights or pretty rocks to prevent wind disruption.
You can add personality with custom labels for dispensers and bottles that coordinate with your party theme or colors.
You should include a water station with cucumber, citrus, or berries added for those preferring non-alcoholic refreshment options.
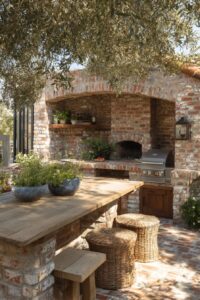
Cozy Conversation Nooks Created from Items You Already Own


That collection of mismatched outdoor furniture can transform into intimate conversation areas that encourage guests to linger and connect.
You can create inviting seating arrangements using everything from conventional patio furniture to hay bales covered with colorful blankets, old wooden crates, or even tree stumps topped with cushions.
You’ll want to arrange seating in small groups facing inward, ideally in a circular or U-shaped configuration that naturally encourages conversation.
You might define each seating area by placing it on an outdoor rug, which adds color while creating a visual boundary that feels like a room within your garden.
You can add comfort to even the most basic seating with an abundance of weather-resistant pillows and throws that invite guests to settle in for extended conversations.
You should consider the sizing of your conversation areas – generally groups of 4-6 seats work best as larger groupings can make intimate conversation difficult.
You’ll create the most inviting atmosphere by ensuring each conversation nook has its own lighting source, whether lanterns placed on the ground, string lights overhead, or solar stakes surrounding the area.
You might position conversation areas near interesting garden features – beside a bubbling fountain, under a flowering tree, or overlooking your best garden view.
You can enhance comfort by providing small side tables within easy reach of each seat, giving guests places to rest their drinks and plates.
You should consider protection from the elements, positioning some seating areas in shaded spots and others in sunny locations depending on your climate and time of day.
You’ll find that adding unexpected elements like weighted tablecloths (to prevent wind disruption) and accessible bug spray can greatly increase how long guests enjoy your outdoor conversation spaces.
You might create themed conversation areas reflecting different moods – perhaps a coffee bar with cozy seating in one area and a livelier cocktail space in another.
You can increase the feeling of intimacy by using tall plants or decorative screens to partially enclose some seating areas, creating the sense of a secret garden room.
You should ensure there’s adequate space between conversation nooks to allow for easy movement while maintaining enough separation for distinct conversations.
Edible Decorations That Serve Double Duty as Late-Night Snacks

Those beautiful fruits and vegetables can become the most stunning decorative elements while providing delicious snacks as your party progresses.
You can create breathtaking edible centerpieces that guests admire initially and enjoy eating as the evening continues.
You’ll want to select produce that holds up well at room temperature – think grapes cascading from compote dishes, artfully arranged citrus fruits, or cherry tomatoes still on the vine.
You might elevate simple fruit platters by arranging slices in gradient color patterns or using cookie cutters to create shaped melon pieces displayed on vertical skewers.
Incorporate herbs from your garden as both garnishes and fragrant decorations – rosemary sprigs make beautiful miniature trees while adding wonderful scent.
Use hollowed fruits as serving vessels – pineapples for tropical drinks, watermelons for fruit salads, or bell peppers for dips.
Create conversation-starting displays by using unusual vegetables with decorative qualities – purple cauliflower, striped heirloom tomatoes, or romanesco broccoli with its mathematical fractals.
Hang small edible elements from trees or garden structures – perhaps baby apples or cherry tomatoes on fishing line for a floating fruit effect.
Create “growing” centerpieces by placing herb pots down the center of tables, encouraging guests to snip fresh additions for their meals or drinks.
You should include edible flowers like pansies, nasturtiums, or borage as decorative elements on food displays, ensuring they’re organic and pesticide-free.
You’ll impress guests by freezing edible flowers or herb leaves in ice cubes for drinks that become more beautiful as they melt.
You might create a “living wall” of strawberry plants or lettuce varieties that serves as both decoration and snack source throughout your event.
You can arrange vegetables in ombré color gradients – perhaps bell peppers ranging from purple to red to orange to yellow – for a display that’s both nutritious and visually stunning.
You should provide small decorative signs identifying unusual varieties and suggesting pairing ideas to encourage guests to enjoy your edible decorations.
This or That?
Pick your fave — see what other readers chose! 👀
Nature-Inspired Table Runners That Cost Almost Nothing

That overgrown section of your garden can provide the most stunning table decorations without costing a single dollar.
You can create breathtaking table runners using materials gathered entirely from your own backyard – think trailing ivy, fragrant eucalyptus branches, or even simple green ferns laid down the center of your table.
You’ll want to collect your natural materials shortly before your event to ensure maximum freshness, perhaps spritzing them lightly with water to maintain their vibrancy throughout your gathering.
You might layer different natural elements for visual interest – perhaps pine boughs as the base, with eucalyptus mixed in for scent, and wildflowers tucked throughout for color.
You can incorporate seasonal elements that reflect the specific time of year – fallen autumn leaves arranged in gradient colors, spring blossoms scattered artfully, or winter evergreens dusted with artificial snow.
You should add unexpected elements from your kitchen garden – artichokes with their architectural shape, flowering kale with its purple-tinged edges, or even ornamental pepper plants still bearing colorful fruit.
Mix-and-Match Table Settings That Look Intentionally Curated


That pile of mismatched dishes hiding in your cabinets can become the most photographed element of your garden party with some strategic styling.
Create an eclectic yet cohesive table setting by combining different patterns that share a common color palette – think various floral patterns in blues and whites or assorted vintage dishes in complementary pastels.
You’ll find that thrift stores offer incredible dish collections for pennies on the dollar, allowing you to build an impressive set of mix-and-match pieces without breaking the bank.
You might try the designer trick of using consistent glassware and flatware while letting the plates and bowls vary, providing enough uniformity to feel intentional rather than random.
Quick Design Dilemma
Cast your vote — see what other readers think! 🤔
💭 I Wrote a Book About My Biggest Decorating Mistakes!
When I decorated my first home, I thought I knew what I was doing. Spoiler: I didn’t. 😅
💸 I bought a sofa way too big for my living room. Paint colors that looked amazing in the store but terrible on my walls.
Add personality with unique napkin treatments – perhaps rolling them and securing with small sprigs of herbs, vintage brooches, or lengths of twine with personalized name tags.
Create the most impact by adding unexpected elements like antique teacups used as condiment holders or small potted succulents as part of each place setting that double as take-home favors.