ne tradition many families share is decorating the Christmas tree and adorning it with beautiful ornaments.
While you can always buy pre-made ornaments, there is something special about decorating your tree with handmade ones.

Not only are DIY ornaments often more unique and meaningful, but making them yourself or with loved ones also provides quality bonding time and lasting memories.

Folded Paper Ornaments
Let’s start with one of my favorites (and simplest) ornament designs – folded paper ornaments.
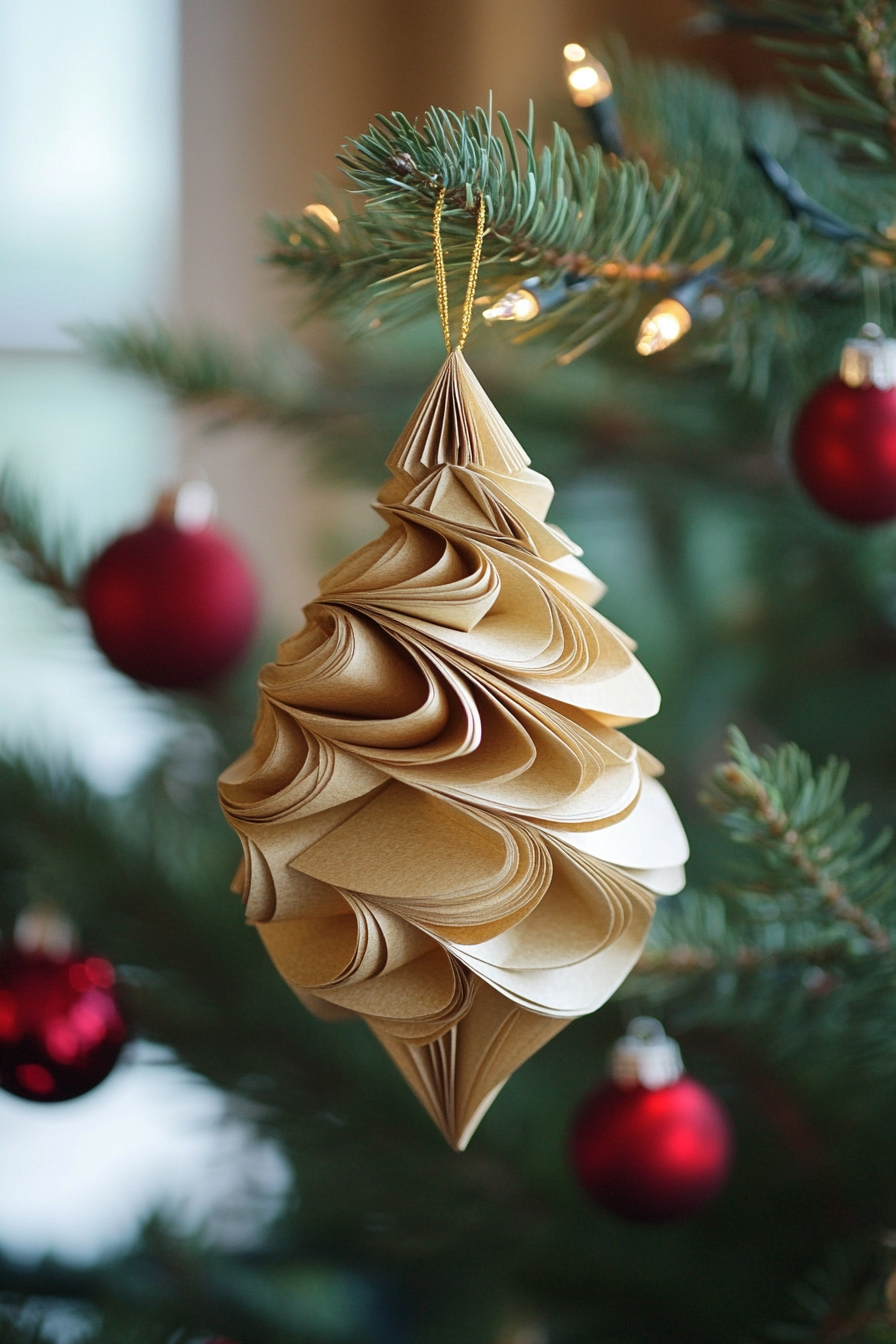
I’m absolutely head-over-heels for this elegant paper swirl ornament.
It looks like something straight out of a fancy boutique, but here’s the secret—it’s SO easy to make!
Seriously, you’re going to feel like a crafting genius when you see how this comes together.
What You’ll Need
- Decorative scrapbook paper or cardstock (I’m loving these cream and gold marbled patterns!)
- Scissors or a circle punch (about 3-4 inches in diameter)
- Hot glue gun and glue sticks
- Gold thread or thin ribbon
- A pencil
- Optional: a small wooden bead for the bottom
Step 1: Cut Your Circles
First things first—grab that gorgeous paper!
You’ll need about 15-20 circles, all the same size.
I used a 3.5-inch circle punch because it makes this step so much faster (and honestly, my hand-cutting skills aren’t always Instagram-worthy, ha!).
But if you’re team scissors, just trace around a cup or use a compass.
Pro tip: Mix and match coordinating papers for an extra special look!
Step 2: Create the Swirls
Now here’s where the magic happens!
Take each circle and fold it in half.
Then—and this is the fun part—fold it in half again to create a quarter circle.
You’ll want to leave it slightly loose and curved rather than creasing it flat.
Think soft and swooshy, not origami-sharp!
Step 3: Prep Your Thread
Cut about 8-10 inches of gold thread and tie a loop at the top for hanging.
I like to add a little dot of hot glue on that knot to make sure it stays put.
Nothing sadder than an ornament that loses its hanger, right?
Step 4: Start Layering
Okay, deep breath—this is easier than it looks!
Start at the bottom and work your way up.
Take your first folded circle and apply a small dot of hot glue along the folded edge.
Attach it to your thread, positioning it so the swirled layers face outward.
It should look like a little paper petal!
Step 5: Build Your Tree Shape
Here’s where your ornament starts to come alive!
Continue gluing each folded circle along the thread, rotating them slightly as you go up.
Overlap them generously and vary the angles—that’s what creates that gorgeous dimensional swirl effect.
Start with larger, more open circles at the bottom and gradually make them tighter and smaller as you reach the top.
Madison’s insider tip: I like to step back every 4-5 pieces to see how it’s looking from a distance.
Sometimes you’ll want to adjust the spacing or rotation!
Step 6: Create the Top Point
As you near the top, make your folds tighter and more pointed to create that elegant teardrop shape.
Your last 2-3 circles should be folded quite small and tight.
Secure the final piece with a generous dab of glue.
Step 7: Optional Finishing Touch
If you want to add a little extra oomph (and hide the bottom of the thread), glue a small wooden bead or a tightly folded piece of paper to the bottom.
It just gives it that polished, “I-totally-knew-what-I-was-doing” look!
Tap to Explore These Beauties
See my ideas in action 👇 Tap any image to explore full details.
Popcorn and Cranberry Garland

For a tasty, natural ornament idea, make a popcorn and cranberry garland!
This edible decoration looks gorgeous on the tree and smells amazing.
Making it is also a fun family or holiday party activity.
You will need popping corn, fresh cranberries, a needle and thread or fishing line, and optional decorations like dried cranberries, nuts, small candies, spices, etc.
First, pop enough popcorn to fill a large bowl – about 2 cups of unpopped kernels should yield 6-8 cups of popped corn.
Transfer to a large mixing bowl.
Next, thread a sturdy needle with about 15 feet of fishing line or thin thread.
Tie a knot at the end.
Now you are ready to assemble your garland.
Start stringing the popcorn and cranberries, alternating between 1-3 pieces of each.
Continue until the thread is filled, spacing them close together.
Feel free to add other edible decorations like nuts, dried fruit, crushed candy canes, cinnamon sticks, cloves or anything else that looks festive.
Just be sure they can slide through the needle eye easily without breaking the thread.
Once your popcorn and cranberry garland is complete, wrap it around and around your Christmas tree.
You can secure it with ornament hooks if needed.
Finish it off by tying the ends together.
Not only does my handmade garland look and smell wonderful on the tree, but it’s also a tasty holiday treat you can snack on!
Painted Wood Ornaments

For an easy DIY ornament project, try painting simple wooden shapes.
You can find plain wood cutouts year-round at craft stores, or use wood slices, discs, or cut branches from outside.
Acrylic craft paint, painters tape, and ribbon are also all you need.
Start by selecting your wood pieces.
Circles, stars, hearts, diamonds, and simple abstract shapes all work well.
Sand them lightly if needed to prep the surface.
Next, use painters tape to mark out any patterns you want like stripes, dots, zigzags or geometrics.
Feel free to get creative with different tape shapes.
Now comes the fun part – paint your designs!
Use acrylic craft paint in holiday hues like red, green, white, gold or silver.
Add accents, words or details with a thin brush.
Once the paint dries fully, remove the tape to reveal your pattern.
Finish by tying a ribbon hanger to the top of each ornament.
Salt Dough Ornaments

For an easy, bakeable homemade ornament, whip up some salt dough.
This air-dry clay recipe is simple to make using just a few pantry ingredients.
Here is the recipe:
- 2 cups flour
- 1 cup salt
- 1 cup warm water
- Food coloring, optional
- Essential oils, optional
Mix the flour and salt together in a large bowl.
Gradually stir in the warm water until a dough forms.
Turn out onto a floured surface and knead until smooth.
For color, mix in drops of food coloring.
You can also add a few drops of essential oils like cinnamon or peppermint for scent.
Once your dough is ready, roll it out to 1⁄4 – 1⁄2 inch thick.
Cut out shapes using cookie cutters or improvise your own patterns.
Place carefully on a baking sheet lined with parchment.
Bake at 200°F for 2-3 hours until hard and dry.
Turn off oven and let cool completely before removing.
Add decorations or leave plain – they look beautiful both ways!
You can paint or glue on decorations like beads, glitter, ribbons or other embellishments.
Attach a hanger or string to hang on the tree.
Your homemade salt dough ornaments will look adorable on the tree!
Find Your Room’s Color Palette
Tap a vibe — get a curated 5-color palette with hex codes you can copy ✨

💭 I Wrote a Book About My Biggest Decorating Mistakes!
When I decorated my first home, I thought I knew what I was doing. Spoiler: I didn’t. 😅
💸 I bought a sofa way too big for my living room. Paint colors that looked amazing in the store but terrible on my walls.
Felt Ornament Kits

For an easy DIY kit, look for prepackaged felt ornament sets.
These come with pre-cut felt pieces, thread, stuffing, and instructions for assembling different designs.
While not technically made “from scratch”, these do allow you to hand-make cute felt ornaments with no sewing required.
Look for kits to make gingerbread men, stockings, snowflakes, trees, stars, angels, and other holiday shapes.
Many also include rudimentary patterns and designs to decorate the characters or shapes.
To assemble the ornaments, simply cut out the pre-cut felt pieces, punch out any holes or slits, and follow the guide to stack and layer the pieces.
Many pieces slot together with tabs or have slots to insert ribbon for hanging.
Use the included stuffing to fill shapes as you assemble so they end up puffy and dimensional.
Thread is used to attach pieces and parts like scarves or bows.
follow the guide to embroider any details like faces.
In an hour or two, you can craft an entire collection of adorable handmade felt Christmas ornaments!
They make great keepsakes, gifts, and tree decorations for displaying your DIY holiday spirit!
Beaded Ornaments

Add some sparkle to your holiday decor with beaded Christmas ornaments!
You can find materials for beading projects year round at local craft stores.
Grab an ornament crafting kit or assortment of beads in holiday colors and designs.
Round plastic bead ornaments that open into halves work best for adding beads.
You’ll also need beading wire, head pins, and a selection of beads in styles like round, teardrop, star and more.
Start by opening your empty ornament and applying tacky glue all around one half of the inside edges.
Carefully close the halves together and let dry completely.
Now you are ready to start decorating!
Cut several 15 inch pieces of beading wire.
String beads in any pattern onto the wire.
Every few beads, insert a head pin trimmed to 1-2 inches.
This helps secure the beads in place.
Once your beaded strand is filled, position it on the ornament and carefully wrap the ends around the edges to attach.
Continue adding more beaded strands until the ornament is full!
Finish by trimming any excess wire on the inside and closing up the ornament halves.
Add a hanger if needed.
Your custom hand-beaded Christmas ball will add some beautiful shimmer to the holiday decor!
What’s Your Decor Personality?
5 questions · 30 seconds · Instant style match 🏡
Glittered Dried Citrus Slices

For a natural ornament with sparkle, turn dried citrus slices into glittered decor!
Orange and lemon slices look beautiful embellished with glitter and hung around the home.
Start by slicing oranges, lemons, limes, or grapefruit into 1/4 to 1/2 inch rounds.
Lay them flat in a single layer on a cooling rack placed over a baking sheet.
Place in the oven at its lowest setting, around 175°F, for 4-6 hours.
Check periodically until slices feel completely dried out.
Remove and let cool completely.
Apply tacky glue or decoupage medium all over the top of each slice in a thin layer.
Quickly sprinkle glitter generously over the glue so it sticks.
Carefully shake off excess glitter after a minute or two.
Add a ribbon hanger and allow to fully dry before hanging.
Group them together in a bowl or display singly around the home for natural holiday sparkle!
Cinnamon Stick Ornaments

For a natural DIY ornament full of holiday fragrance, ornament bundles made from cinnamon sticks are simple to create.
Purchase fresh cinnamon sticks, available in the spice aisle or baking section of the grocery store.
Cut colorful pieces of ribbon into 5-6 inch lengths.
Take 3-5 cinnamon sticks and gather them into a bundle, sliding the ribbon through the middle and tying it closed at the top.
Fluff the sticks out into a spray shape.

Feel free to use sticks of varied lengths for visual interest.
Repeat with more bundles, using ribbon in different colors and patterns.
These aromatic cinnamon stick ornaments smell amazing hung on the Christmas tree or displayed in bowls.
Make extra bundles to give as homemade holiday gifts too!
Photo Ornaments

Preserve your favorite holiday memories in custom photo ornaments!
These homemade keepsakes are easy to make using printed photos, clear glass ornaments, and decorative embellishments.
Start by selecting meaningful photos and printing them at a small size – around 1-2 inches.
Cut them into circles or ovals.
Mod Podge or tape photos face-down inside empty glass ornament balls.
You can also decoupage photos onto the outside of plain wood ornaments for a unique effect.
Use small photos or split and wrap a larger photo around the sides.
Next, decorate the ornaments by adding ribbon bows, beads, glitter, pine sprigs, or anything that complements the photos.
Get kids involved by having them draw holiday art to seal inside too!
Hang your finished custom photo ornaments on the tree every year to remember cherished holiday moments and the people you love.
This or That?
Pick your fave — see what other readers chose! 👀
Pinecone Ornaments

For an all-natural DIY ornament, look no further than pinecones!
These seed-bearing cones make rustic yet beautiful holiday decor.
Start by collecting pinecones of varied sizes and shapes.
Look for tightly closed ones without any prickly openings.
Clean and dry them fully – you can bake at a low temp until crisp.
Decorate pinecones by painting them with acrylic craft paint or metallic spray paint.
Add details with a marker.
💭 I Wrote a Book About My Biggest Decorating Mistakes!
When I decorated my first home, I thought I knew what I was doing. Spoiler: I didn’t. 😅
💸 I bought a sofa way too big for my living room. Paint colors that looked amazing in the store but terrible on my walls.
Or roll them in glitter for sparkle!
Tie ribbons around pinecones or glue on decorative beads, fabric, twine, branches or other embellishments.
Attach a loop of ribbon or string at the top for hanging on the tree.
Group pinecone ornaments together in a bowl or display them around the house and on the mantel to accent your holiday decor.
Allow this foraged, eco-friendly ornament to infuse your home with natural Christmas spirit!
Thumbprint Cookie Ornaments


For an edible homemade ornament, decorated thumbprint cookies are quick and easy to whip up.
Kids will love helping make them!
Start by mixing and chilling a simple butter cookie dough.
Roll out dough to 1⁄4 inch and cut rounds using a small cup or cookie cutter.
Press thumb into center of each round.
Bake 10 minutes until set but not browned.
Cool completely before decorating.
Now for the fun part!
Fill each thumbprint with homemade piping gel frosting.
✦ You Might Love This
Anyone Skipping These Xmas Cabinet Decor Ideas Will Regret Their Holiday Glow Keep Reading →
Top with sprinkles, crushed candy, mini chocolate chips, nuts or anything that looks festive.
Finally, thread ribbon through holes punched near the top of the cookies before the frosting dries.
Hang on the tree or package in cello bags to give as edible DIY gifts!
Quick Design Dilemma
Cast your vote — see what other readers think! 🤔
Clothespin Snowflake Ornaments

Use simple wooden clothespins to craft delightful snowflake ornaments!
All you need are natural clothespins, white craft paint, glue and glitter or ribbon for decorating.
Start by painting the clothespins white on both sides.
While the paint dries, prepare your embellishments like glitter, glue, and cut ribbons.
Next, glue ribbon lengths crisscrossing diagonally across the clothespins to form “snowflake” shapes.
Or, coat the pins generously with glue and press glitter over the front and back.
Add hanging loops of ribbon at the top.
Let your handmade clothespin snowflakes dry fully before hanging on the tree or around the house.
Display them grouped together in a bowl or jar for wintry holiday decor wherever you need a little DIY cheer.
Glass Jar Luminaries

Illuminate the holiday season with handmade glass jar luminaries!
These are quick and easy to assemble in just about any size or color.
Pick out canning jars or other glass jars in varied shapes and sizes.
Clean thoroughly and remove all labels.
Place a flameless LED tealight or fairy light inside each jar.
Next, decorate the jars however you’d like – add painted designs, tie fabric around, glue on pompoms or bead garland, etc.
Get creative!
Finally, place the lid on top, though do not seal completely closed so the light can shine through.
Arrange your homemade luminaries around the house, along walkways, atop the mantel, or clustered as holiday centerpieces.
Enjoy their magical glow!
Handmaking your own ornaments is deeply rewarding.
Decorating the tree with your homemade creations fills it with memories, meaning, and your personal holiday style.
The variety of ornament projects here ensures beginners and experts alike can find something fun to make.
Gather some good music, hot cocoa, and loved ones to craft with you for an even more special experience.