lank walls got you down?
Ready to add some texture, warmth, and personality to your space without breaking the bank?
Woven wall hangings are having a major moment in home decor, and the best part is you don’t need to shell out big bucks for these statement pieces.
With some basic materials and a little creativity, you can craft stunning wall art that reflects your personal style.
By the time you finish reading, you’ll be itching to get your hands on some yarn and start weaving!
Macramé Dreamcatcher Fusion

Imagine combining the mystical allure of dreamcatchers with the textural beauty of macramé – that’s exactly what this project delivers.
You’ll need a metal or wooden hoop, various yarns, cotton cord, beads, feathers, and basic macramé knowledge to get started.
The magic happens when you create a dreamcatcher center using traditional knotting techniques, then expand outward with flowing macramé patterns.
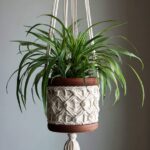
This fusion piece works with any color scheme, but natural tones like cream, tan, and soft terracotta create an earthy, bohemian vibe that’s currently trending.
Begin by wrapping your hoop completely with yarn for a clean foundation – this simple step elevates the professional look of your piece instantly.
For the dreamcatcher center, use thin cotton cord to create the web pattern, working from the inside out and securing each loop around the hoop.
Next, attach your macramé cords to the bottom portion of the hoop using basic larks head knots as your anchor points.
The beauty of this project is in mixing different knot patterns – square knots, spiral knots, and diagonal double half-hitch knots create interesting visual texture.
Try incorporating wooden beads at varying intervals to add unexpected dimensional elements to your piece.
For a truly eye-catching design, vary the lengths of your hanging strands, creating an asymmetrical edge that feels modern and artistic.
Don’t forget to add a few strategically placed feathers or crystal beads for that authentic dreamcatcher touch.
The finished piece makes a statement above a bed, where dreamcatchers traditionally hang, but also works beautifully as a focal point in living spaces.
This project typically takes about 3-4 hours to complete, making it perfect for a rainy weekend afternoon.
As you work, remember that imperfections add character – this isn’t about machine-like precision but rather handcrafted charm.
With practice, you’ll develop your own signature style of fusion between these two fiber art techniques.
Tap to Explore These Beauties
See my ideas in action 👇 Tap any image to explore full details.
Geometric Statement Piece with Yarn and Driftwood


Nothing captures attention quite like bold geometric patterns suspended from a piece of weathered driftwood – nature and modern design in perfect harmony.
This project transforms simple yarn into a sophisticated art piece through the clever use of shape, negative space, and texture.
The driftwood serves as both a rustic frame and a counterpoint to the precise geometry below, creating a compelling visual tension.
You’ll need a beautiful piece of driftwood (collected from a beach or purchased online), various thicknesses of yarn, a dowel for tension, and basic tools like scissors and measuring tape.
Begin by laying out your driftwood and planning your design – sketching it on paper first helps visualize the final result.
Prepare your yarn by cutting lengths that are at least twice the desired finished length of your hanging, as you’ll be folding them over the driftwood.
Attach your yarn strands to the driftwood using simple lark’s head knots, spacing them evenly for a clean, professional look.
The geometric magic happens when you start creating patterns through strategic knotting – try diamond shapes, triangles, or even pixel-like designs.
You can create shapes by knotting specific strands together at predetermined points, using a measuring tool to ensure accuracy.
For added dimension, incorporate a second or third color that contrasts with your base yarn, making the geometric elements pop visually.
Don’t be afraid to leave negative space – the empty areas between your yarn patterns become part of the design itself.
For a truly striking effect, try dip-dyeing portions of your completed piece in fabric dye, creating an ombré effect that adds further visual interest.
This project particularly shines with contemporary décor, bringing warmth to minimalist spaces without overwhelming them.
The beauty of this design is its versatility – it can be scaled up for a dramatic statement piece or kept small for a subtle accent.
With practice, you’ll learn to create increasingly complex geometric patterns that become signature pieces for your home or even gifts for lucky friends.
Upcycled T-shirt Yarn Tapestry


Transform your old t-shirts into a stunning, eco-friendly wall hanging that’s as kind to your wallet as it is to the planet.
This project breathes new life into clothing destined for the donation bin, creating thick, jersey yarn that’s perfect for weaving substantial, textured pieces.
The resulting tapestry has a unique, chunky quality that store-bought yarn can’t replicate, with a subtle heathered appearance depending on your shirt selection.
Start by gathering 5-10 old t-shirts in complementary colors – think ombré effects with blues, or earthy tones like beige, brown, and olive.
Cutting the shirts into continuous strips is surprisingly simple – remove the hems, cut across from armpit to armpit, then spiral cut upward to create one long strand.
When you stretch these strips, they naturally curl into a yarn-like material that’s perfect for weaving projects.
You can work on a simple homemade loom (a picture frame with nails spaced evenly along the top and bottom works perfectly) or invest in an inexpensive lap loom.
Begin by warping your loom – these are the vertical threads that create the foundation for your weaving.
Regular yarn works best for the warp threads, as t-shirt yarn is too thick and stretchy for this structural element.
Now comes the fun part – weaving your t-shirt yarn horizontally through the warp threads using a simple over-under pattern.
The thickness of the t-shirt yarn allows you to create dramatic texture quickly, making this an ideal project for beginners looking for fast results.
Experiment with different weaving techniques – try soumak knots for ridge-like texture or rya knots for a shaggy, fringe-like appearance in sections.
One of the most striking approaches is to create blocks of color using different shirt yarns, creating a modern, color-blocked effect.
Don’t be afraid to incorporate other materials – adding sections of regular yarn, thin rope, or even copper wire creates interesting textural contrasts.
When your weaving is complete, carefully remove it from the loom, securing the warp threads at the top and bottom to prevent unraveling.
The finished piece has a wonderfully tactile quality that adds depth and interest to any wall, while also serving as a conversation starter about sustainable crafting.
Find Your Room’s Color Palette
Tap a vibe — get a curated 5-color palette with hex codes you can copy ✨
Branch and Botanical Weaving


Bring the outdoors inside with this nature-inspired wall hanging that incorporates actual botanical elements within the weave.
This unique approach marries traditional weaving techniques with natural found objects, creating a piece that evolves and changes subtly over time.
You’ll begin with a foraged branch as your hanging rod – look for something with character, interesting curves, or beautiful bark texture.
The gathering process itself becomes part of the creative journey, encouraging you to observe nature more closely on walks or hikes.
For your warp threads, natural cotton or linen in neutral tones provides the perfect backdrop for the botanical elements to shine.
Begin weaving with your choice of yarn for the first few rows, establishing a foundation before introducing the natural elements.
Here’s where the magic happens – carefully weave in pressed leaves, small branches, dried flowers, grasses, or seed pods.
These botanical inclusions should be completely dried and pressed beforehand to prevent mold or deterioration in your finished piece.
Secure delicate elements by weaving over and under them multiple times, or by creating a “sandwich” with transparent thread.
Varying the weaving tension creates pockets and spaces perfect for tucking in smaller botanical elements.
Between botanical sections, continue weaving with complementary yarns in natural fibers like wool, cotton, or silk for a cohesive look.
The overall effect should appear organic and somewhat spontaneous, though careful planning ensures the structure remains sound.
This type of weaving tells a story of place and time – perhaps featuring plants from your garden or from a meaningful location.
For preservation, a light spray of clear acrylic sealer helps protect the botanical elements without compromising their natural beauty.
Over time, your piece will gently age – dried elements may become more brittle or slightly change color, adding to the wabi-sabi charm.

💭 I Wrote a Book About My Biggest Decorating Mistakes!
When I decorated my first home, I thought I knew what I was doing. Spoiler: I didn’t. 😅
💸 I bought a sofa way too big for my living room. Paint colors that looked amazing in the store but terrible on my walls.
Mini Loom Weavings Collection

Think beyond the single large wall hanging and consider the impact of a carefully curated collection of mini weavings displayed together.
This approach allows you to experiment with different techniques, colors, and textures while creating a cohesive gallery wall that makes a major statement.
Start by gathering or making several small looms – embroidery hoops, picture frames, cardboard rectangles, or even sturdy paper plates can serve as foundations.
The beauty of working small is that each piece becomes a manageable project you can complete in an evening, perfect for busy schedules.
With mini weavings, you can be bolder with color choices and experimental techniques since you’re committing to a smaller area.
Try dedicating each mini weaving to a specific technique – one for rya knots, another for soumak, a third for plain weave with texture yarns.
Working at this scale allows you to use those precious scraps of specialty yarns you’ve been saving – the luxury yarn too expensive to buy in large quantities.
Alternatively, stick to a tight color palette of 3-4 complementary colors that repeat throughout the collection for a harmonious look.
Each mini weaving becomes a small fiber art composition with its own focal point, balance, and visual interest.
For mounting, you can leave some pieces on their looms (especially embroidery hoops), while others can be finished with dowels or backing.
The arrangement of your collection becomes an art form itself – try laying out different configurations on the floor before committing to wall placement.
A scattered, organic arrangement works beautifully for a bohemian vibe, while a grid pattern feels more contemporary and structured.
The collection can grow over time, allowing you to add new pieces as you learn new techniques or discover interesting materials.
This approach is particularly perfect for apartment dwellers or those with limited wall space who still want to make a big impact with fiber art.
What’s Your Decor Personality?
5 questions · 30 seconds · Instant style match 🏡

Embroidery Hoop Woven Wall Art

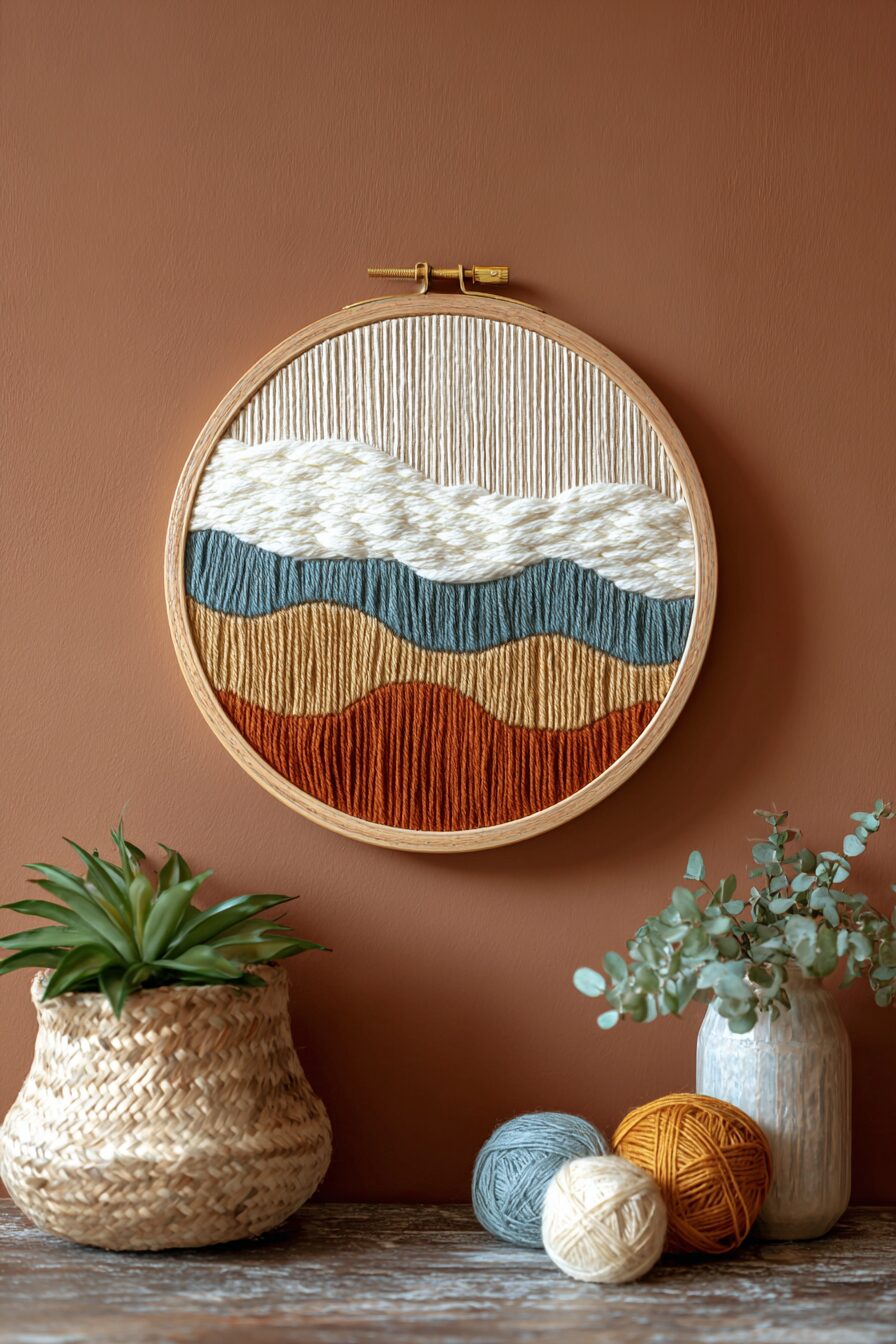
Transform ordinary embroidery hoops into extraordinary circular weavings that break away from the traditional rectangular format.
The circular shape immediately draws the eye, creating a fresh, contemporary take on traditional weaving that works in any décor style.
Start with wooden embroidery hoops in various sizes – from tiny 3-inch versions to statement-making 12-inch hoops – for visual variety.
The wooden hoops serve as both loom and frame, eliminating the need for additional finishing materials when your weaving is complete.
Begin by creating your warp threads, which will radiate from the center like spokes on a wheel rather than running parallel as in traditional weaving.
This radial warping creates a sunburst effect that becomes part of the design itself, even before you begin the actual weaving process.
Secure your warp threads by tying them around the inner hoop, ensuring even tension and spacing for a professional finish.
As you weave around the circular form, you’ll naturally create a spiral pattern that adds movement and flow to your piece.
The circular format allows for interesting gradient effects – try weaving from dark colors at the center to lighter shades at the edges, creating a glowing effect.
For added dimension, incorporate varying heights of pile, with shorter weave near the center and longer, shaggier sections toward the outer edges.
Don’t feel confined to filling the entire hoop – leaving portions of the warp threads exposed creates airy, delicate sections that contrast beautifully with denser weaving.
Try weaving only half the circle for a modern, minimalist look that plays with negative space in an unexpected way.
For a truly unique piece, combine weaving with embroidery techniques – add French knots, lazy daisy stitches, or satin stitch elements to your woven sections.
The embroidery hoop format lends itself perfectly to celestial themes – create moon phases, starbursts, or planet-inspired designs.
When displaying multiple hoop weavings, varying the fiber density creates visual rhythm – place airy, open weavings next to dense, textural pieces.
This project is particularly satisfying for beginners because the built-in frame means your piece is ready to hang as soon as you tie off the last thread.
Yarn Painting with Texture


Forget everything you thought you knew about weaving – this technique approaches fiber art more like painting, using yarn as your medium and texture as your brushstroke.
The result is a dimensional piece that blurs the line between weaving and sculpture, creating shadows and depth that change with the light throughout the day.
Unlike traditional weaving that follows a strict grid, yarn painting allows for organic shapes, curves, and expressive lines that flow freely across your piece.
Start with a traditional warped loom as your canvas, but approach it with a painter’s eye for composition, focusing on creating areas of visual interest.
Rather than following the traditional over-under pattern, you’ll wrap, loop, knot, and manipulate your yarns to create texture and dimensionality.
Think in terms of texture techniques – bouclé yarn creates bumpy terrain, while tightly twisted wool can form raised ridges or even three-dimensional shapes.
Try “painting” a landscape using different yarns and techniques – fluffy mohair becomes clouds, smooth cotton creates a calm lake surface, and nubby wool forms textured mountains.
Incorporate unexpected materials for unique textural effects – thin wire can hold shapes that defy gravity, while ribbon adds smooth, satiny areas.
Build up layers just as a painter would, starting with background elements and gradually adding foreground details that stand out from the surface.
Don’t shy away from letting your warp threads show in places – these vertical lines can become part of your composition, like the canvas showing through paint.
For truly dramatic texture, try roving wool that hasn’t been spun into yarn – this can be gently teased and shaped into cloud-like formations that seem to float off the surface.
Color becomes even more impactful when combined with texture – consider how rough textures catch the light differently than smooth ones, affecting how we perceive color.
This technique particularly shines when you incorporate fiber reactive techniques like felting certain wool sections directly on your weaving.
The freedom of yarn painting allows you to respond to the piece as it develops, making intuitive decisions rather than following a predetermined pattern.
This approach is particularly freeing for those who find traditional weaving too rigid – there are no rules except to create a piece that’s visually and tactilely interesting.
This or That?
Pick your fave — see what other readers chose! 👀
Rope and Fiber Wall Sculpture


Step beyond traditional weaving into the realm of fiber sculpture with this architectural approach to wall hangings.
Using rope as your primary material creates immediate visual impact through its substantial weight and dramatic draping capabilities.
This technique bridges the gap between craft and fine art, resulting in pieces that command attention and serve as the focal point of any room.
Start with various thicknesses of cotton rope, from slim 2mm cord to substantial 1-inch diameter statement rope for dramatic contrast.
The key to this technique is manipulating the rope through knotting, wrapping, coiling, and shaping to create three-dimensional forms that project from the wall.
Unlike flat weavings, these sculptures play with shadow and light, creating additional visual elements that change throughout the day as lighting shifts.
Begin with a solid wood dowel or metal rod as your hanging base, ensuring it’s strong enough to support the weight of your rope composition.
Attach your thickest ropes first, creating the main structural elements that will define the overall silhouette of your piece.
💭 Ever wondered what your room would actually look like rearranged?
I built a free tool that lets you drag furniture around a 2D floor plan. No signup, no catch.
See the Room Planner →Large knots become focal points in the design – try oversized monkey fists, elaborate Chinese crown knots, or chunky square knots as feature elements.
Incorporate wrapped sections by tightly winding thinner cord around thicker rope segments, creating color blocking and textural variation.
For areas of density and visual weight, coil rope into spiral formations, securing the shape with hidden stitches using waxed linen thread.
Create contrast by allowing some rope ends to hang loose and straight, playing against the more manipulated sections for visual tension.
This technique particularly shines when you incorporate unexpected materials – copper pipe segments, wooden beads, or even small air plants nestled within the rope structure.
While more challenging than some other techniques, rope sculpture creates truly original pieces that blur the boundary between functional décor and museum-worthy art.
Bohemian Tassel and Bead Creation

Channel your inner free spirit with this joyfully exuberant wall hanging that celebrates movement, color, and uninhibited creativity.
This bohemian-inspired piece combines the satisfying fullness of handmade tassels with the catching light of wooden, ceramic, or glass beads.
The resulting creation feels alive with energy – tassels sway with the slightest breeze, while beads catch and reflect light around your space.
Begin with a driftwood or dowel base, preferably something with character that will complement the organic nature of the piece.
Rather than traditional weaving, this project focuses on the art of tassel-making, which is surprisingly simple yet endlessly customizable.
Create tassels in varying sizes – from petite 2-inch accents to dramatic 12-inch statement makers – for a composition with rhythm and visual interest.
The technique is straightforward: wrap yarn around a piece of cardboard, slip off, tie at one end, cut at the other, and trim to perfect the shape.
Experiment with different tassel tops – some wrapped in contrasting colors, others adorned with beads, some left simple and elegant.
Arrange your tassels along the base in a planned composition – perhaps an ombré color effect, a rainbow progression, or a more random, exuberant mix.
Between tassel groupings, add beaded elements on sturdy thread or thin wire – these catch the light and add dimension to your piece.

For an authentic bohemian feel, incorporate unexpected elements – small bells that tinkle softly, miniature mirrors that flash in the sunlight, or tiny shells collected from beach travels.
The beauty of this style is its forgiving nature – imperfections and asymmetry contribute to the handcrafted, traveled-the-world appeal.
This style works particularly well with global-inspired décor, bringing warmth and personality to neutral spaces or complementing already colorful bohemian rooms.
The movement factor makes this perfect for spaces where air circulates – near windows, in hallways, or anywhere a gentle breeze might activate your creation.
While exuberant in spirit, you can tailor the color palette to suit your space – from muted neutrals for a more sophisticated take to vibrant jewel tones for maximum impact.
Quick Design Dilemma
Cast your vote — see what other readers think! 🤔
Woven Photo or Memory Display


Combine the textural beauty of weaving with the personal significance of photos and mementos in this uniquely meaningful wall art.
This piece becomes a living family archive or travel diary, preserving memories within a handcrafted framework that elevates snapshots to art status.
Unlike traditional photo displays, the woven elements add warmth, dimension, and artistic merit to your collection of images and keepsakes.
Begin with a larger loom setup – a frame loom at least 18 inches square gives you adequate space for both weaving and photo display.
Create a woven foundation using neutral yarns in a simple pattern, leaving strategic gaps or pockets where photos and memorabilia will be incorporated.
Alternatively, weave a more complete piece, then add special photo-holding elements like small leather pockets or tiny clothespins attached to the weaving.
Print your photos on matte paper rather than glossy for a more harmonious integration with the natural fibers of your weaving.
Beyond photos, incorporate meaningful small objects – a ticket stub from a first date, a feather from a nature walk, a small note written in a loved one’s handwriting.
Use weaving techniques strategically – perhaps looser, more open weaving surrounds a wedding photo, while tighter, more protective weaving cradles a baby’s hospital bracelet.
The tactile nature of this piece invites interaction – visitors may be drawn to touch the fibers and look more closely at the memories preserved within.
Unlike digital photo collections, this physical manifestation of memories creates a focal point for family storytelling and connection.
For preservation of precious items, use archival techniques – acid-free paper backing for photos, UV-resistant glass covering for very valuable memorabilia.
This approach works beautifully for marking major life transitions – a graduation piece, a wedding memory keeper, or a celebration of a new home.
The combination of handcraft and personal history creates an heirloom quality that elevates this project beyond simple décor to something truly meaningful.
The beauty of these projects is their flexibility – adjust the scale, colors, and complexity to match your skill level and home décor.
Remember, the most beautiful woven pieces often embrace imperfection, so don’t stress about getting everything exactly right.
Your walls are waiting – which project will you try first?
💭 I Wrote a Book About My Biggest Decorating Mistakes!
When I decorated my first home, I thought I knew what I was doing. Spoiler: I didn’t. 😅
💸 I bought a sofa way too big for my living room. Paint colors that looked amazing in the store but terrible on my walls.