
Is there anything quite like the moment you open up that special box each December?
You know the one—it smells faintly of pine and nostalgia, and inside, nestled in tissue paper, are all the beloved ornaments collected over the years.
Each one tells a story, from the slightly lopsided popsicle-stick reindeer your kid made in kindergarten to the elegant glass ball from your grandmother.
These little treasures transform a simple evergreen into a glowing timeline of your family’s most cherished memories, and that magical feeling is exactly what we’re celebrating today.

Geometric Glass Terrariums with LED Fairy Lights

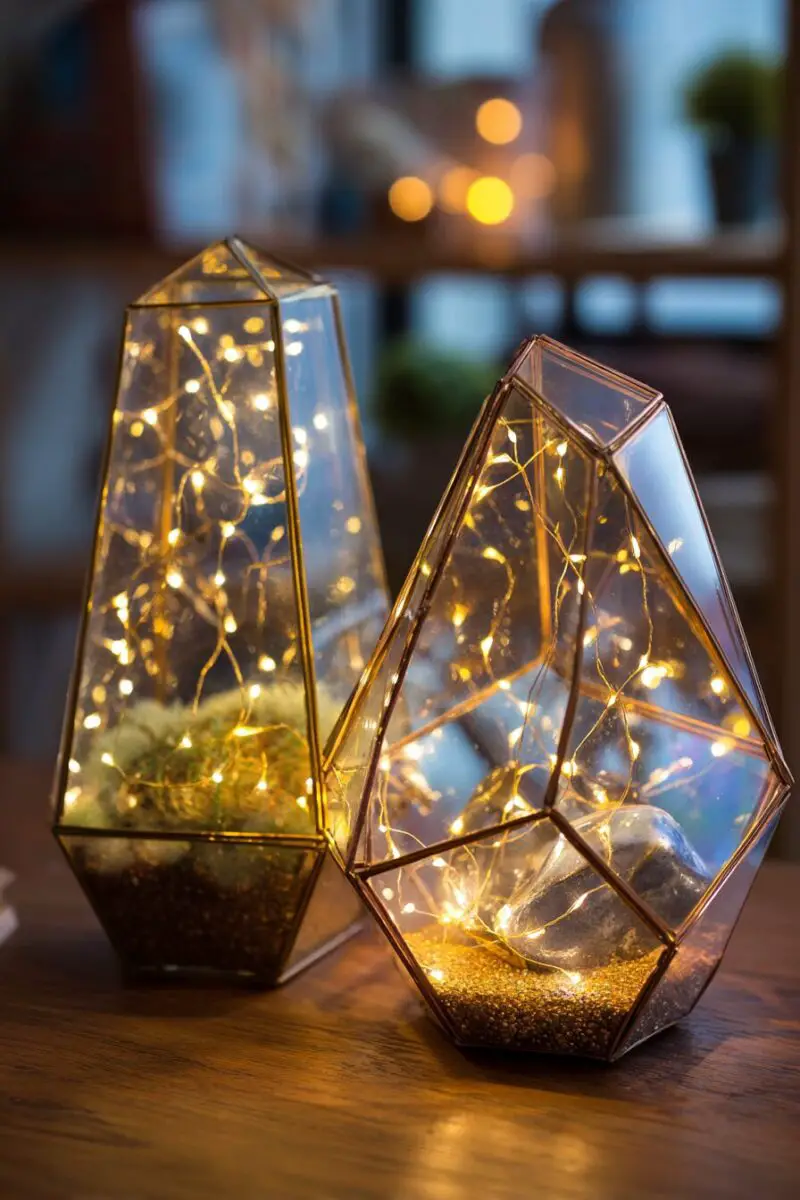
Transform ordinary glass ornament balls into stunning miniature worlds that glow from within.
Start by carefully removing the metal cap from clear glass ball ornaments using needle-nose pliers.
Fill the bottom with a thin layer of colored sand or crushed glass for that modern terrarium vibe.
Add tiny succulents, air plants, or even miniature figurines to create your own little ecosystem inside each sphere.
The real magic happens when you thread battery-operated micro LED lights through the opening before sealing it back up.
These fairy lights will make your ornaments glow like tiny planets hanging on your tree.
You can customize each one with different colored sands, plants, or themes – think winter wonderlands, desert scenes, or even miniature cityscapes.
Kids absolutely love helping with this project because they get to play architect for these tiny worlds.
The best part is that these ornaments look expensive and sophisticated, but they cost just a few dollars each to make.
You can find the glass balls at any craft store, and the LED lights are available in bulk online for super cheap.
For an extra modern touch, try mixing different sizes of spheres and hanging them at varying heights.
The combination of natural elements with the technological twist of LED lighting creates a perfect balance between organic and contemporary design.
These ornaments also make incredible gifts because each one is completely unique and handmade with love.
Your guests will be mesmerized by the soft, enchanting glow these create in the evening when the room lights are dimmed.
Macrame and Wood Slice Combo Ornaments
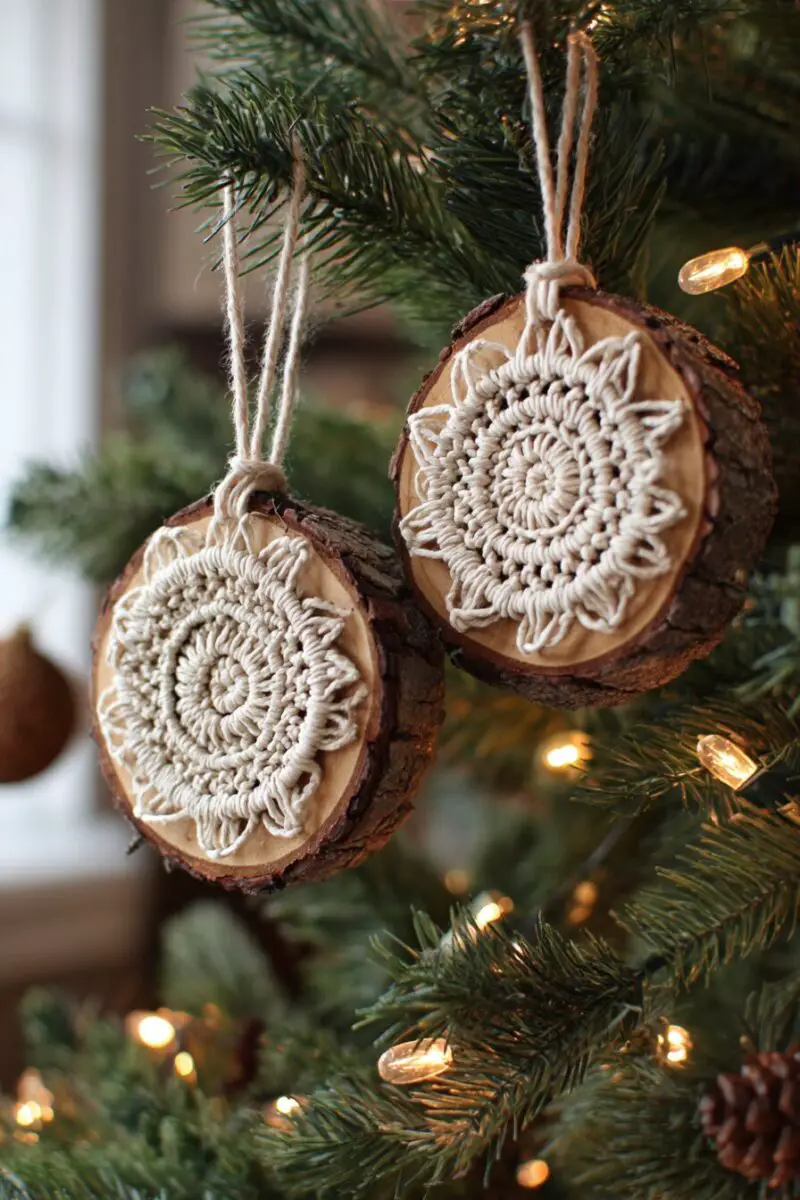
Bring that trendy boho-chic aesthetic to your Christmas tree with these Instagram-perfect hanging decorations.
Start by collecting wood slices from fallen branches in your yard or purchasing pre-cut rounds from craft stores.
Sand them smooth and add a clear protective coating to bring out the natural grain patterns.
While those dry, cut macrame cord into various lengths – you’ll need about 24 inches for each ornament.
Create simple macrame patterns like square knots or spiral designs that will frame your wood slice beautifully.
The key is to make the macrame portion about twice as long as your wood slice diameter for the perfect proportions.
Drill a small hole through the top of each wood slice and thread your macrame cord through it.
You can personalize each ornament by wood-burning family names, dates, or simple geometric designs onto the wood surface.
Kids can help by choosing the macrame patterns and even trying their hand at the basic knots.
For a modern twist, dip-dye the bottom portion of your macrame cords in metallic gold or silver paint.
These ornaments photograph beautifully and add that handcrafted, artisanal look that’s so popular right now.
The natural wood combined with the textured cord creates incredible visual interest and depth on your tree.
You can vary the sizes and shapes of wood pieces – try hexagons, rectangles, or even heart shapes for different family members.
The neutral colors work perfectly with any tree color scheme and won’t clash with your existing decorations.
Design Your Dream Room in Minutes!
🏡 Start Creating FREE →Upcycled Vinyl Record Snowflakes
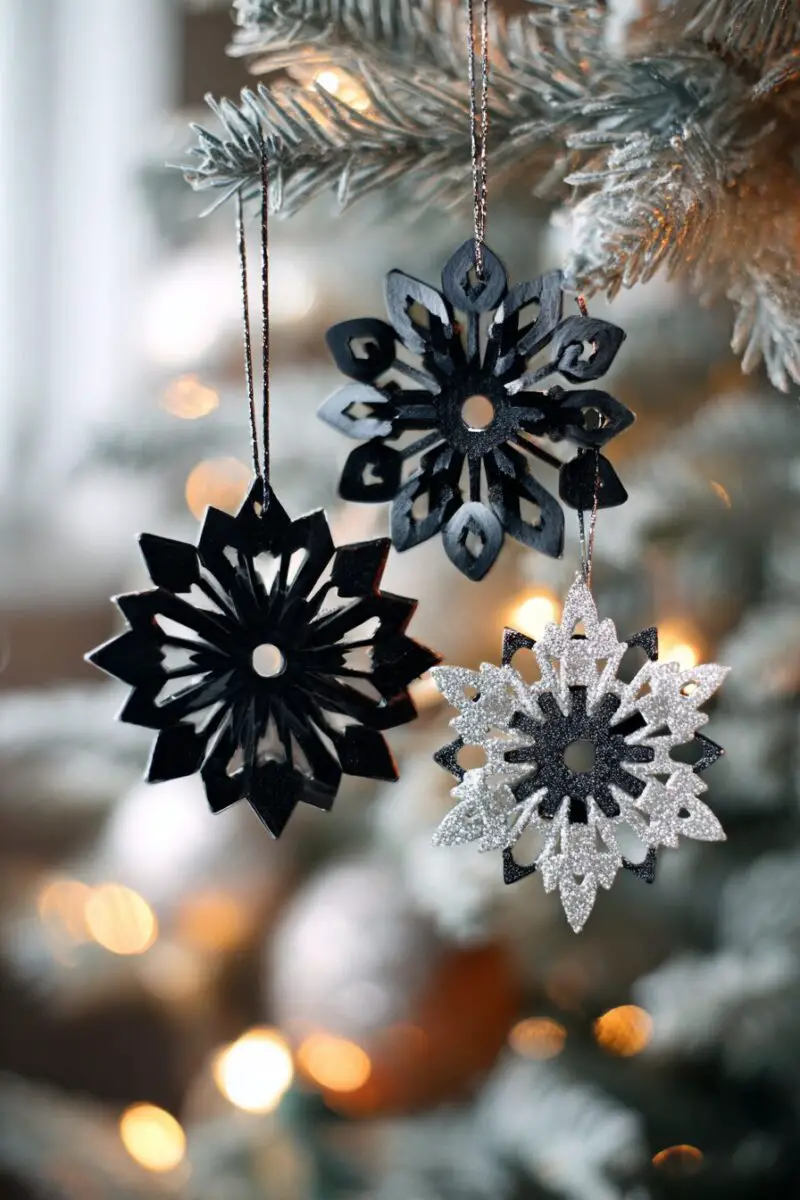
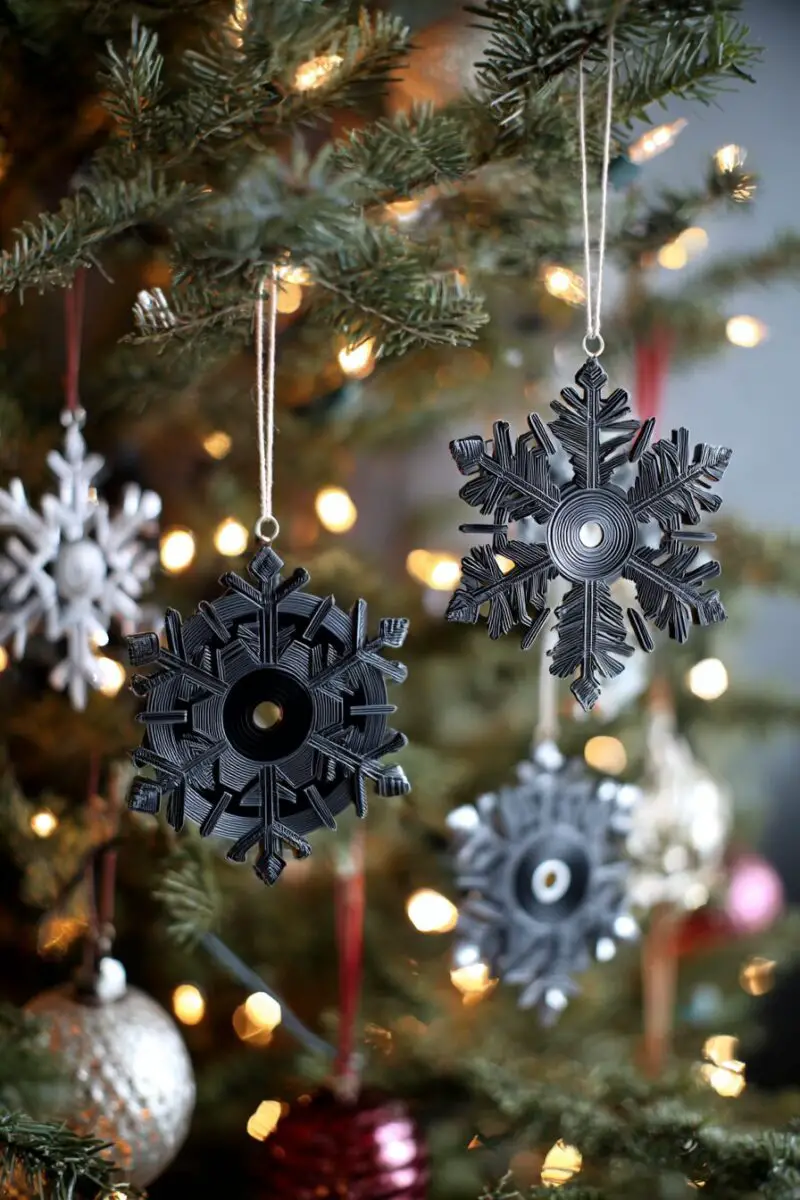
Turn those scratched old records into show-stopping ornaments that’ll have everyone doing double-takes.
Heat your oven to 200 degrees and place vinyl records on parchment-lined baking sheets.
Watch them carefully as they soften and become pliable – this usually takes about 3-5 minutes.
Using oven mitts, quickly remove them and press into large bowls or molds to create curved, flowing shapes.
Once they cool and harden, use a craft knife to cut intricate snowflake patterns into the vinyl.
The key is to work quickly while the vinyl is still warm and flexible.
Start with simple geometric patterns if you’re new to this technique, then get more elaborate as you gain confidence.
Spray paint them with metallic finishes like copper, rose gold, or classic silver for that high-end look.
You can also leave some in their original black for a more industrial, modern aesthetic.
Kids can help by designing the snowflake patterns on paper first, then you can transfer those designs to the vinyl.
These ornaments catch light beautifully and create amazing shadows on your walls when hung near light sources.
The circular shape of records naturally lends itself to snowflake designs, and the vinyl material is surprisingly durable.
For extra sparkle, brush on some glitter while the paint is still wet.
Each record can yield multiple ornaments if you cut them into different sections.
These conversation starters will have your guests sharing stories about their own old record collections.
Polaroid Photo Memory Baubles

Create the most heartwarming ornaments ever by showcasing your favorite family memories inside clear glass spheres.
Purchase large, clear plastic or glass ornament balls that open completely in half.
Print your favorite family photos in mini Polaroid style using online printing services or instant cameras.
Roll each photo gently and slide it into the ornament ball so it unrolls and displays against the curved wall.
Add a few drops of fake snow or iridescent glitter to make the photos look like they’re floating in a snow globe.
You can fit 2-3 small photos in each ornament if you arrange them strategically.
This project becomes incredibly meaningful when each family member contributes their favorite memory from the past year.
Kids love seeing their photos displayed so prominently and will spend hours looking at all the different ornaments.
For a modern twist, print some photos in black and white while leaving others in full color.
You can also include tiny handwritten notes or quotes that relate to each photo.
The clear ornaments allow the photos to be visible from multiple angles as they hang and slowly rotate on the tree.
These make incredible keepsake gifts for grandparents who love seeing family photos.
Over the years, you can build a collection that tells the story of your family’s growth and adventures.
The best part is that these ornaments become more precious with time as the memories they hold become even more special.
Clay Thumbprint Constellation Ornaments

Transform your family’s thumbprints into stunning celestial masterpieces that’ll look amazing on your tree.
Start with air-dry clay rolled into circles about 3 inches in diameter and quarter-inch thick.
Have each family member press their thumb firmly into the clay to create deep, clear impressions.
Use a toothpick to poke a small hole at the top for hanging before the clay starts to harden.
Let the clay dry completely according to package directions – usually 24-48 hours depending on thickness.
Once dry, paint the entire surface with dark blue or black acrylic paint as your night sky base.
After that dries, use metallic gold or silver paint to carefully fill in each thumbprint impression.
The thumbprints become individual stars, and you can connect them with thin painted lines to create actual constellations.
Research real constellation patterns online and recreate them using your family’s thumbprints as the star positions.
Kids absolutely love learning about astronomy while making these ornaments.
You can write the constellation names on the back of each ornament along with the date and family member names.
For extra magic, brush on some glow-in-the-dark paint over the metallic stars.
These ornaments tell a beautiful story about your family being connected like stars in the sky.
Each one is completely unique because no two thumbprints are identical.
They also serve as precious keepsakes that capture your family’s fingerprints for future generations.
Concrete and Gold Leaf Modern Minimalists

Create sophisticated, gallery-worthy ornaments that look like they came from an expensive boutique.
Mix quick-setting concrete according to package directions until you achieve a smooth, yogurt-like consistency.
Pour the mixture into silicone molds shaped like geometric forms – spheres, pyramids, or hexagons work beautifully.
Insert a small loop of wire or string into the top of each shape while the concrete is still wet.
Allow 2-3 hours for complete curing, then carefully remove from molds.
Sand any rough edges smooth and wipe clean with a damp cloth.
Apply gold leaf adhesive to random sections of each ornament and let it get tacky.
Gently press sheets of gold leaf onto the adhesive areas, creating stunning metallic accents against the gray concrete.
The contrast between the industrial concrete and luxurious gold creates an incredibly sophisticated look.
These ornaments photograph beautifully and add serious style points to your holiday decor.
You can experiment with different metallic finishes like copper or silver leaf for variety.
The weight of concrete makes these ornaments hang beautifully and adds substance to your tree.
Kids can help by choosing which areas to apply the gold leaf and learning about the leafing process.
These modern masterpieces work perfectly in contemporary homes but also add interesting contrast to traditional holiday decor.
The minimalist aesthetic means they’ll look amazing year after year without going out of style.
Embroidery Hoop Mini Wreaths

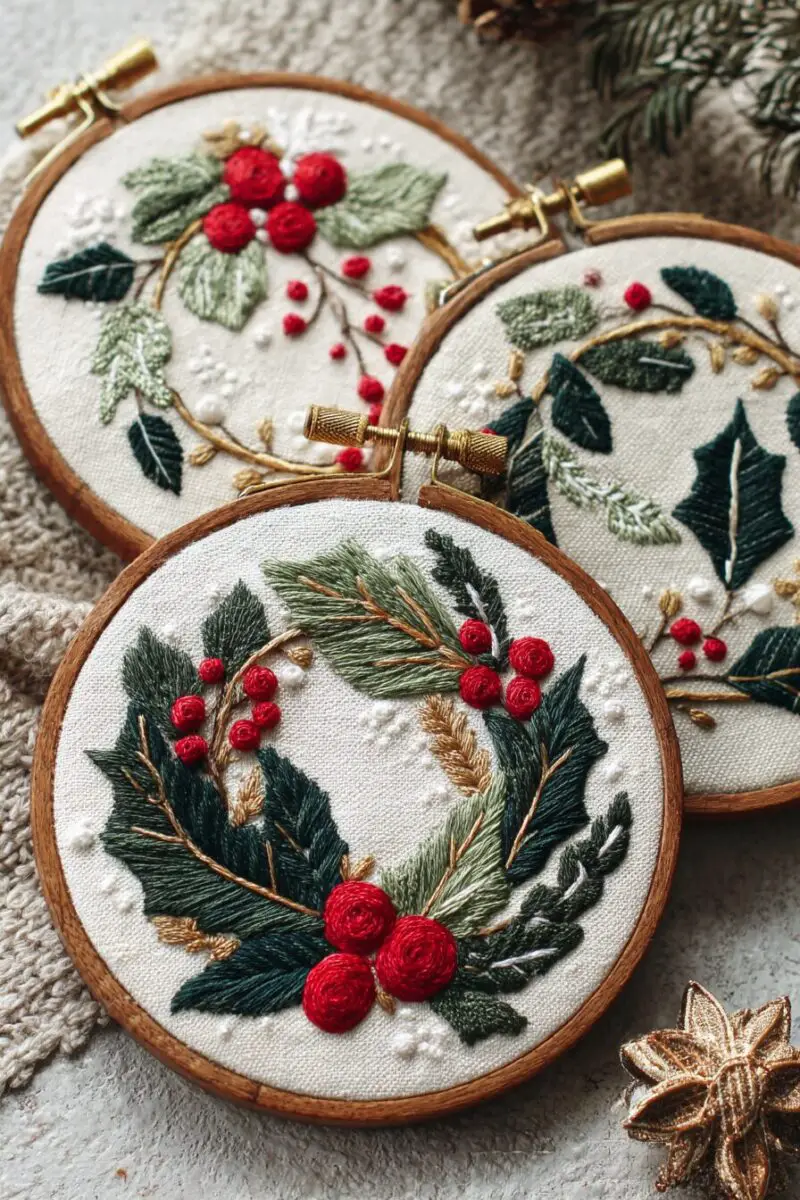
Transform basic embroidery hoops into adorable miniature wreaths that pack maximum visual impact.
Purchase small embroidery hoops in 3-4 inch diameters from any craft store.
Remove the fabric and separate the inner and outer rings.
Wrap the outer hoop completely with green yarn, ribbon, or twine, securing the ends with hot glue.
Create tiny flowers, leaves, and berries using felt or fabric scraps cut into small shapes.
Hot glue these decorative elements around the wrapped hoop to create your mini wreath design.
You can add small jingle bells, buttons, or beads for extra texture and interest.
The inner ring becomes a second ornament when wrapped in contrasting colors or materials.
Kids can help by cutting felt shapes and deciding where to place each decorative element.
These tiny wreaths look absolutely adorable clustered together on one section of your tree.
You can create themed versions like all-white winter wreaths or bright, colorful tropical versions.
For a modern touch, try wrapping hoops in metallic thread or adding geometric felt shapes instead of traditional flowers.
The circular shape naturally draws the eye and creates perfect little focal points throughout your tree.
These ornaments are incredibly lightweight, so they work well on even the most delicate tree branches.
Each family member can design their own mini wreath reflecting their personal style and favorite colors.
Salt Dough Fossil Impressions

Create mysterious and educational ornaments that look like ancient treasures discovered by archaeologists.
Mix 2 cups flour, 1 cup salt, and 1 cup water to create smooth salt dough.
Roll the dough to about half-inch thickness on a floured surface.
Press various objects into the dough to create fossil-like impressions – shells, leaves, toys, or even pasta shapes work great.
Cut around each impression with cookie cutters or a knife to create individual ornament shapes.
Use a straw to poke hanging holes before the dough dries.
Bake at 200 degrees for 2-3 hours until completely hardened.
Once cool, paint the entire surface with brown or gray acrylic paint.
While the paint is still slightly damp, wipe the raised areas with a dry cloth to create an aged, weathered appearance.
The impressions will remain darker while the raised surfaces become lighter, creating amazing depth and contrast.
For extra realism, brush on some antiquing glaze or tea stain to make them look genuinely ancient.
Kids love pressing different objects into the dough and guessing what each impression will look like.
These ornaments spark great conversations about paleontology and natural history.
You can research real fossils online and try to recreate similar patterns in your salt dough.
Each ornament becomes a unique artifact that tells its own story about the object that created it.
Origami Paper Crane Mobiles


Elevate the traditional paper crane into stunning three-dimensional ornaments that seem to float magically.
Choose high-quality origami paper in metallics, pastels, or traditional holiday colors.
Fold multiple paper cranes in graduated sizes – start with 6-inch squares and work down to 2-inch squares.
The key is creating sets of 5-7 cranes in descending sizes for each mobile ornament.
Thread fishing line or clear thread through the cranes, spacing them about 2 inches apart vertically.
Attach all threads to a small embroidery hoop or thin wooden dowel cut into 4-inch lengths.
The cranes should hang at different levels to create a cascading, floating effect.
For a modern twist, dip the wing tips of some cranes in metallic paint or glitter.
These delicate mobiles catch air currents and move gently, adding beautiful motion to your tree.
Kids can help with the paper folding once they learn the basic crane technique.
The ancient art of origami brings a peaceful, meditative quality to your holiday crafting time.
Each mobile tells a story of patience and precision, making them extra meaningful as family projects.
You can vary the colors within each mobile or create monochromatic versions for different tree sections.
The paper cranes symbolize peace and good fortune, adding beautiful meaning to your holiday traditions.
These ornaments photograph incredibly well and create stunning silhouettes against tree lights.
Resin and Dried Flower Preservations

Capture the beauty of nature forever in crystal-clear resin ornaments that look like precious gems.
Collect small flowers, leaves, and herbs throughout the fall to dry and preserve for this project.
Purchase clear epoxy resin and silicone molds in various ornament shapes from craft stores.
Press your dried botanicals between heavy books for at least two weeks to ensure they’re completely flat and dry.
Mix the resin according to package directions in a well-ventilated area.
Pour a thin layer into your molds, then carefully arrange your dried flowers and leaves.
Cover with another layer of resin, being careful to eliminate any air bubbles with a toothpick.
Allow 24-48 hours for complete curing before removing from molds.
