Those structural poles in your basement don’t have to be the ugly stepchilden of your home design.
With some creativity and elbow grease, you can turn these necessary supports into stunning focal points that guests will actually compliment.
Wrap Them in Faux Stone for an Instant Castle Vibe


You can create the illusion of ancient castle pillars by wrapping your basement poles in faux stone panels.
These lightweight panels come in various textures and colors, from weathered limestone to rustic fieldstone.
Start by measuring your pole’s circumference and height to determine how much material you’ll need.
Clean the pole thoroughly and let it dry completely before beginning the installation process.
Apply construction adhesive to the back of each panel, working in small sections to ensure proper bonding.
Wrap the panels around the pole, overlapping edges slightly for a seamless appearance.
Use a utility knife to trim panels that extend beyond the pole’s base or ceiling connection.
The beauty of this approach lies in the dramatic transformation it creates without permanent alterations to your home’s structure.
You can choose stones that match your basement’s overall design theme, whether you’re going for medieval dungeon vibes or sophisticated wine cellar elegance.
For added authenticity, fill the seams between panels with grout or caulk that matches the stone color.
This technique works especially well in finished basements where you want to create distinct zones or architectural interest.
The textured surface also helps break up the visual monotony that plain poles can create in open basement spaces.
If you’re feeling adventurous, you can even add LED strip lighting behind translucent stone panels to create a subtle glow effect.
This method typically costs between $50-150 per pole, depending on the quality of materials you choose and the pole’s dimensions.
The installation process usually takes a weekend to complete for multiple poles, making it a manageable DIY project for most homeowners.
Tap to Explore These Beauties
See my ideas in action 👇 Tap any image to explore full details.
Create Nautical Magic with Rope Wrapping Techniques

Transform your basement poles into ship masts by wrapping them with thick nautical rope from bottom to top.
This technique brings a coastal, maritime atmosphere to your underground space that feels both rustic and sophisticated.
Purchase marine-grade rope in your preferred thickness – typically 1 to 2 inches works best for most standard basement poles.
Start at the bottom of the pole, securing the rope end with heavy-duty construction adhesive or cable ties.
Wrap the rope tightly around the pole, ensuring each layer sits snugly against the previous one without gaps.
Use a rubber mallet to gently tap each layer into place as you work your way up the pole.
The key to professional-looking results lies in maintaining consistent tension throughout the wrapping process.
Pause every few feet to check that your rope lines remain parallel and evenly spaced around the pole’s circumference.
When you reach the top, secure the rope end with additional adhesive and tuck it discretely under the final wrap.
This approach works particularly well in basements with exposed ceiling beams or industrial-style lighting fixtures.
You can enhance the nautical theme by adding brass cleats, ship wheels, or vintage maritime accessories nearby.
The rope texture also provides excellent acoustic properties, helping to dampen sound in basement entertainment areas.
For a modern twist, try using colored rope or alternating between different rope materials like jute and manila.
Some homeowners incorporate LED rope lights within the wrapping for ambient lighting effects during evening gatherings.
The natural fiber materials add warmth to basement spaces that might otherwise feel cold or unwelcoming.
This project typically costs $30-80 per pole and can be completed in a single afternoon with basic tools.
Turn Poles into Realistic Tree Trunks for Indoor Forest Feels

Create an enchanting indoor forest by transforming your basement poles into realistic tree trunks using specialized bark-textured materials.
This nature-inspired approach brings the outdoors inside and creates a unique, organic atmosphere in your basement space.
Start by selecting artificial bark materials that come in rolls or sheets specifically designed for this purpose.
These materials often feature realistic textures and coloring that mimic oak, birch, or pine bark patterns.
Measure your poles carefully and order slightly more material than needed to account for overlapping and trimming.
Clean the pole surface and apply a base coat of brown or tan paint that matches your chosen bark material.
This base color ensures that any small gaps or imperfections won’t reveal the original pole surface.
Carefully wrap the bark material around the pole, starting from the bottom and working your way up systematically.
Use contact cement or specialized adhesive designed for textured surfaces to ensure long-lasting adhesion.
Pay special attention to seam placement, positioning them where they’ll be least visible from your basement’s main viewing angles.
Add realistic details by incorporating artificial moss, small branches, or even battery-powered LED lights that simulate fireflies.
You can vary the bark types on different poles to create the impression of a diverse forest ecosystem.
Some creative homeowners add artificial roots at the base using sculptural foam or additional bark materials.
This technique works exceptionally well in basement family rooms, children’s play areas, or home theaters with nature themes.
The textured surface provides visual interest and helps break up the industrial feel that basement poles often create.
For ultimate realism, lightly sand certain areas of the bark material to create natural-looking wear patterns.
Material costs typically range from $75-200 per pole, depending on the quality and type of bark materials chosen.
Find Your Room's Color Palette
Tap a vibe — get a curated 5-color palette with hex codes you can copy ✨
Transform Poles into Giant Chalkboard Canvases for Creative Expression


Turn your basement poles into functional art pieces by covering them with chalkboard paint that invites creativity and interaction.
This approach combines practical functionality with artistic expression, making your poles serve multiple purposes in your basement space.
Choose high-quality chalkboard paint that provides smooth writing surfaces and erases cleanly without ghosting or staining.
Prepare the pole surface by cleaning thoroughly and lightly sanding any glossy areas to ensure proper paint adhesion.
Apply painter’s tape to protect surrounding floors and walls from accidental paint drips or roller marks.
Use a foam roller for the smoothest possible finish, applying thin, even coats rather than trying to cover everything in one thick application.
Allow each coat to dry completely before applying the next one, typically requiring 2-3 coats for optimal coverage.
After the final coat dries, season the chalkboard surface by rubbing chalk over the entire area and then erasing it completely.
This seasoning process prevents the first real messages from permanently etching into the paint surface.
Install small chalk holders or magnetic containers at convenient heights to keep writing materials easily accessible.
These chalkboard poles become interactive elements where family members can leave messages, create artwork, or track basement activities.
Kids especially love having designated spaces where they can draw and write without getting in trouble.
You can also use the chalkboard surface for practical purposes like keeping score during basement game nights or listing workout routines.
The dark surface helps camouflage the pole’s presence while adding sophisticated, modern appeal to your basement design.
For variety, alternate between traditional black chalkboard paint and colored versions like green, blue, or even clear chalkboard paint over colored backgrounds.
Regular maintenance involves occasional cleaning with damp cloths and reapplying chalk seasoning as needed.
This project costs approximately $25-50 per pole and can be completed in a weekend with proper drying time between coats.

💭 I Wrote a Book About My Biggest Decorating Mistakes!
When I decorated my first home, I thought I knew what I was doing. Spoiler: I didn't. 😅
💸 I bought a sofa way too big for my living room. Paint colors that looked amazing in the store but terrible on my walls.
Illuminate Your Space with LED Strip Light Pole Wrapping


Create stunning ambient lighting effects by wrapping your basement poles with programmable LED strip lights that can change colors and patterns.
This modern approach turns structural necessities into dynamic lighting features that enhance your basement’s atmosphere for any occasion.
Purchase high-quality LED strips with adhesive backing and weatherproof coating to ensure longevity in basement humidity conditions.
Choose strips with individual LED control capabilities for maximum programming flexibility and visual impact.
Plan your lighting layout by mapping out power source locations and determining how many strips you’ll need for each pole.
Clean the pole surface thoroughly with degreasing cleaner to ensure the LED strips’ adhesive backing bonds properly.
Start at the bottom of the pole and carefully apply the LED strip in a spiral pattern, maintaining consistent spacing between each wrap.
Use cable management clips or clear mounting tape at regular intervals to provide additional security for the LED strips.
Connect the strips to programmable controllers that allow you to adjust colors, brightness, and pattern sequences through smartphone apps.
Install dimmer switches or smart home integration to easily adjust lighting levels for different basement activities.
The programmable nature allows you to create different moods – bright white for working, soft blues for relaxation, or dynamic color changes for parties.
Position the LED strips to avoid glare while maximizing the light reflection off nearby walls and ceiling surfaces.
This technique works particularly well in basement home theaters, bars, or entertainment areas where ambiance matters.
You can synchronize multiple pole lights to create coordinated lighting shows or set them to respond to music for party atmospheres.
Some LED strips offer special effects like twinkling, fading, or chase patterns that add visual interest to your basement space.
The low heat output of LED technology makes this approach safe for long-term installation in basement environments.
Material costs range from $100-300 per pole depending on strip quality and controller sophistication, but the energy efficiency provides long-term savings.
What's Your Decor Personality?
5 questions · 30 seconds · Instant style match 🏡
Create Dazzling Mirror Disco Effects with Reflective Tiles

Transform your basement poles into sparkling focal points by covering them with small mirror tiles that create stunning light reflection patterns.
This glamorous approach adds vintage disco vibes while making your basement feel larger and brighter through strategic light multiplication.
Purchase mirror tiles in various sizes, from small mosaic pieces to larger format tiles, depending on your desired aesthetic effect.
Choose tiles with beveled edges for maximum light refraction and visual impact when light sources hit them from different angles.
Prepare the pole surface by ensuring it’s completely clean, dry, and free from any texture that might prevent proper tile adhesion.
Use mirror-specific adhesive that won’t damage the reflective backing and provides long-lasting hold in basement moisture conditions.
Start tiling from the bottom of the pole, working in horizontal rows to maintain straight lines and consistent spacing.
Use tile spacers to ensure uniform gaps between tiles, which you’ll later fill with appropriate grout or sealant.
Apply tiles carefully to avoid air bubbles under the adhesive, which could cause tiles to pop off over time.
Install strategic lighting around the basement to maximize the mirror effect and create beautiful reflected light patterns on walls and ceilings.
The reflective surfaces help distribute natural light from basement windows more effectively throughout the space.
You can create patterns by alternating mirror tile sizes or incorporating colored mirror tiles for more dynamic visual effects.
This technique works exceptionally well in basement bars, dance areas, or entertainment spaces where you want to create festive atmospheres.
Regular maintenance involves gentle cleaning with appropriate mirror cleaners to maintain maximum reflectivity and prevent water spots.
For safety, ensure all tile edges are properly secured and smooth to prevent injury in high-traffic basement areas.
The mirror effect helps make basement ceilings appear higher and spaces feel more open and luxurious.
Project costs typically range from $80-250 per pole depending on tile quality and size, but the dramatic visual impact justifies the investment.
💭 Ever wondered what your room would actually look like rearranged?
I built a free tool that lets you drag furniture around a 2D floor plan. No signup, no catch.
See the Room Planner →Chic with Exposed Pipe Aesthetics

Give your basement poles an industrial makeover by wrapping them with PVC or metal pipes that create an authentic factory-inspired aesthetic.
This approach celebrates the mechanical nature of basements while adding visual texture and urban sophistication to your underground space.
Select pipes in various diameters to create layered, complex visual patterns that draw the eye upward along the pole’s length.
Use PVC pipes for lightweight, cost-effective installation, or choose metal pipes for more authentic industrial appearance and durability.
Plan your pipe arrangement by sketching different patterns and configurations before beginning the actual installation process.
Secure pipes to the pole using heavy-duty mounting brackets, pipe clamps, or custom-fabricated mounting hardware.
Create vertical runs, spiral patterns, or geometric arrangements that complement your basement’s overall design theme.
Paint pipes in metallic finishes like copper, bronze, or gunmetal to enhance the industrial aesthetic and prevent corrosion.
Add functional elements like valve handles, pressure gauges, or industrial lighting fixtures to increase authenticity.
Install LED strip lights inside translucent pipes to create unique illumination effects that highlight the industrial design.
This approach works particularly well in basement workshops, man caves, or modern entertainment spaces with exposed ceiling elements.
Incorporate real functional elements like electrical conduit or cable management within the pipe framework for practical benefits.
Use weathered or distressed finishes on pipes to create the appearance of aged industrial equipment with authentic patina.
Connect multiple poles with horizontal pipe runs to create a unified industrial ceiling grid that defines different basement zones.
The hard surfaces and geometric patterns help balance softer furnishing elements in mixed-style basement designs.
You can easily modify or expand the pipe arrangements as your basement use evolves over time.
Material costs range from $60-180 per pole depending on pipe materials and complexity of mounting hardware required.
This or That?
Pick your fave — see what other readers chose! 👀
Wrap Poles in Luxurious Fabric for Sophisticated Elegance

Elevate your basement’s sophistication by wrapping poles in high-quality fabric that adds texture, color, and acoustic benefits to your space.
This approach allows you to introduce rich textures and patterns that complement your basement’s furnishing and create a more finished, intentional appearance.
Choose fabrics with appropriate weight and durability for vertical installation, avoiding materials that stretch or sag over time.
Velvet, heavy cotton, linen, or upholstery-weight fabrics work best for this application and provide lasting visual appeal.
Measure your poles precisely and add extra fabric length to account for overlapping and securing at both top and bottom.
Create a padded underlayer using batting or foam padding to give the fabric wrap more substantial appearance and improved acoustic properties.
Secure the padding to the pole using spray adhesive or staples placed where the fabric will cover them completely.
Begin wrapping fabric at the bottom of the pole, pulling taut but not overly tight to avoid puckering or distortion.
Use fabric adhesive or strategically placed staples hidden within fabric folds to secure the material as you work upward.
Create neat, professional-looking seams by overlapping fabric edges and securing them with fabric-appropriate adhesive or hidden stitching.
Choose patterns and colors that complement your basement’s existing decor while adding visual interest without overwhelming the space.
Fabric wrapping provides excellent acoustic dampening properties, helping reduce echo and noise in basement entertainment areas.
You can easily change the fabric seasonally or when redecorating, making this approach more flexible than permanent solutions.
Add decorative trim, rope, or ribbon at the top and bottom of each wrapped pole for finished, custom-upholstered appearance.
This technique works beautifully in basement family rooms, home offices, or sophisticated entertainment spaces where comfort and style matter.
Protect fabric from moisture damage by applying fabric protector sprays designed for upholstery applications.
Project costs vary widely from $40-150 per pole depending on fabric choice and quality, but the customization possibilities are virtually unlimited.

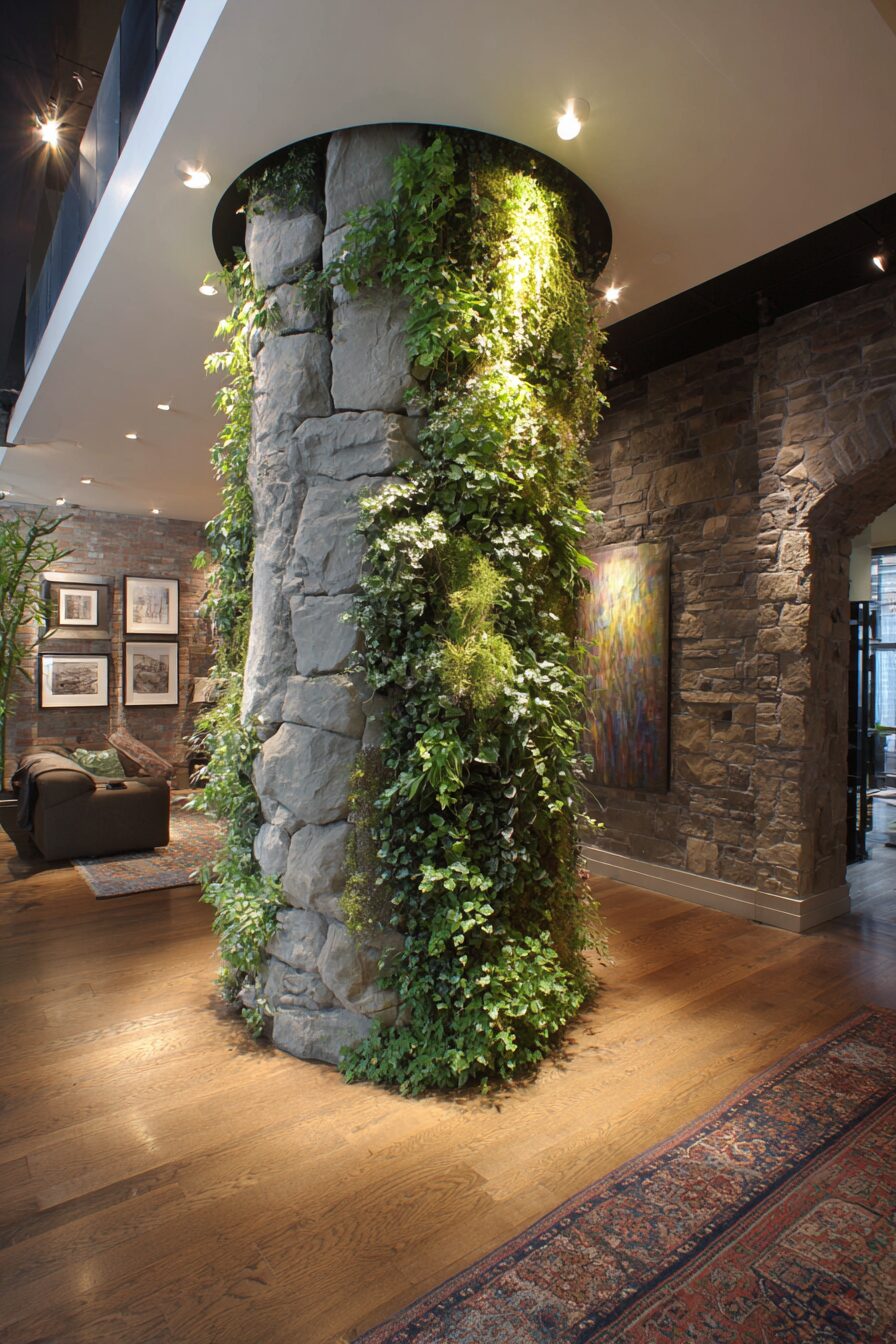
Install Climbing Plant Systems for Living Green Columns


Transform your basement poles into living pillars by installing climbing plant systems that bring natural beauty and air purification to your underground space.
This approach creates a stunning biophilic design element while improving air quality and adding a fresh, natural fragrance to your basement environment.
Choose low-light tolerant climbing plants like pothos, philodendrons, or ivy varieties that thrive in basement lighting conditions.
Install full-spectrum LED grow lights if your basement lacks adequate natural light for healthy plant growth and development.
Create a mounting system using wire mesh, trellises, or specialized plant climbing structures that attach securely to your poles.
Position drainage-equipped planters at the base of each pole to house the root systems and catch excess watering runoff.
Select planters large enough to support mature plant growth while fitting proportionally with your pole dimensions and basement ceiling height.
Install automatic drip irrigation systems or self-watering planters to maintain consistent moisture levels without daily maintenance requirements.
Train young plants to climb by gently securing growing shoots to your mounting structure using soft plant ties or clips.
As plants mature, they’ll naturally attach to climbing surfaces and create lush, green coverage that softens the industrial appearance of structural poles.
This living approach requires ongoing care but provides long-term benefits including improved air quality and natural humidity regulation.
You can vary plant types on different poles to create diverse textures and leaf patterns throughout your basement space.
Incorporate air plants or hanging varieties at different heights to create layered, forest-like vertical gardens.
The natural growth patterns ensure that each pole develops unique characteristics over time, creating one-of-a-kind design elements.
Regular pruning and maintenance keep plants healthy while allowing you to shape their growth patterns according to your aesthetic preferences.
This approach works exceptionally well in basement home offices, meditation spaces, or areas where you want to create calming, natural environments.
Initial setup costs range from $75-200 per pole including plants, mounting systems, and basic irrigation equipment, with ongoing maintenance costs for plant care.
Quick Design Dilemma
Cast your vote — see what other readers think! 🤔
Integrate Built-in Bookshelf Systems Around Poles


Create functional storage solutions by building custom bookshelf systems that incorporate your basement poles as central support elements for floor-to-ceiling storage.
This approach transforms structural necessities into integral parts of beautiful, functional storage systems that maximize your basement’s utility while adding architectural interest.
Design shelving systems that use poles as primary vertical supports, eliminating the need for additional structural elements.
Choose materials that complement your basement’s existing finishes, whether you prefer natural wood, painted MDF, or industrial metal shelving components.
Plan shelf spacing to accommodate different items – books, storage boxes, decorative objects, or basement-specific equipment and supplies.
Install adjustable shelf brackets to allow future reconfiguration as your storage needs change over time.
Create custom-fitted shelving that wraps partially or completely around each pole, maximizing available vertical storage space.
Use the pole-integrated shelving to create distinct zones in open basement areas, defining spaces for different activities or storage categories.
Incorporate lighting within the shelving system using LED strips or individual shelf lights to improve functionality and create ambient lighting effects.
Add cabinet doors to some sections to hide less attractive storage items while keeping frequently used items easily accessible on open shelves.
This approach works particularly well for basement libraries, craft rooms, workshops, or multi-purpose spaces that require substantial storage capacity.
Install pull-out drawers or rolling storage bins in lower sections for easy access to heavy or frequently used items.
Use the top shelves for seasonal or rarely accessed items, keeping everyday necessities at convenient heights.
Add decorative elements like crown molding or trim pieces to give the built-in storage system a finished, professional appearance that matches your home’s architectural style.
The integration of poles into functional storage makes them completely disappear while adding significant value to your basement space.
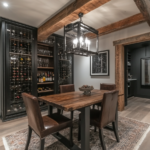
Include specialized storage features like wine racks, display areas, or equipment-specific compartments based on your basement’s primary uses.
Construction costs vary widely from $200-800 per pole depending on materials, complexity, and whether you hire professionals or complete the project yourself.
Your basement poles no longer have to be boring afterthoughts in your home design equation.
With these creative transformation ideas, you can turn those structural supports into stunning design features that guests will actually notice and admire.
Pick the approach that matches your style, budget, and basement’s purpose – your underground space will never look the same again.
💭 I Wrote a Book About My Biggest Decorating Mistakes!
When I decorated my first home, I thought I knew what I was doing. Spoiler: I didn't. 😅
💸 I bought a sofa way too big for my living room. Paint colors that looked amazing in the store but terrible on my walls.