ooking up from the four walls of a room, the ceiling awaits.
This often overlooked fifth element offers intriguing design possibilities to amplify a room’s character.
Utilizing color, texture, materials, and graphic elements overhead awakens a formerly mundane space.
Wood brings irresistible warmth and detail.
Tiles and panels add architectural interest.
Macrame and bead curtains impart breezy bohemian style.
The play of light transforms, filters and spotlights through creative mediums above.
Let your imagination ascend to the ceiling plane.
Simple planks arrange into dazzling herringbone and chevron patterns overhead.
Let get started!
💭 Ever wondered what your room would actually look like rearranged?
I built a free tool that lets you drag furniture around a 2D floor plan. No signup, no catch.
See the Room Planner →Exposed Wood Beams

Exposed wood beams are a classic way to add visual interest and character to any room.
Leaving structural beams uncovered creates an organic, natural aesthetic that feels cozy and invites the eye upward.
Exposed beams work especially well in rustic, farmhouse, or craftsman-style homes, but can add charm to modern spaces too.
When implementing exposed beams, it’s important to carefully plan their placement.
Beams running perpendicular to the length of the room will make ceilings feel higher.
Installing beams in a grid pattern feels more formal and structural.
Wide beams spaced further apart make a bolder statement than narrow beams placed close together.
Mixing beam widths and spacing creates appealing visual variety.
Exposed wood beams require special installation considerations.
Beams must be properly supported and attached at their ends to carry building loads.
Working with an experienced contractor is recommended to ensure beams are integrated into the structure correctly.
Sealing and protecting wood beams is also essential to prevent drying, cracking and rotting over time.
Using a clear sealant preserves the natural look of wood while allowing the grain and color to show through.
Tap to Explore These Beauties
See my ideas in action 👇 Tap any image to explore full details.
Wood Plank Ceiling

Installing a wood plank ceiling is an easy way to add natural, architectural interest to any room.
Unlike exposed beams, a wood plank ceiling has a smooth, cohesive look since the boards are tightly installed side-by-side.
Plank ceilings work well with many design aesthetics from modern to traditional.
Visually warm wood tones help create a welcoming, inviting atmosphere.
Choosing wider planks versus narrower boards makes a dramatic difference in the look of the ceiling.
Wider planks have a more rustic, craftsman-style appearance that pairs well with exposed beams.
More narrow boards create a cleaner, refined visual that complements contemporary spaces nicely.
Varying the stain or paint color of the boards adds extra design flair.
Contrasting dark and light woods in creative patterns makes the ceiling a true work of art.
Installing a wood plank ceiling properly requires careful planning and precision.
Ceiling planks fasten directly to ceiling joists or furring strips.
Irregular joist spacing may require shimming to support even board alignment.
Taking time to level and space boards correctly results in a flawless finished look.
Since wood moves naturally, allow slight gaps between each plank to prevent buckling or cracks.
Using quality kiln-dried woods minimizes shrinkage issues down the road.
Wood Panel or Coffered Ceiling

One elegant way to utilize wood on the ceiling is installing decorative panels or coffering.
Panels and coffers add formal architectural detail that immediately elevates a space.
This classic design works equally well in traditional dining rooms, stately libraries, and sophisticated master suites.
Wood panels or coffers bring warmth that balances the formality with functionality and livability.
Typically, decorative ceiling panels get installed in grids to create geometric shapes.
Squares and rectangles are most common, but you can also do diagonals, octagons, or diamonds.
Varying the size and placement of patterns adds visual intrigue.
For a truly ornate look, add crown molding around the perimeter to define and highlight each panel.
Coffers take the concept a step further by recessing each panel several inches deep.
This extra depth and shadow lines cast an even more dramatic, elegant effect.
Keep in mind, deeper coffers require additional framing and construction work.
Deeping coffers by just 2-4 inches keeps the process simpler while still making an impact.
Finishing the ceiling inside each coffer in a different color or material than the grids packs a punch.
Well-crafted wood panel or coffered ceilings do require expertise to install properly.
Precisely aligning multiple grids requires skill and patience.
Hiring a talented carpenter or contractor pays off when it comes to fine finished results.
But the work pays off handsomely in creating a custom ceiling that feels luxurious.
Tongue and Groove Planks

A tongue and groove wood plank ceiling uses specialty milled boards that interlock together to create a tight seam.
The protruding “tongue” on each board fits into the corresponding “groove” on adjoining boards.
When installed correctly, this system creates a smooth, even ceiling surface.
Tongue and groove planks are a smart choice for do-it-yourselfers since they easily nail directly to joists or furring strips.
The characteristic thin seam line between tongue and groove planks adds subtle visual texture and interest.
Varying the species, grade, and stain color of the wood boards enhances this effect.
Combining glossy and matte finishes on alternating boards also livens up the look.
For those seeking a bolder touch, painting the groove portion in a contrasting color before installation underscores the dynamic line shadows.
Tongue and groove ceilings work in any interior but the linear design feels particularly suited to modern spaces.
The crisp, clean lines and slightly industrial vibe pairs well with contemporary trends.
Wider planks result in fewer seams for a more streamlined look.
Narrower boards increase linear contrast, ideal in sleek, urban rooms.
With the right wood species and finish, tongue and groove ceilings also adapt nicely to traditional environments.
Installing tongue and groove ceilings requires carefully aligning boards and precisely nailing into joists.
Allowing adequate expansion space at walls and ends prevents possible buckling.
Using a pneumatic nail gun simplifies the process greatly.
With some basic carpentry skills and patience, a tongue and groove ceiling can be a relatively easy DIY project.
Find Your Room’s Color Palette
Tap a vibe — get a curated 5-color palette with hex codes you can copy ✨

💭 I Wrote a Book About My Biggest Decorating Mistakes!
When I decorated my first home, I thought I knew what I was doing. Spoiler: I didn’t. 😅
💸 I bought a sofa way too big for my living room. Paint colors that looked amazing in the store but terrible on my walls.
Wood Slat Ceiling


Wood slat ceilings add visual texture and dimension using simple, narrow strips of wood.
The thin, repetitive slats create pattern and shadows that draw the eye upward.
Wood slat ceilings work in casual settings like covered porches, patios, and pergolas.
But they also pair nicely with modern or industrial interiors.
The linear look works well in rooms with high ceilings since the vertical lines elongate the space even further.
Varying the width and spacing of ceiling slats creates different visual effects.
Wider slats placed close together result in a cleaner, smoother look with fewer lines.
Narrow slats spaced further apart increase contrast and shadows for more texture.
Mixing up slat sizes and direction adds architectural interest.
Curve slats in waves or concentric circles to reflect an organic sensibility.
To install a wood slat ceiling, furring strips get securely attached to the structural ceiling first.
Wood slats then nail across perpendicular to the furring strips.
Using pressure-treated pine boards ensures durability in bathrooms or outdoor settings.
Cedar, redwood, and Douglas fir also resist moisture well.
Apply a protectant finish to ward off discoloration and rotting.
Pulling selection of wood types adds natural visual variety to the slats.
Wood slat ceilings create intriguing visual rhythm and depth while remaining budget-friendly.
Compared to more labor-intensive wood treatments, slats are relatively easy for DIY installation.
The repetitive slat pattern also allows you to space out work over time if needed.
Let your creativity run wild in designing a custom slat look.
Wood Strips or Battens

Taking wood slat ceilings one step further, installing wood strips or battens creates bolder definition and shadow lines.
Wood strips are wider than slats and spaced further apart.
The result is a dynamic ceiling surface with great depth and character.
Battens add even more heft, utilizing wide planks up to 6-8 inches across.
Battens make a especially dramatic statement when alternated with recessed panels.
Wood strips and battens work well in any room with sufficient ceiling height.
The strong lines elongate a space visually to feel airy and open.
Wood strip ceilings complement many design styles from beachy to modern.
Battens lend themselves nicely to the industrial or craftsman aesthetic.
Creative patterns like herringbone or chevron outlines add interest to the batten shape and placement.

Installing wood strips or battens takes a bit more effort and carpentry skills than a simple slat ceiling.
First, furring strips get securely mounted to the structural ceiling.
Wood strips or battens then nail across to the furring strips.
Take care to accurately space and level strips for the desired effect.
In rooms with shorter ceilings, consider running strips vertically instead of horizontally to avoid an overly heavy feel.
Alternating wood stain colors increases the dynamic interplay of light and shadows.
Combining glossy and matte finishes adds extra visual punch.
For a more layered, bespoke look, distress or hand-scrape the wood strips before installation.
Any imperfections in the wood grain and surface appear intentional.
Wood strips or battens undeniably make a statement and create an architectural focal point overhead.
Herringbone Pattern

The classic herringbone pattern makes a fun statement on both walls and ceilings.
The zigzag design feels visually playful and energetic in any room.
Teak, oak, ash, or walnut all create beautiful herringbone interest overhead.
Mixing in contrasting wood tones highlights the dynamic shape even more.
Consider painting or staining the zigzags in bold, dark hues against a light ceiling for maximum drama.
Unlike typical linear wood applications, herringbone patterns take more planning and effort to install.
Each piece must be carefully measured and cut to fit together at precise angles.
Working with an experienced carpenter is highly recommended to ensure proper installation.
Using thicker 1×4 or 1×6 boards provides needed stability and minimizes sagging or gapping issues down the road.
Ceiling height plays an important role in selecting your herringbone scale.
For standard 8 foot ceilings, a smaller zigzag with boards 3-4 inches wide keeps the pattern feeling proportional.
On higher cathedral ceilings, go bold with wider 6-8 inch boards to balance the additional overhead space.
Incorporate herringbone into a larger coffered grid for extra visual impact.
The active energy of herringbone adds great visual interest compared to traditional linear wood layouts.
Its playful geometry incites creativity and conversation.
Herringbone patterns date back centuries but feel entirely fresh and current today.
The whimsical zigzags cast mesmerizing shadows in ever-changing light.
There’s motion in the angled pattern, giving rooms an energy boost.
What’s Your Decor Personality?
5 questions · 30 seconds · Instant style match 🏡
Chevron Pattern
![]()
Chevron patterns add bold style to any ceiling.
The classic zigzag design packs visual punch and strong graphic appeal.
For seriously dramatic impact, paint the chevron stripes in high contrast colors against a lighter ceiling.
Black and white delivers classic sophistication.
Deep blues or greens play well in more colorful, eclectic spaces.
All types of wood from oak to maple can be configured in a chevron design.
For wider chevrons, 1×4 or 1×6 boards provide needed stability at the angle points.
Narrower chevrons may only require 1×2 or 1x3s.
Mixing woods with contrasting stains or paint colors helps each zigzag stand out crisply.
Consider glossy and matte finishes on alternating stripes to catch the light.
Proper ceiling height and angle measurements ensure your chevrons align correctly.
Centering the point of the chevron on the midline of the ceiling creates visual symmetry.
Zigzags across the entire ceiling deliver major impact.
For a subtler take, apply chevrons within a large bordered rectangle or octagon inset.
Limiting chevrons over just part of the ceiling balances the strong lines nicely.
The bold energy of chevron ceilings complements many design styles from modern to rustic farmhouse.
Chevrons add movement and feel more casual than formal herringbone patterns.
They work especially well in contemporary rooms as an edgy but elegant focal point.
Paint color choices provide endless options to complement your existing furnishings and finishes.
Make a strong geometric statement overhead.
Beadboard Panels

Beadboard ceilings provide charming cottage style in a snap.
The classic tongue and groove boards with subtly rounded edges instantly create vintage farmhouse character.
Visually, beadboard offers softened texture compared to flat planks.
The thin, repetitive beadlines cast pretty shadows and add architectural interest overhead.
Painted beadboard ceilings keep the country charm flowing in crisp white or light blue hues.
Play up the cottage vibe even further by adding accent colors on the end boards or borders for a personalized touch.
For a more sophisticated look, stain the breadboard in richer wood tones like walnut or ebony.
Darker colors provide beautiful contrast on higher ceilings.
Installing beadboard properly requires careful prep and precision.
Only use boards designed and milled specifically for ceilings to handle structural stresses.
Nailing boards perpendicular to ceiling joists every 12-16 inches provides adequate support.
Filling nail holes and caulking board seams finishes off the smooth surface.
New PVC and polyurethane synthetic beadboards offer increased durability and moisture resistance while still mimicking the classic look.
This makes them ideal for bathrooms, kitchens, and laundry rooms prone to humidity issues.
Synthetics are also paintable and stainable just like real wood.
Easier maintenance makes them smart choices for busy families.
In just a day or two, you can easily update basic ceilings with charming beadboard character.
The affordable boards install using many of the same techniques as drywall.
With quality installation, beadboard elegantly upgrades ceilings for generations by providing vintage architectural details that never go out of style.
Tin Ceiling Tiles

For uniquely vintage architectural flair, install a decorative tin ceiling.
Tin ceiling tiles have experienced a major resurgence in popularity for their iconic decorative charm and durability.
Intricate stamped patterns like flowers, fleur-de-lis, or geometric designs create visual intrigue overhead.
The embossed texture and brushed metallic sheen cast reflections and shadows for added depth.
Tin ceiling tiles come in a variety of finishes from bright glossy silver to subdued copper, bronze and gold patinas.
Matching metallic wall tiles allow you to expand the antique tin theme throughout a room.
For seriously dramatic contrast, paint ceiling tiles in matte black or deep navy while leaving embossed details shiny.
Contemporary spaces can lean modern by opting for streamlined tin tiles with simpler texture.
Unlike ornate hand-crafted antique tin work, today’s tin ceiling tiles utilize recycled content and convenient drop-in installation.
Durable steel gets coated in tin then stamped with various patterns.
For easy DIY, tiles come in 2×2 foot sections that drop into a suspended grid framework similar to installing a drop ceiling.
This allows easy access to mechanicals and wiring above the tiles if needed.
Strong magnetic tiles are also available for direct application to smooth drywall ceilings.
From Victorian era architecture to trendy cafes, decorative tin ceilings supply timeless throwback style.
The whimsical patterns and luminous sheen enliven any space in an entirely unique, artisanal way.
Tin tiles lend industrial spaces a refined polish while providing an eclectic focal point in traditional interiors.
This or That?
Pick your fave — see what other readers chose! 👀
💭 I Wrote a Book About My Biggest Decorating Mistakes!
When I decorated my first home, I thought I knew what I was doing. Spoiler: I didn’t. 😅
💸 I bought a sofa way too big for my living room. Paint colors that looked amazing in the store but terrible on my walls.
Hand-Painted Medallion


Make your ceiling a stunning work of art by installing a custom hand-painted medallion.
Skilled artisans beautifully render decorative center medallions in your choice of motifs and designs.
Floral medallions with intricate vines, leaves, and blossoms bring dramatic natural flair overhead.
For romantically ornate spaces, choose patterns of lattice, scrolling, columns and arches.
Recreate favorite antique or historical medallion details to evoke a room’s unique architectural origins.
Hand-painted medallions allow for fully customizable sizes from 2 to 6 feet in diameter to suit your room’s proportions.
While historically done in oil paints, many artisans now use high quality acrylics for easier cleaning and maintenance.
Neutral medallion bases painted in delicate grays and ivories suit a wide range of decors.
For a pop of color, boldly paint or gild accent portions of the design in tones like azure, crimson or emerald.
Meticulously designed and painted by hand, medallions exhibit gorgeous depth and dimension.
Each artist must adeptly render fine details at a wide range of scales.
Expect an ornate medallion to involve at minimum 2-3 weeks of painstaking brushwork.
The labor of love results in a spectacular, one-of-a-kind sculpture for your ceiling.
Artfully drawing the eye upward, a medallion provides an elegant focal point and conversational showpiece.
Centuries-old painted medallions still adorn fine buildings and palaces across Europe.
Carry on the tradition by commissioning your own custom art piece reflecting your cherished style.
An heirloom-quality hand-painted medallion graces your space with timeless artistic beauty.
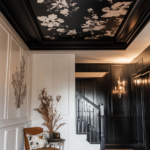
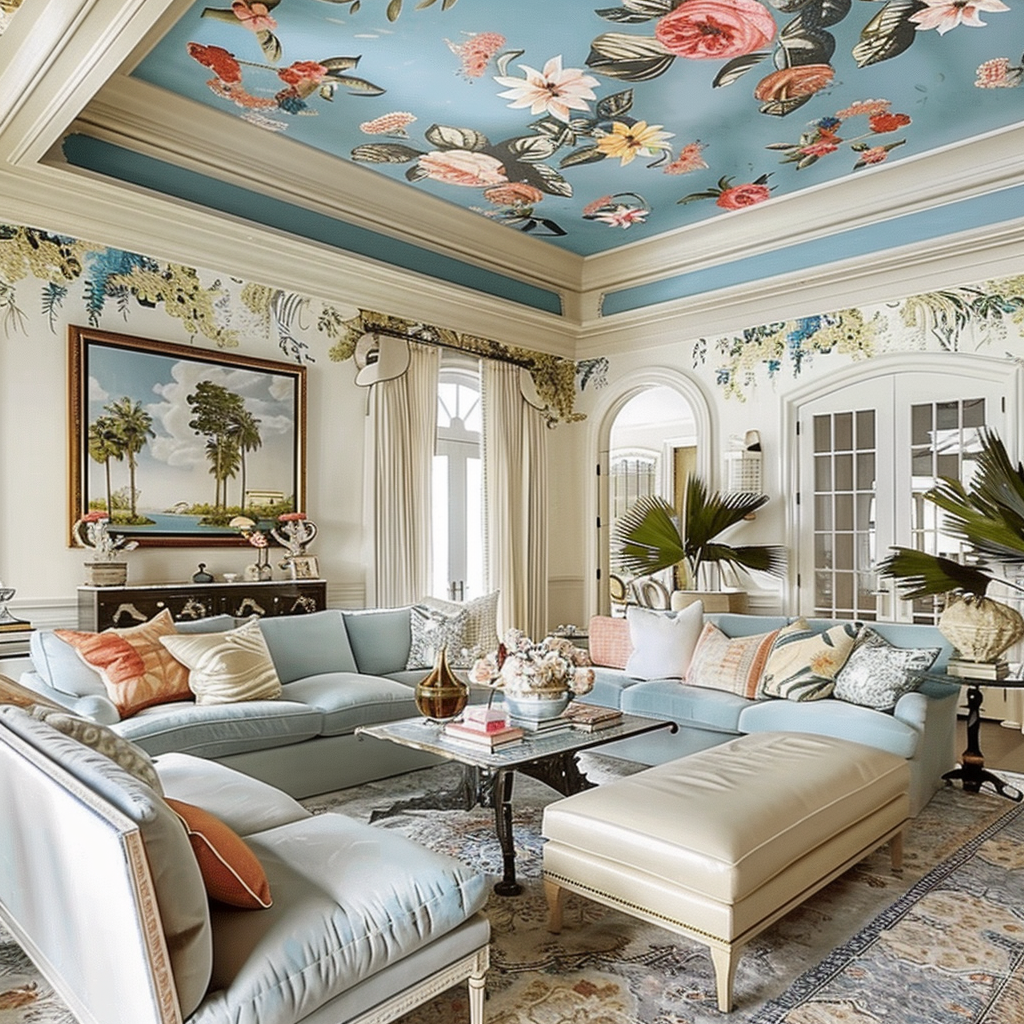
Wallpapered Ceiling


For serious wow-factor overhead, install wallpaper on your ceiling.
Any wallpaper pattern imaginable adapts beautifully to ceilings, from traditional damasks and Toiles to vivid florals and dynamic geometrics.
Covering the entire ceiling in wallpaper makes a bold statement.
For lighter impact, wallpaper just the center panel or borders around a central medallion.
Many posh hotels and restaurants introduce wallpapered ceilings as a striking surprise design detail.
Choose papers with metallic inks, pearlescent finishes, or colorful accents to catch the light overhead.
Installing wallpaper horizontally versus vertically on ceilings creates different effects.
Horizontal aligns many standard roll patterns nicely.
But vertical application makes a bolder graphic statement.
Wallpaper choices today offer nearly endless possibilities.
Select durable vinyls or acrylic-coated papers made specifically for high-moisture areas like bathrooms.
Make sure wallpaper adhesive fully seals seams to prevent peeling or bubbling down the road.
Avoid delicate hand-painted papers or fabrics lacking water-resistance.
Professional installation guarantees the best looking results since ceilings come with unique challenges.
Hiring experienced paperhangers ensures ceiling papers align perfectly across cut seams and edges.
The installer also works cleanly around lighting fixtures and heating vents to maintain a smooth cohesive application.
With the right paper and proper installation, a stunning wallpapered ceiling imparts showstopping elegance overhead.
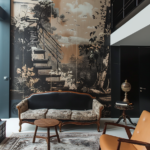
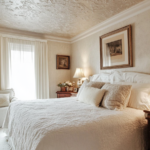
Faux Finishes

Take your ceiling to the next level by applying gorgeous faux finishes.
From clouded skies to elaborately painted medieval wood, faux finishing recreates the beauty of ornamental ceilings right on your own drywall.
Hiring a professional muralist or decorative painter brings skilled artistry and technical prowess to execute the work properly.
Faux finishes require multiple layers, specialty tools, and careful blending to mimic authentic textures and depth effectively.
One go-to faux treatment for ceilings is antique plaster washes.
The translucent layered glazes of umber, raw sienna, and terra cotta resemble timeworn Venetian plaster.
For a weathered look, apply cracking and peeling effects over wood graining.
Metallic paints add Old World brilliance and reflectivity overhead.
Trompe l’oeil painting creates startlingly realistic visuals like drifting clouds or open sky.
Durability does require some maintenance considerations.
Top coat faux finishes in matte polyurethane sealants to minimize scuffing or yellowing.
Avoid excessive moisture which may disrupt paint adhesion.
But the elegance and unmatched artistry faux finishes contribute to your space make them worthwhile.
A skillfully rendered faux ceiling feels transportive, elevating the entire room experience.
Faux finishing possibilities stay limited only by imagination.
Your unique decorative vision comes to life on the ceiling as a magnificent mural or ornately textured canvas.
Faux transformed ceilings become an artistic jewel box enclosing the room in beauty.
Surprise and delight guests when they lay eyes on your striking masterpiece overhead.
Quick Design Dilemma
Cast your vote — see what other readers think! 🤔
Suspended Bead Curtain

For carefree bohemian style, install a suspended wood bead curtain on your ceiling.
Also called bamboo or stick curtains, bead curtains use small wooden dowels loosely strung together to form a playful hanging partition.
The organic look relaxes any space with easy, breezy charm.
Wood lends natural warmth overhead and allows filtered, dappled light through.
Shake the dangling beads and enjoy the lively sound.
Bamboo bead curtains work anywhere you want to softly divide a space while maintaining an open, casual feel.
Use over a library reading nook or kitchen banquette to define those special corners.
Place at the ceiling line of an open walkway to transition between rooms.
Cafe-style curtains installed floor to ceiling also serve as intriguing room dividers.
For outdoors, bead curtains make breezy porch or gazebo partitions.
Hand-stringing bead curtain dowels takes patience and skill.
Purchase readymade bamboo bead curtain panels to bypass the labor while still enjoying the handcrafted look.
Select medium or wide width dowels over thin versions for stability and architectural presence.
Mix up wood tones and shapes for visual interest.
Draw eyes upward by alternating convex and cylindrical beads.
A wood bead curtain at the ceiling imparts natural texture, filtering the light beautifully.
The gentle clacking and wooshing sounds add soothing acoustics to any room.
Keep ceilings feeling open and airy by letting your bead curtain sway loosely.
Welcome an effortlessly playful vibe overhead.
Macrame Hanging

Macrame hangings offer a quintessential bohemian vibe on ceilings.
Visually soft and textural, the colorful knotted weavings feel light and casual overhead.
Cotton or hemp are the classic fibers used for macrame.
For outdoor use, nylon cord lasts better in sun and rain.
Thicker rope choices lend greater visual presence befitting larger rooms.
Add whimsical interest by alternating sizes and textures of cording.
Create dynamic scalloped edges with rope fringe.
Incorporating beads or small shells adds artisanal embellishment.
Hang macrame panels solo over seating nooks or group multiples together in a bold ceiling installation.
For breezy overhead impact outdoors, suspend macrame between structural beams of a covered patio or awning.
Keep the mood relaxed by allowing the knotted fabric to flow and drape freely.
Hanging macrame requires securely mounting durable hooks or rods into ceiling structural supports.
Use strong metal wire or turned wood rods to prevent visible sagging over time.
Since macrame has an open, porous weave, regularly lightly dusting or vacuuming keeps it clean.
Avoid over-handling or pulling macrame taut, which can loosen knots.
Celebrate the handworked imperfections for casual artistry.
Bohemian macrame brings free-spirited style overhead.
Blended colors like indigo, crimson and saffron create a global Bazarr aesthetic.
Neutral natural jutes and hemps exude breezy sophistication.
The dynamic draping textures feel energizing yet soothing.
Macrame hangings overhead lend an artful handcrafted accent while diffusing light elegantly.
Welcome their laidback chic charm.
In summary, the ceiling offers intriguing design potential to add character and style to your home.
Patterns like chevron and herringbone enliven the ceiling with bold energy and geometric impact.
For fun and relaxed style, install bamboo bead curtains or breezy macramé panels to softly filter the light.
With so many ways to utilize wood, color, texture and materials, your imagination is truly the only limit in designing a ceiling that awakens and delights.