
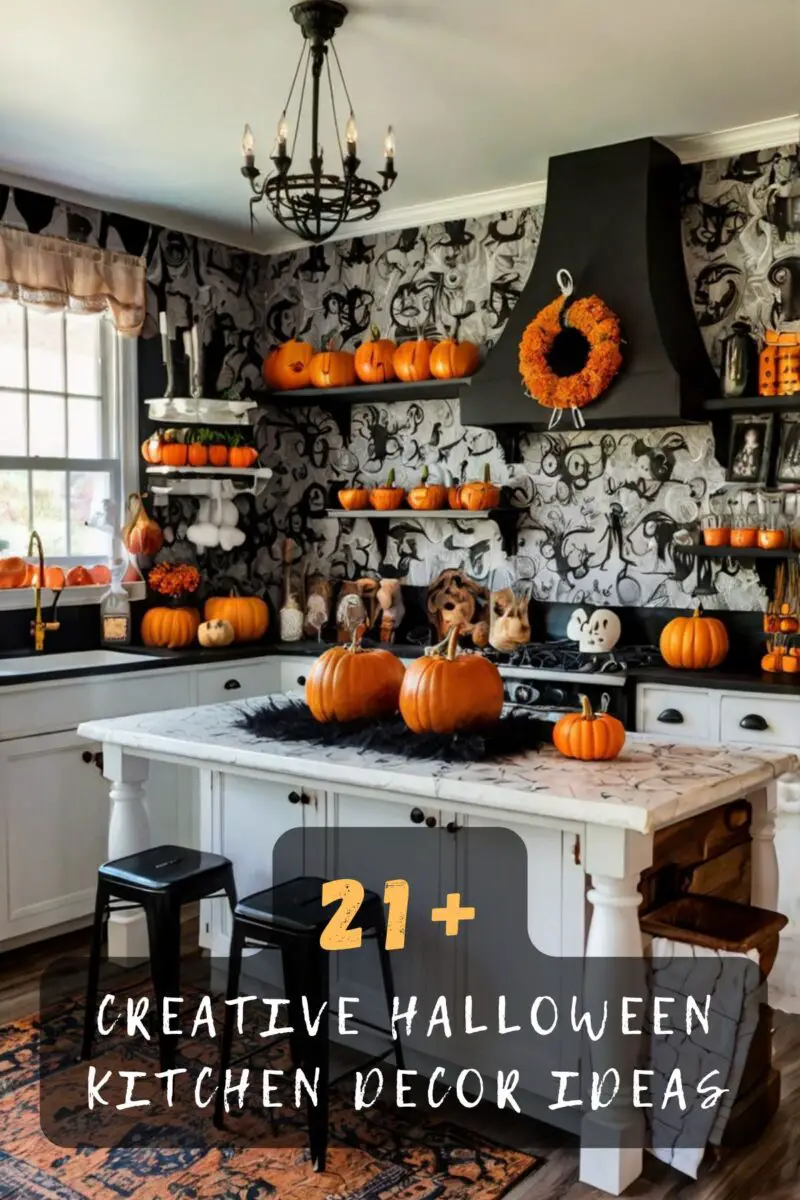
Your kitchen doesn’t have to miss out on the Halloween fun just because it’s where you cook your meals.
With a few creative touches and some spooky imagination, you can turn your culinary space into the most bewitching room in your house this October.
Love This Post? You’ll Love My Book!
I wasted THOUSANDS on decorating mistakes you can EASILY AVOID. ✨ My book shares every lesson I learned the hard way—so you can create a home you LOVE without the costly trial and error. 🏡
Get the Book NowSpooky Spice Jar Makeovers
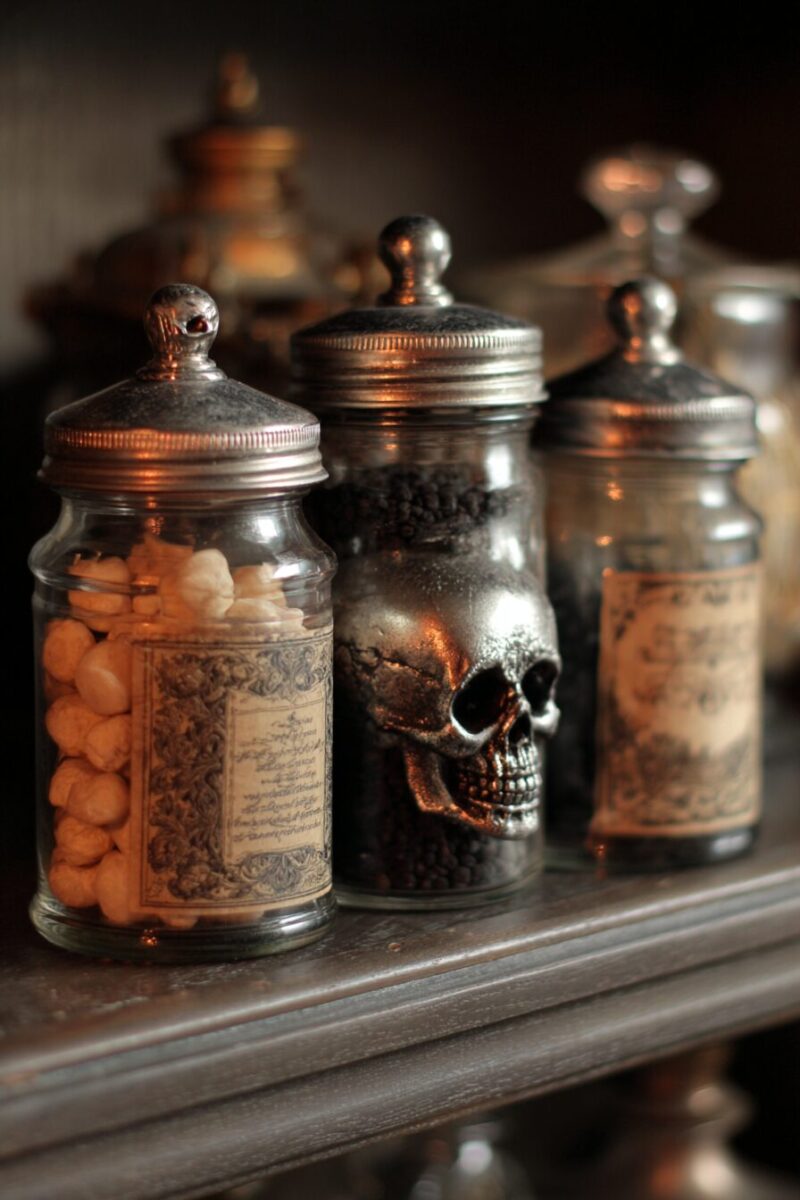
Your spice rack is about to become the star of your Halloween kitchen transformation.
Start by removing all the labels from your existing spice jars and replacing them with custom Halloween-themed labels that’ll make your guests do a double-take.
Create labels with names like “Graveyard Dirt” for black pepper, “Dragon’s Blood” for paprika, and “Witch’s Hair” for dried herbs.
You can design these labels using free online templates or craft them by hand with aged-looking paper and spooky fonts.
Take your spice jar makeover to the next level by adding colored food coloring to clear spices like salt and garlic powder.
A few drops of green food coloring can transform regular salt into “Zombie Dust,” while red coloring turns garlic powder into “Vampire Ash.”
Don’t forget to add some theatrical elements to your spice display area.
Drape fake spider webs around the spice rack and tuck small plastic spiders between the jars for an authentic creepy-crawly effect.
You can also add battery-operated LED tea lights in orange or purple hues underneath clear glass shelves to create an eerie glow that illuminates your potion collection.
For an extra touch of authenticity, include a few empty antique-looking bottles filled with colored water and cork stoppers.
Label these with names like “Moonbeam Essence” or “Phantom Tears” and position them prominently among your regular spices.
This transformation costs almost nothing but creates maximum impact, turning your everyday cooking essentials into a witch’s apothecary that’ll have everyone asking about your secret ingredients.
💭 I Wrote a Book About My BIGGEST Decorating Mistakes!
When I decorated my first home, I thought I knew what I was doing. Spoiler alert: I DIDN’T. 😅
💸 I bought a sofa that was WAY TOO BIG for my living room. I chose paint colors that looked amazing in the store but terrible on my walls. I spent THOUSANDS on pieces that didn’t work together. Sound familiar?
“Things I Wish I Knew Before I Decorated My First Home” is your shortcut to avoiding ALL my costly mistakes. ✨ Inside, you’ll find practical, NO-NONSENSE advice that will save you time, money, and a whole lot of decorating regret. 🏡
🎯 Grab Your Copy Now!Haunted Hanging Herb Garden
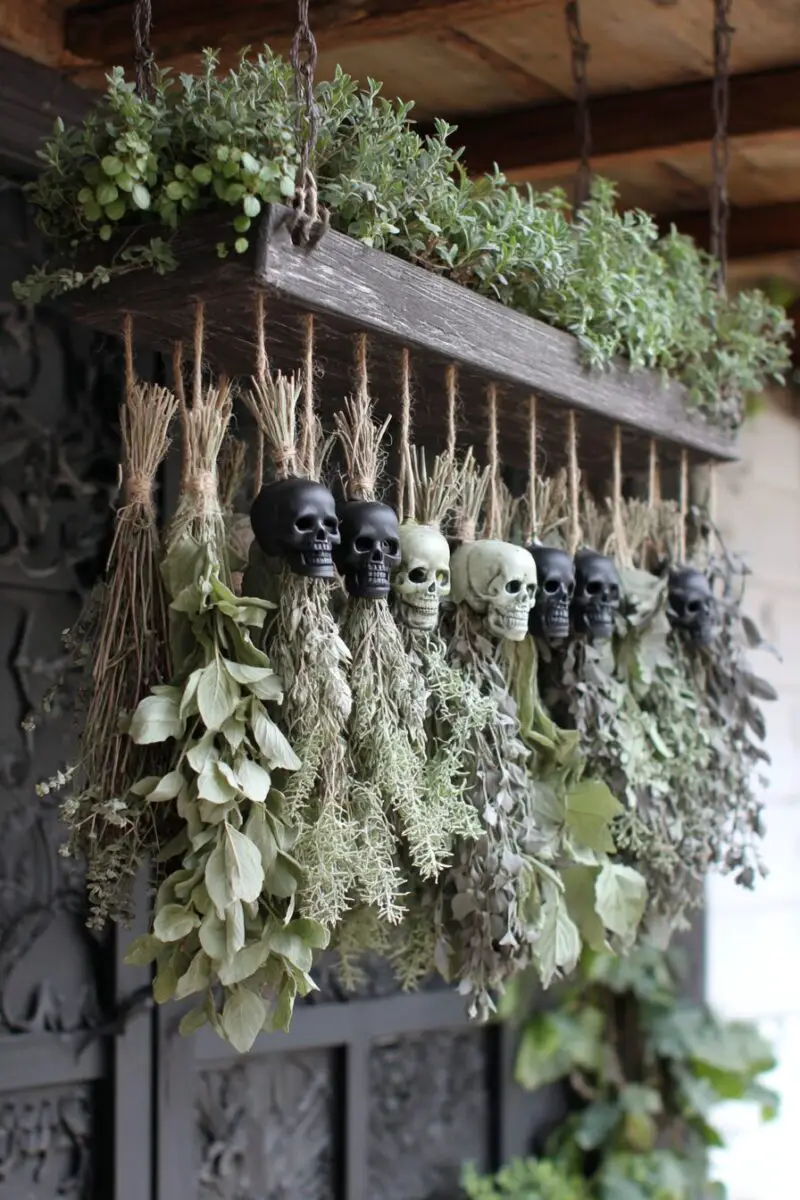
Fresh herbs take on a whole new personality when you give them a spooky Halloween makeover.
Transform your windowsill herb garden into a hanging display that looks like it belongs in a witch’s cottage deep in the woods.
Start by selecting herbs that naturally fit the Halloween theme – think dark purple basil, silvery sage, and trailing rosemary that resembles tiny pine trees.
Replace your regular planters with weathered-looking containers that tell a story.
Old tin cans painted with chalkboard paint work perfectly, especially when you add handwritten labels in white chalk with gothic lettering.
Mason jars wrapped in burlap and tied with twine create that rustic, farmhouse-meets-haunted-house vibe that’s perfect for Halloween.
Hang these containers at varying heights using thick rope or rusty-looking chains to create visual interest and movement.
The key is making everything look slightly aged and mysterious, as if these herbs have been growing in this enchanted kitchen for centuries.
Add some non-edible elements to enhance the spooky factor without compromising your actual herbs.
Tuck small skeleton hands emerging from the soil, or add tiny tombstone plant markers that you can make from cardboard and paint.
Battery-operated string lights in deep orange or purple can be woven through the hanging garden to create an otherworldly glow.
Don’t forget to include some trailing plants like pothos or ivy to create that overgrown, abandoned greenhouse effect.
These plants don’t need to be herbs – they’re purely for atmosphere and can be positioned to drape dramatically around your herb collection.
The beauty of this project is that you’re creating functional decor that serves double duty, providing fresh herbs for your cooking while delivering serious Halloween atmosphere that’ll impress every guest who enters your kitchen.
Design Your Dream Room in Minutes! – By Madison
🏡 Start Creating FREE →Gothic Candelabra Centerpieces
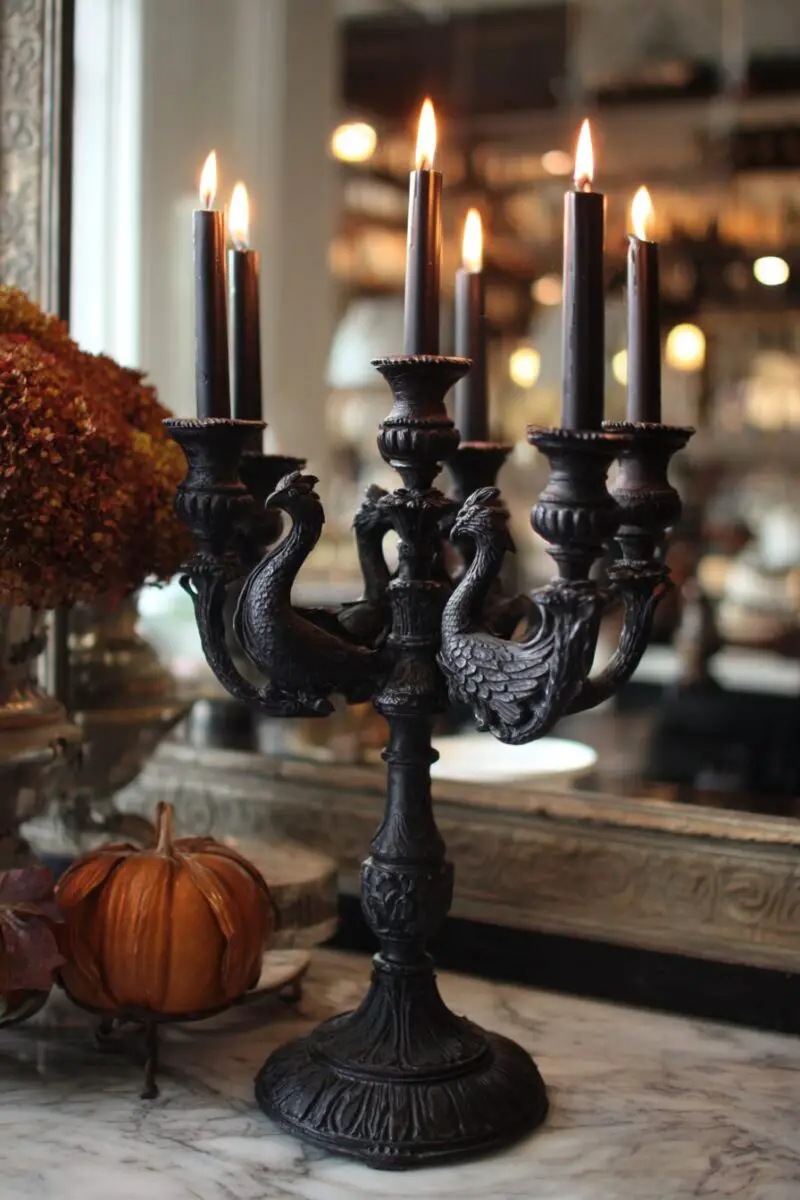
Nothing says Halloween elegance quite like flickering candlelight casting dancing shadows across your kitchen surfaces.
Create dramatic focal points throughout your kitchen using candelabras that range from thrift store finds to DIY masterpieces you craft yourself.
Hunt through second-hand shops and estate sales for brass or iron candelabras in various sizes – the more tarnished and weathered they look, the better they’ll fit your Halloween aesthetic.
If you can’t find authentic vintage pieces, you can easily age new candelabras using black spray paint and dry brushing techniques with metallic colors.
Position these candelabras strategically throughout your kitchen – on your island, countertops, and even on top of your refrigerator if space allows.
Mix different heights and styles to create visual drama that draws the eye around the room.
Choose candles that enhance the spooky atmosphere you’re creating.
Black candles are obvious choices, but deep burgundy, dark purple, and blood red candles can be equally effective and slightly more unexpected.
Drip wax candles add authentic gothic charm, and you can create the dripped wax effect yourself by lighting white candles and allowing the wax to drip down colored candles beneath.
Safety should always be your top priority when working with open flames in a kitchen environment.
Never leave burning candles unattended, and make sure they’re positioned away from curtains, paper towels, and other flammable materials.
For busy cooking areas, LED candles that flicker realistically can provide the same atmospheric effect without the fire hazard.
Enhance your candelabra displays with complementary elements that amplify the gothic mood.
Drape artificial spider webs lightly around the base of each candelabra, being careful not to let them get too close to actual flames.
Add small decorative elements like miniature skulls, ravens, or antique keys scattered around the base to complete the mysterious, old-world atmosphere that makes your kitchen feel like it’s part of a haunted mansion.
Love This Post? You’ll Love My Book!
I wasted THOUSANDS on decorating mistakes you can EASILY AVOID. ✨ My book shares every lesson I learned the hard way—so you can create a home you LOVE without the costly trial and error. 🏡
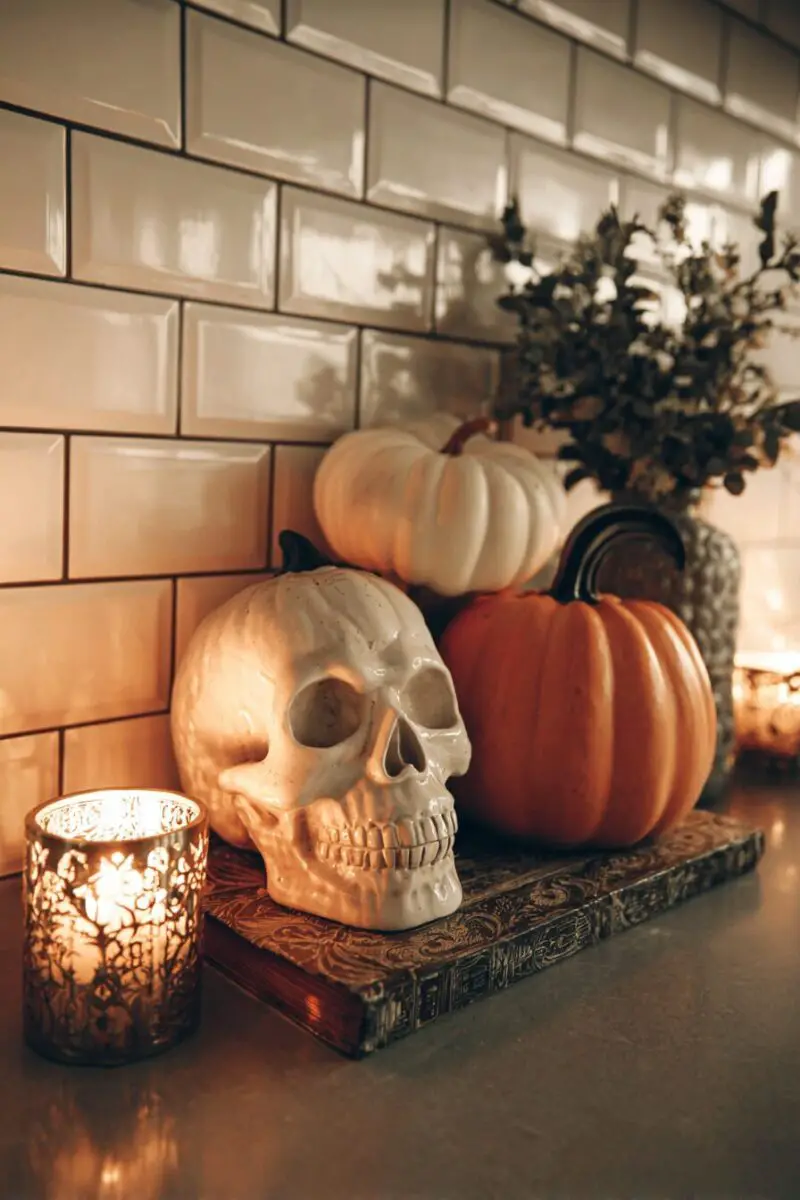
Get the Book NowPumpkin-Themed Dishware Display
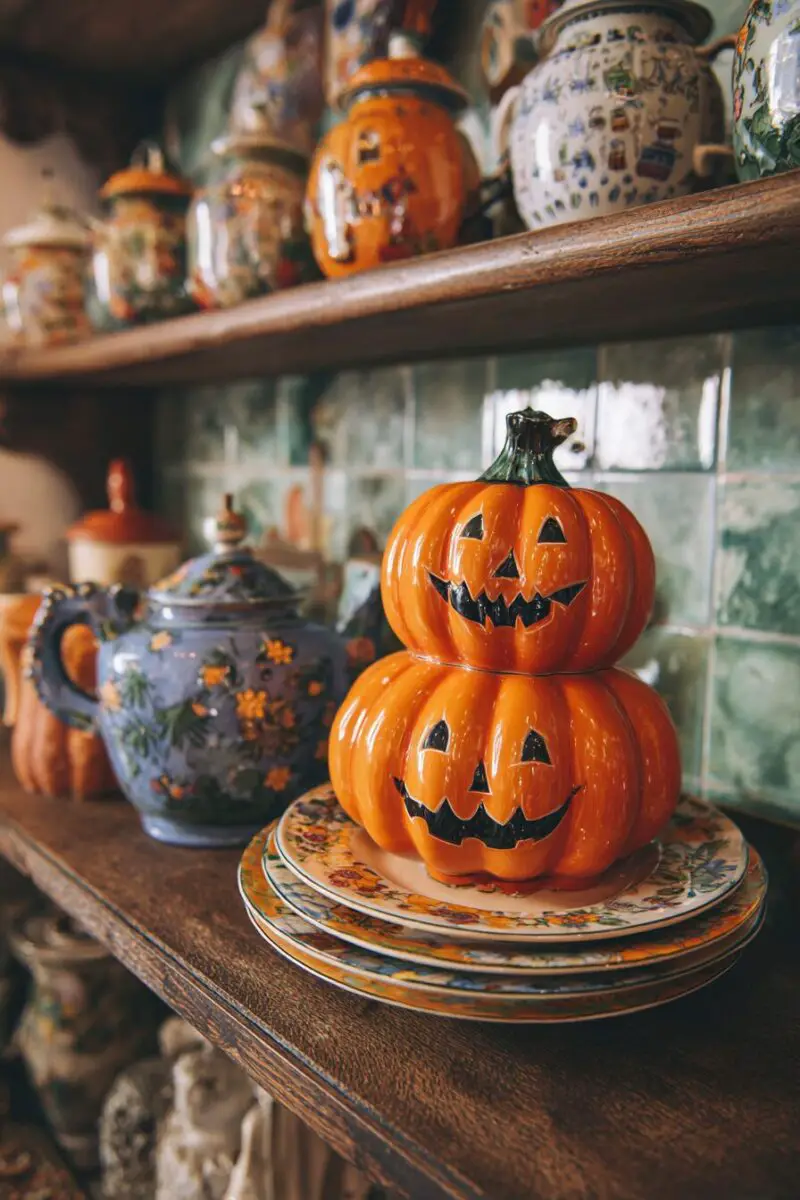
Your everyday dishes can take a backseat this October while you showcase a complete pumpkin-themed table setting that celebrates the season.
Start by collecting orange and black dishes from various sources – you don’t need matching sets, as mismatched pieces often create more visual interest and authentic vintage charm.
Thrift stores, discount retailers, and even dollar stores carry Halloween-themed plates, bowls, and mugs that can anchor your seasonal display.
Create a dramatic showcase by clearing out a prominent display area in your kitchen, such as open shelving, a hutch, or even your kitchen island.
Arrange your pumpkin-themed dishware in layers, with larger serving pieces in the back and smaller items like mugs and bowls in front.
Mix in actual mini pumpkins and gourds between the dishes to blur the line between functional items and decorative elements.
Don’t limit yourself to traditional orange pumpkins – white, green, and even blue pumpkins can add sophisticated color variation to your display.
Take your pumpkin theme beyond just orange dishes by incorporating pieces with pumpkin motifs, autumn leaves, or harvest designs.
Vintage Pyrex bowls in autumn colors, ceramic pumpkin-shaped serving bowls, and mugs with fall sayings all contribute to the seasonal story you’re telling.
Layer different textures and materials to keep the display from looking flat – mix ceramic pieces with wooden serving boards, metal serving trays, and woven placemats in autumnal colors.
Add height variation to your display using cake stands, small boxes covered with seasonal fabric, or stacks of autumn-themed cookbooks.
This creates visual depth and allows you to showcase more pieces in the same amount of space.
Incorporate lighting elements to make your pumpkin dishware collection truly shine.
Battery-operated LED strip lights tucked behind dishes can create a warm glow that highlights your collection, while small spotlights can dramatically illuminate focal pieces.
String lights in warm white or orange hues can be woven throughout the display to add sparkle and movement.
Complete your pumpkin-themed display with complementary accessories like autumn-colored cloth napkins, wooden serving utensils, and small chalkboard signs describing special pieces or sharing seasonal recipes that use your beautiful pumpkin dishware.
💭 I Wrote a Book About My BIGGEST Decorating Mistakes!
When I decorated my first home, I thought I knew what I was doing. Spoiler alert: I DIDN’T. 😅
💸 I bought a sofa that was WAY TOO BIG for my living room. I chose paint colors that looked amazing in the store but terrible on my walls. I spent THOUSANDS on pieces that didn’t work together. Sound familiar?
“Things I Wish I Knew Before I Decorated My First Home” is your shortcut to avoiding ALL my costly mistakes. ✨ Inside, you’ll find practical, NO-NONSENSE advice that will save you time, money, and a whole lot of decorating regret. 🏡
🎯 Grab Your Copy Now!Creepy Crawly Cabinet Hardware
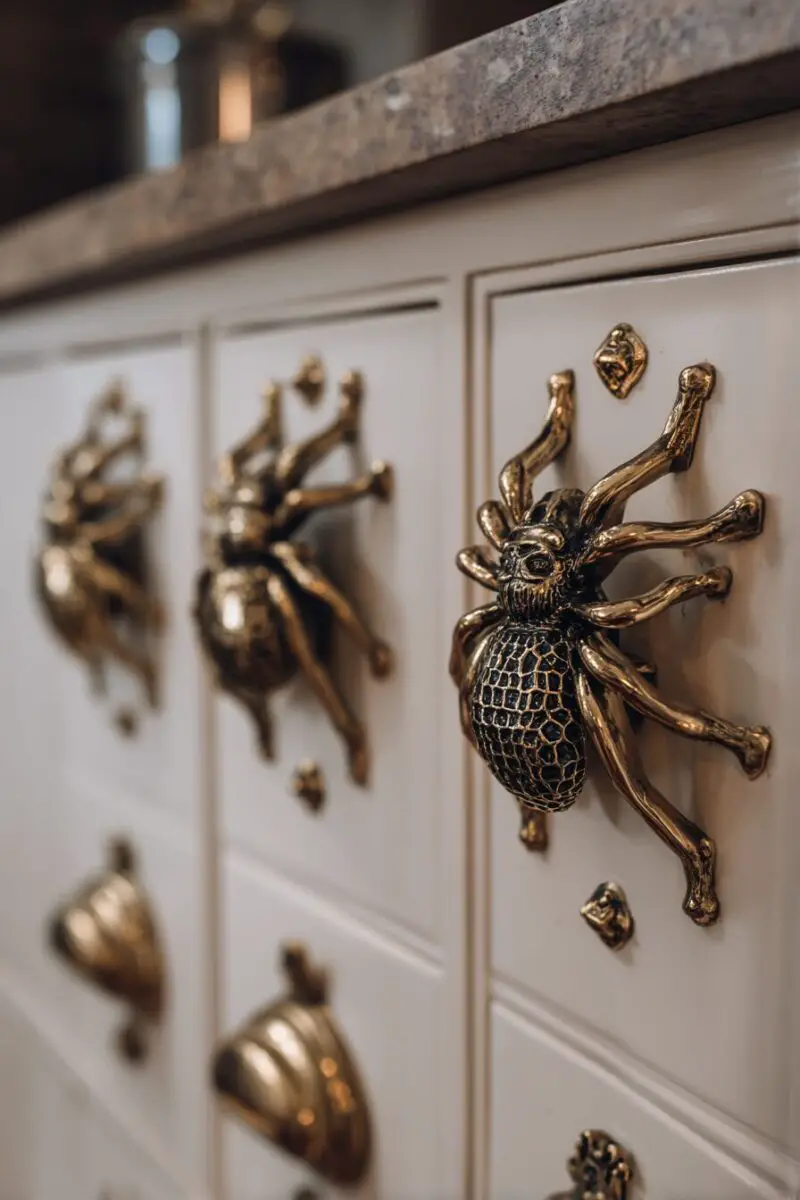
Your cabinet handles and drawer pulls present an often-overlooked opportunity to inject serious Halloween personality into your kitchen.
Swapping out your regular hardware for spooky alternatives is a temporary change that delivers maximum visual impact with minimal effort and expense.
Start by measuring your existing hardware to ensure you buy replacement pieces that will fit the existing holes in your cabinets and drawers.
Look for Halloween-themed cabinet pulls shaped like skeleton hands, spider legs, twisted branches, or gothic designs that match your overall Halloween aesthetic.
Many hardware stores carry seasonal options during October, but online retailers offer year-round selections with more unique and detailed designs.
If you can’t find pre-made spooky hardware that fits your measurements, you can easily transform existing pulls using spray paint and creative additions.
Black spray paint can instantly age and darken brass or chrome hardware, while metallic paints in copper or bronze can create an antique, weathered look.
Wrap thin wire around handles to create a twisted, thorny appearance, or attach small plastic spiders or bats using strong adhesive.
Hot glue small skeleton hands to point from cabinet handles, creating the illusion that something is trying to escape from inside your cabinets.
Focus your hardware transformation on the most visible cabinets and drawers – you don’t need to change every single piece to create the desired effect.
Upper cabinets at eye level and drawers near your main prep areas will have the most visual impact and give you the biggest bang for your decorating buck.
Create a cohesive look by choosing a consistent theme for your hardware transformation.
If you go with a spider theme, carry it throughout all your replaced hardware rather than mixing spiders with skeletons and bats.
This consistency helps your kitchen feel intentionally decorated rather than randomly spooky.
Don’t forget about other hardware elements in your kitchen that can be temporarily transformed.
Cabinet hinges can be painted black for a more dramatic look, and you can add decorative elements to your faucet handle, light switch covers, and outlet covers.
Small details like these help create a fully immersive Halloween environment that shows you’ve thought about every aspect of your seasonal transformation.
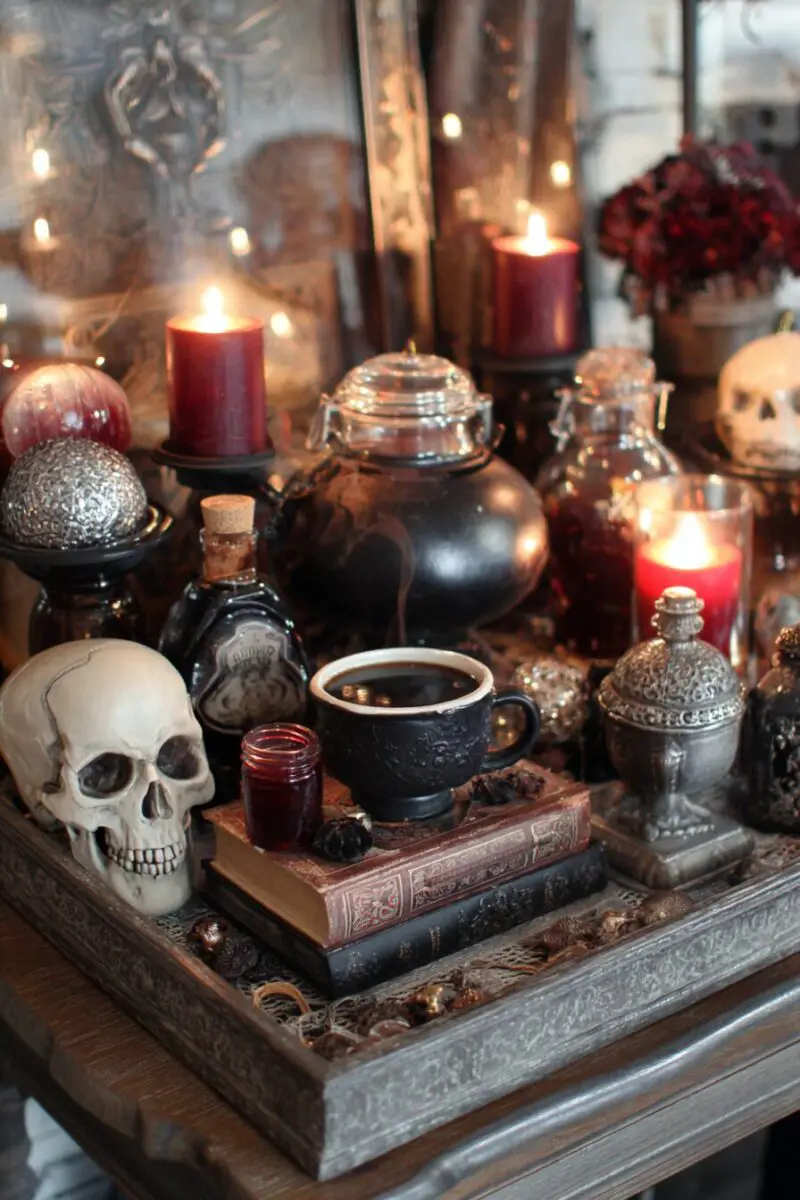
Witch’s Brew Coffee Station
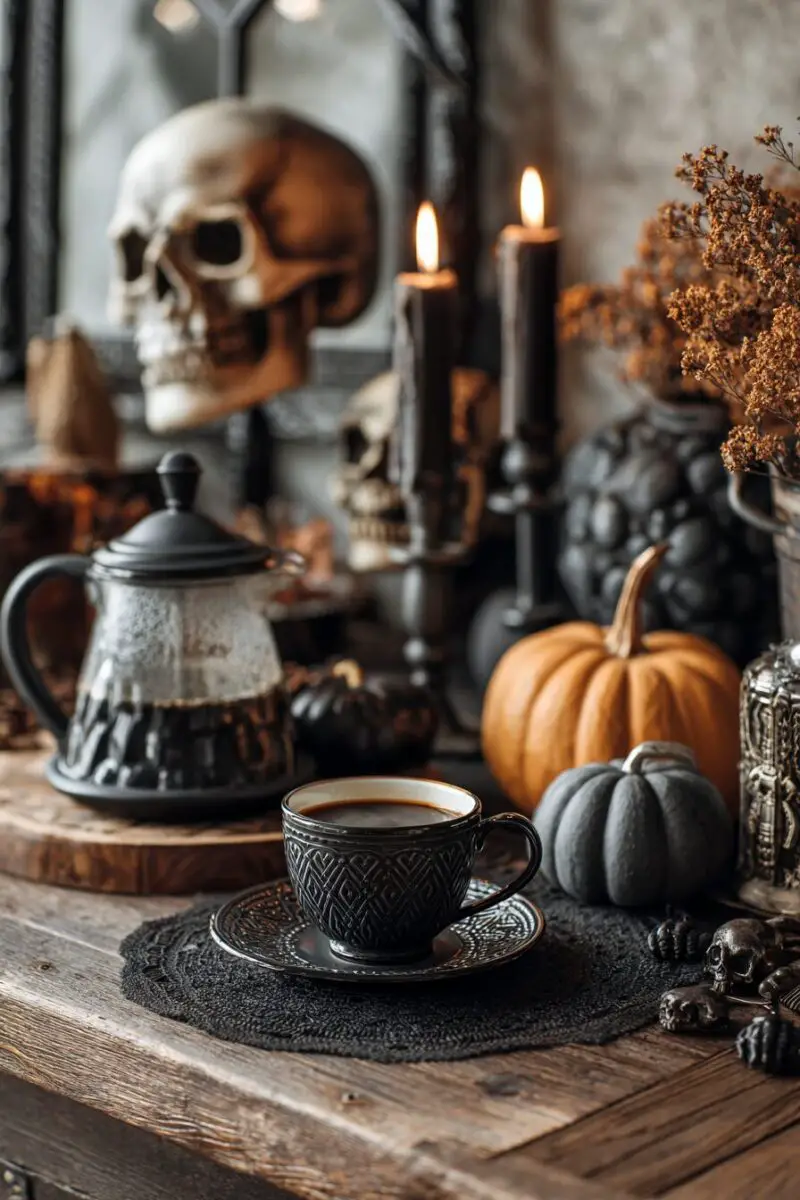
Transform your coffee area into a magical potion-making station that’ll have everyone believing you’re brewing more than just morning caffeine.
Start by relocating your coffee maker, grinder, and related accessories to a dedicated area that can become your official “brew station” for the Halloween season.
Clear a counter space or use a rolling cart that can serve as your potion-making headquarters.
Replace your regular coffee storage containers with apothecary jars, vintage bottles, and containers that look like they belong in a witch’s laboratory.
Label your coffee supplies with spooky names that maintain the magical theme – “Energy Elixir” for regular coffee, “Midnight Potion” for dark roast, and “Sweet Spell” for sugar.
Create custom labels using aged paper and calligraphy-style writing, or print labels with gothic fonts that look authentically mysterious.
Add elements that enhance the witch’s laboratory atmosphere without interfering with your actual coffee-making process.
Drape artificial spider webs around your coffee station, but keep them away from appliances and areas where you’ll be handling hot liquids.
Position battery-operated cauldrons with bubbling light effects near your coffee area to suggest that serious potion-making is happening in this corner of your kitchen.
Incorporate props that tell a story about the magical work happening at your coffee station.
Add a small crystal ball, antique-looking spell books (which can be regular books with Halloween covers), and bottles filled with colored liquids that suggest mysterious ingredients.
Hang dried herbs and flowers in small bundles around your coffee area – not only do they look authentically witchy, but many herbs like lavender and mint can actually complement coffee flavors.
Create a menu board that lists your Halloween coffee drinks using spooky names and descriptions.
“Witch’s Wake-Up Call” for espresso, “Ghoul’s Delight” for flavored lattes, and “Vampire’s Victory” for dark cold brew can make even regular coffee feel special and seasonal.
Use a chalkboard or aged wood sign to display your magical menu, and change the offerings throughout the month to keep things interesting.
Enhance the sensory experience by adding appropriate scents and sounds to your witch’s brew station.
Cinnamon sticks, star anise, and other warm spices can be displayed in small bowls to create autumn aromas that complement your coffee scents.
A small bluetooth speaker hidden among your props can play subtle bubbling or magical sound effects that enhance the potion-making atmosphere.
Love This Post? You’ll Love My Book!
I wasted THOUSANDS on decorating mistakes you can EASILY AVOID. ✨ My book shares every lesson I learned the hard way—so you can create a home you LOVE without the costly trial and error. 🏡
Get the Book NowSkeleton Hand Kitchen Utensil Holders
Your cooking utensils deserve holders that match the spooky atmosphere you’re creating throughout your kitchen.
Transform ordinary utensil storage into eye-catching displays that look like skeleton hands are emerging from the countertop to hold your spatulas, whisks, and spoons.
Purchase plastic skeleton hands from Halloween supply stores, or create your own using white polymer clay molded into realistic hand shapes.
The key is positioning these hands to look like they’re reaching up from underground or through your countertop surface.
Create bases for your skeleton hands using various containers that can be disguised or incorporated into the overall design.
Large mason jars, ceramic crocks, or even cleaned tin cans can serve as the foundation for your skeleton hand holders.
Paint these containers black or dark colors so they fade into the background, making the skeleton hands appear to be the primary focus.
Position the skeleton hands so they’re gripping or reaching toward your most frequently used utensils.
For maximum visual impact, arrange multiple skeleton hands at different heights and angles around your cooking area.
Some hands can appear to be clawing their way out of containers, while others can be positioned flat against backsplashes or cabinet faces, holding utensils against the wall.
This variety in positioning creates a more dynamic and interactive display that catches attention from multiple angles.
Don’t limit yourself to just holding utensils – skeleton hands can serve multiple functional purposes throughout your kitchen.
Use them to hold dish towels by positioning hands with slightly curved fingers near your sink area.
Skeleton hands can also hold your tablet or phone while you’re following recipes, creating a functional stand that keeps your devices at the perfect viewing angle.
Add realistic details to make your skeleton hands more convincing and professionally finished.
Dry brushing with gray or yellow paint can age the bones and make them look more authentic.
Small details like painted fingernails in black or deep red can add personality and prevent the hands from looking too generic.
Position LED spotlights to cast dramatic shadows from your skeleton hands, creating moving shadows as you cook that enhance the spooky atmosphere.
Create a coordinated look by using skeleton hands of similar sizes and styles throughout your kitchen, or mix different hand positions and sizes for a more eclectic, haunted house effect that suggests multiple spirits are helping with your cooking tasks.
Halloween-Themed Backsplash Transformation
Your kitchen backsplash offers a large canvas for creating dramatic Halloween impact without making permanent changes to your space.
Removable wallpaper, vinyl decals, and temporary panels can completely transform this prominent area into a spooky focal point that anchors your entire Halloween kitchen design.
Start by measuring your backsplash area accurately so you can plan your temporary transformation without waste or gaps.
Look for removable wallpaper patterns that evoke Halloween themes – think dark damask patterns, vintage gothic designs, or even subtle spider web motifs that add texture without being overwhelming.
Many temporary wallpaper options are designed specifically for kitchen use and can withstand heat and moisture from cooking activities.
For a more dramatic approach, create custom panels that can be mounted temporarily over your existing backsplash.
Large sheets of black foam board or cardboard can be cut to fit your backsplash dimensions and decorated with Halloween designs.
Paint silhouettes of bare trees, flying bats, or haunted house skylines using black paint on dark purple or deep orange backgrounds.
These panels can be attached using removable adhesive strips that won’t damage your existing tiles or paint.
Vinyl wall decals offer another flexible option for backsplash transformation that allows for easy removal and repositioning.
Look for large-scale decals featuring Halloween scenes, spooky trees, or geometric patterns in Halloween colors.
Layer multiple smaller decals to create custom scenes that tell a story across your entire backsplash area.
Flying bats can start from one corner and move across the wall, or climbing ivy can appear to grow up from your countertop.
Add three-dimensional elements to your backsplash transformation for extra visual interest and depth.
Small shelves positioned strategically across your temporary backsplash can hold mini pumpkins, candles, or other Halloween accessories.
Battery-operated LED strip lights can be hidden behind these elements to create dramatic uplighting that makes your backsplash glow with mysterious energy.
Coordinate your backsplash transformation with other elements in your kitchen to create a cohesive Halloween theme.
If you’re using black and orange as your primary colors, incorporate these same hues in your backsplash design.
If your Halloween decor leans more toward gothic elegance, choose backsplash elements in deep purples, burgundies, and metallic accents that complement your overall aesthetic vision.
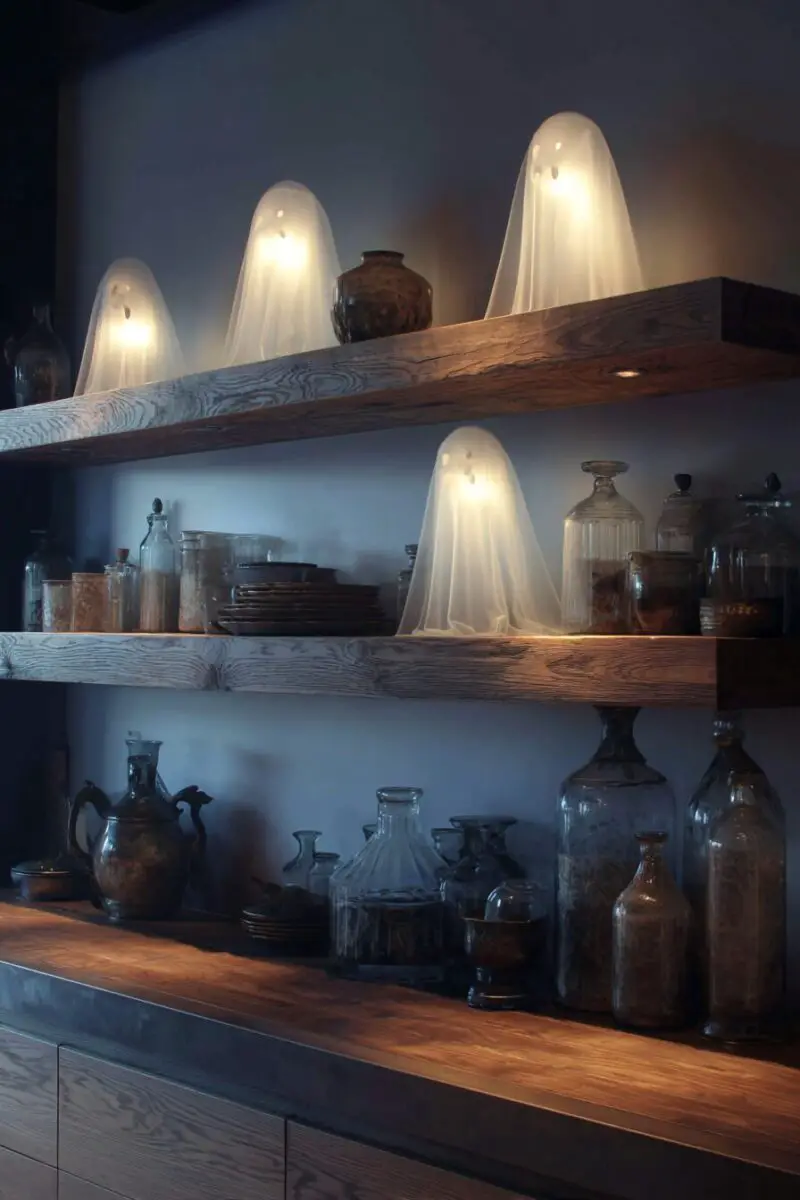
Ghostly Floating Shelves
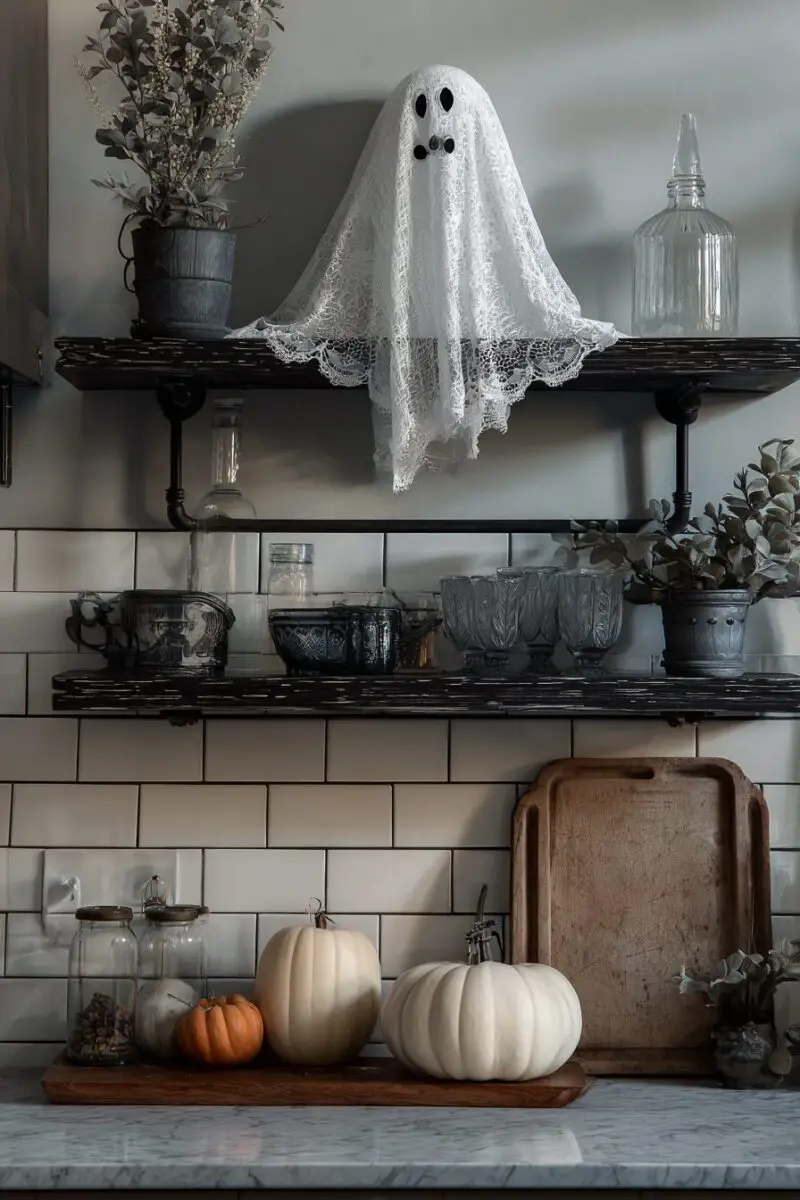
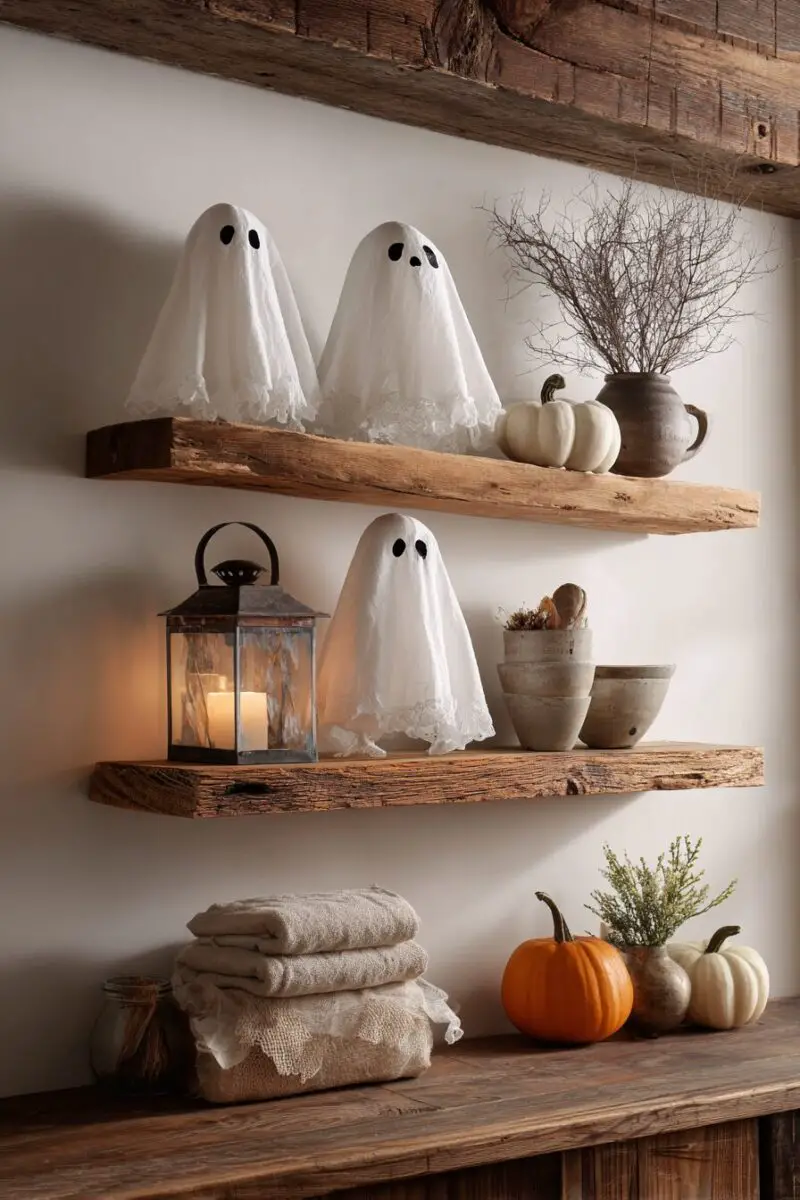
Create the illusion that spirits are rearranging your kitchen accessories with floating shelves that appear to defy gravity and logic.
Start by installing clear acrylic or glass shelves that become nearly invisible once loaded with Halloween decorations, creating the perfect foundation for objects that seem to hover mysteriously in mid-air.
Position these transparent shelves at varying heights and depths to enhance the floating effect and create visual intrigue from multiple viewing angles.
Load your ghostly floating shelves with lightweight Halloween accessories that enhance the supernatural illusion without overwhelming the delicate appearance of floating objects.
White ceramic pieces, translucent glass containers, and items in pale colors work particularly well because they maintain the ethereal, ghost-like quality of your display.
Mini white pumpkins, clear glass orbs, and vintage white dishware can all contribute to the floating ghost theme while remaining functional for your kitchen needs.
Add subtle lighting effects to make your floating shelves truly supernatural and eye-catching.
LED strip lights hidden above or below each shelf can create the illusion that your floating objects are glowing with their own internal energy.
Choose cool white or pale blue LED lights to enhance the ghostly effect, avoiding warm yellows that might make your display feel more cozy than spooky.
Battery-operated options eliminate the need for visible cords that could break the floating illusion.
Create movement and visual interest by incorporating elements that suggest ghostly activity is happening on your floating shelves.
Position lightweight fabric pieces like cheesecloth or sheer white curtain material so they appear to be floating or moving slightly with air currents in your kitchen.
Small battery-operated fans hidden behind larger objects can create gentle movement that makes fabric elements dance mysteriously.
Enhance the ghostly theme by adding translucent elements that catch and reflect light in interesting ways.
Prisms, crystal ornaments, and clear glass decorative pieces can create rainbow effects when positioned to catch natural or artificial light sources.
These light effects add magic and movement to your floating display while maintaining the supernatural atmosphere you’re creating.
Position mirrors strategically near your floating shelves to multiply the visual impact and create the illusion of even more floating objects throughout your kitchen.
Small round mirrors or mirror tiles can be temporarily attached to walls or cabinet faces to reflect your ghostly floating shelves from multiple angles, creating a disorienting and supernatural effect that suggests your kitchen is haunted by playful spirits who enjoy rearranging your decorative accessories while you’re not looking.
Love This Post? You’ll Love My Book!
I wasted THOUSANDS on decorating mistakes you can EASILY AVOID. ✨ My book shares every lesson I learned the hard way—so you can create a home you LOVE without the costly trial and error. 🏡
Get the Book NowCauldron Cooking Pot Collection
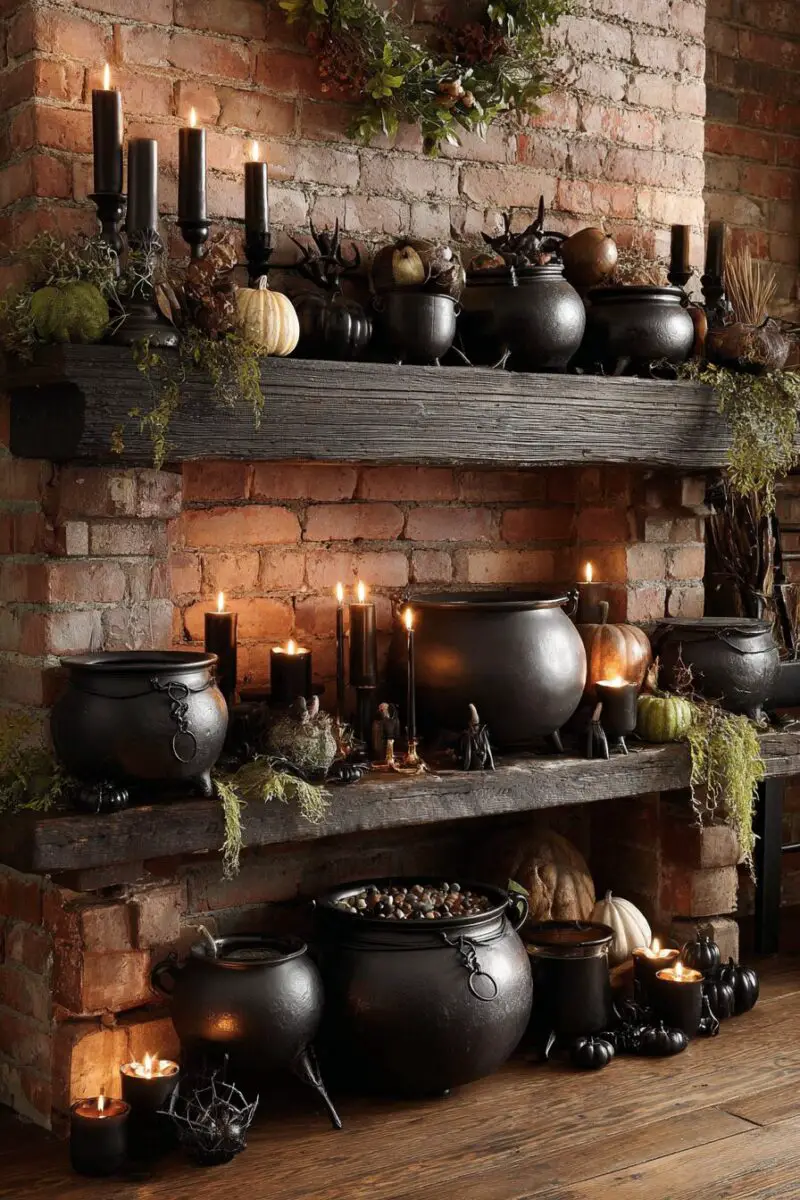
Embrace your inner witch by transforming your regular cooking pot storage into a collection of mysterious cauldrons that suggest serious potion-making happens in your kitchen.
Replace your everyday pots and pans with black cast iron pieces, vintage-looking copper cauldrons, and dark-colored cookware that maintains functionality while enhancing your Halloween atmosphere.
Many thrift stores and antique shops carry old cast iron pieces that can be restored to serve both decorative and practical purposes in your Halloween kitchen transformation.
Display your cauldron collection prominently rather than hiding it away in cabinets, turning your cookware into decorative elements that contribute to your overall Halloween theme.
Hang different sized cauldrons from a pot rack or ceiling-mounted hooks to create varying heights and visual interest.
Arrange smaller cauldrons on open shelving or your stovetop area where they’ll be easily accessible for cooking while serving as atmospheric decoration between meals.
The key is making your functional cookware look intentionally mysterious and magical rather than simply utilitarian.
Add props and accessories that enhance the potion-making story your cauldron collection is telling throughout your kitchen space.
Position wooden spoons, long-handled ladles, and other stirring implements near your cauldrons to suggest active potion brewing.
Small bottles filled with colored liquids can be arranged nearby to serve as magical ingredients waiting to be added to whatever mysterious concoction you’re preparing.
Create custom labels for your ingredient bottles using aged paper and mystical names that could represent either cooking spices or magical components.
Enhance your cauldron display with atmospheric elements that suggest supernatural cooking activities are taking place in your kitchen.
Battery-operated dry ice machines or fog makers can create the illusion of bubbling, steaming cauldrons even when you’re not actively cooking.
LED lights placed inside larger cauldrons can create an eerie glow that suggests magical energy is building inside your cooking vessels.
Choose colored LED lights that match your overall Halloween color scheme – green for classic witch vibes, purple for magical mystery, or orange for traditional Halloween energy.
Incorporate your cauldron collection into your actual Halloween cooking and entertaining activities to maximize both form and function.
Serve Halloween party foods directly from your cauldrons – soups, stews, and punch all look appropriately mysterious when served from dark, mystical-looking vessels.
Create a signature Halloween drink that you can serve from your largest cauldron, complete with dry ice effects and mysterious ingredients that guests can watch you add throughout the evening.
This functional approach to your cauldron collection proves that Halloween decorating doesn’t have to sacrifice practicality for atmosphere, allowing you to create an immersive seasonal experience that enhances both your daily cooking routine and your Halloween entertaining capabilities.
Your kitchen has incredible potential to become the most memorable room in your Halloween-decorated home this season.
Start with one or two ideas that excite you most, then build your Halloween kitchen transformation gradually throughout October for maximum impact and enjoyment.
