Your kitchen doesn’t need a complete gut renovation to look like it belongs in a home magazine.
With some creativity and elbow grease, you can completely transform your cooking space without maxing out your credit cards.
Love This Post? You’ll Love My Book!
I wasted THOUSANDS on decorating mistakes you can EASILY AVOID. ✨ My book shares every lesson I learned the hard way—so you can create a home you LOVE without the costly trial and error. 🏡
Get the Book NowPaint Your Cabinets for an Instant Transformation
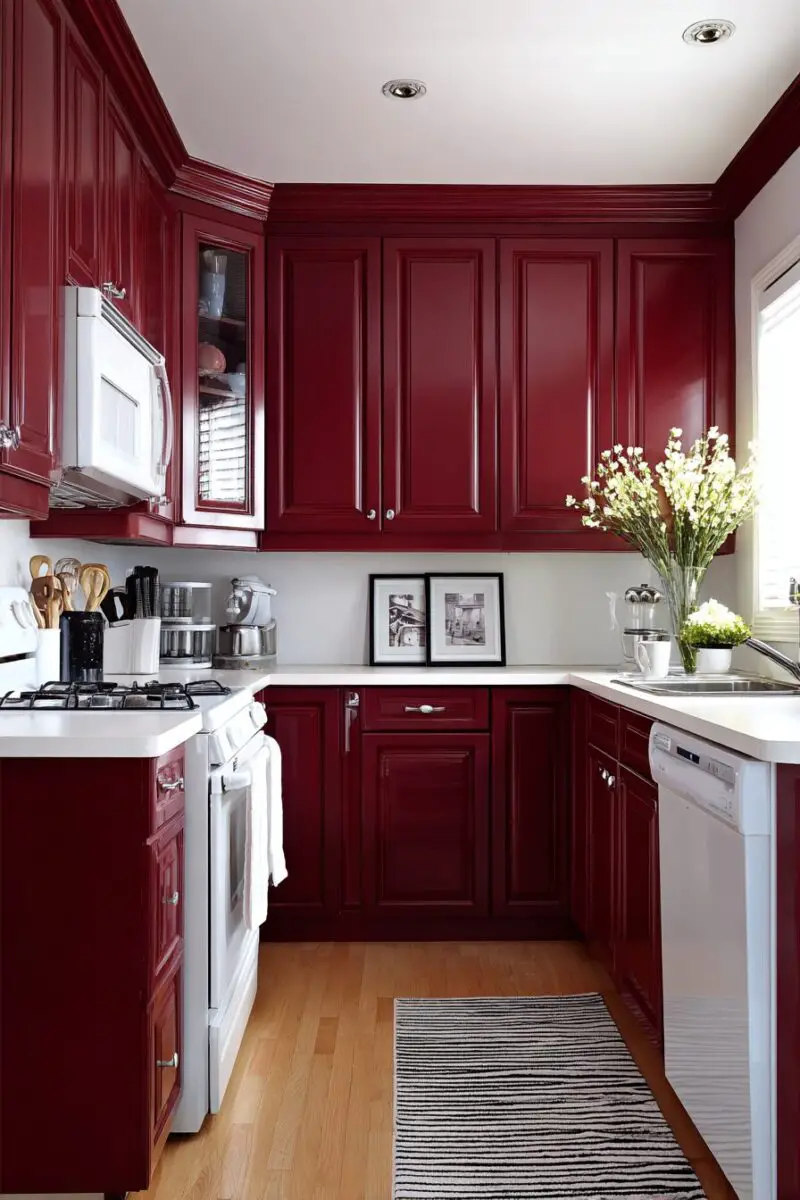
Nothing changes a kitchen’s personality faster than giving those tired cabinets a fresh coat of paint.
You can take your kitchen from drab to fab with just a weekend and about $50 worth of supplies.
Start by removing all the cabinet doors and hardware, then give everything a thorough cleaning with degreasing soap.
Sand the surfaces lightly to help the paint stick better, paying special attention to areas that get touched frequently.
Prime everything with a high-quality bonding primer designed for kitchen use – this step makes all the difference in how long your paint job will last.
Choose a paint color that complements your existing appliances and countertops, or go bold with a dramatic contrast that becomes your kitchen’s new focal point.
Semi-gloss or satin finishes work best in kitchens because they’re easier to clean and more resistant to moisture and grease.
Apply thin, even coats with a high-quality brush or foam roller, allowing each coat to dry completely before adding the next.
Most cabinets need two to three coats for full coverage and a professional-looking finish.
White and cream colors make small kitchens feel larger and brighter, while navy blue or forest green can add sophisticated drama to larger spaces.
Gray has become incredibly popular because it works with both warm and cool color schemes.
Don’t forget to paint the inside edges of the cabinet frames that show when doors are open – these little details make the difference between a DIY job and a professional-looking result.
Replace the hardware with new knobs and pulls while you’re at it, or spray paint the existing ones if they’re still in good shape.
The whole project typically takes a long weekend, but the results will make you feel like you’re cooking in a completely new kitchen.
Pro tip: label each door and its corresponding cabinet with painter’s tape before removal so reassembly goes smoothly.

💭 I Wrote a Book About My BIGGEST Decorating Mistakes!
When I decorated my first home, I thought I knew what I was doing. Spoiler alert: I DIDN’T. 😅
💸 I bought a sofa that was WAY TOO BIG for my living room. I chose paint colors that looked amazing in the store but terrible on my walls. I spent THOUSANDS on pieces that didn’t work together. Sound familiar?
“Things I Wish I Knew Before I Decorated My First Home” is your shortcut to avoiding ALL my costly mistakes. ✨ Inside, you’ll find practical, NO-NONSENSE advice that will save you time, money, and a whole lot of decorating regret. 🏡
🎯 Grab Your Copy Now!Upgrade Your Cabinet Hardware for Maximum Impact
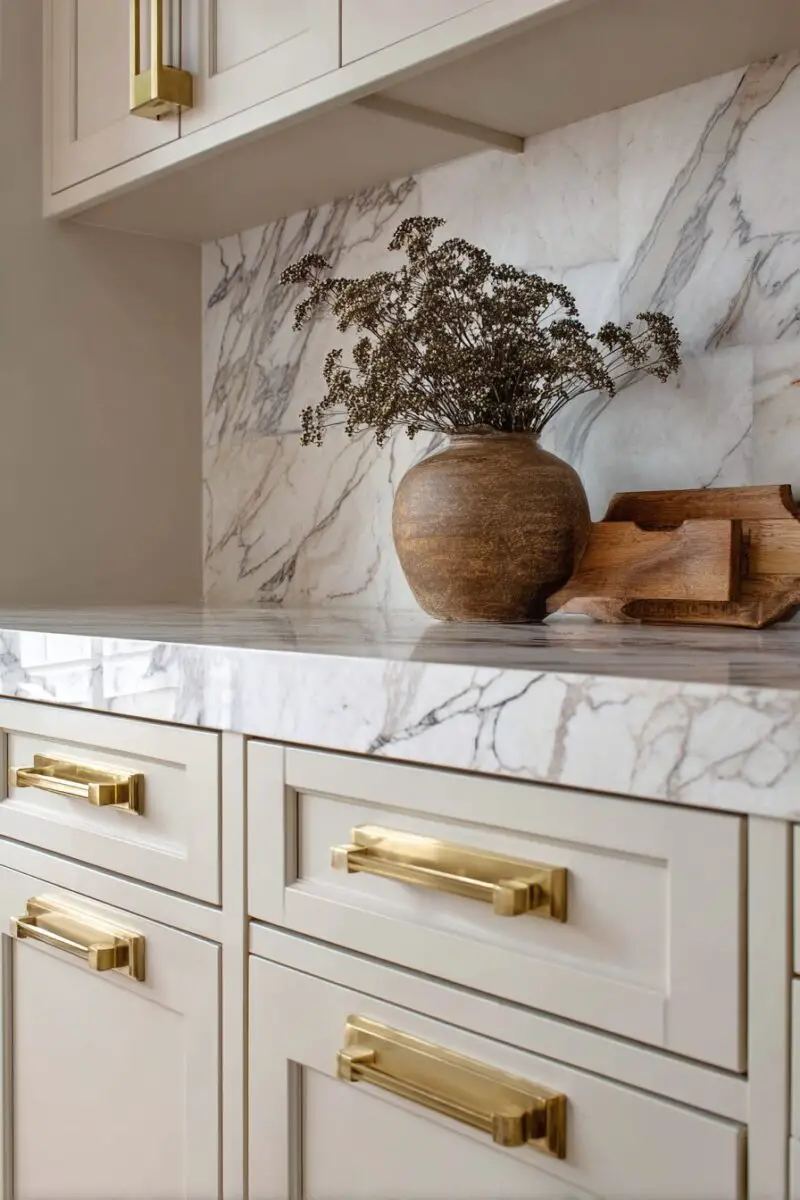
Swapping out old cabinet knobs and pulls might seem like a small change, but it’s one of the most cost-effective ways to modernize your entire kitchen.
You can completely change your kitchen’s style for under $100, and the installation takes just a few hours.
Start by measuring your existing hardware to determine what size replacements you need – most standard cabinets use either 3-inch or 4-inch center-to-center spacing for pulls.
Remove one piece of old hardware and take it to the store with you to ensure you get the right size and style.
Brushed gold and matte black finishes are trending right now and work beautifully with both traditional and modern kitchen styles.
Oil-rubbed bronze adds warmth and pairs perfectly with wood tones, while polished chrome keeps things crisp and clean.
Mixed metals are totally acceptable in modern design, so don’t feel like everything has to match perfectly.
You might choose sleek bar pulls for your upper cabinets and round knobs for drawers, or mix different finishes throughout the space.
Cabinet pulls should generally be mounted vertically on upper cabinets and horizontally on base cabinets for the most comfortable grip.
The rule of thumb for pull length is to choose hardware that’s roughly one-third the width of your cabinet door.
Knobs work best on small doors and drawers, while pulls are more functional on larger doors and wide drawers.
If your new hardware doesn’t line up with existing screw holes, don’t panic – you can fill the old holes with wood filler, sand smooth, and touch up with paint.
For a completely different look, try leather pulls, rope handles, or even vintage wooden knobs from thrift stores.
Installation is straightforward with just a screwdriver, though a drill makes the job go faster.
The transformation is immediate and dramatic – you’ll be amazed how such a simple change can make your entire kitchen feel fresh and updated.
Design Your Dream Room in Minutes! – By Madison
🏡 Start Creating FREE →Create a Stunning Backsplash with Peel-and-Stick Tiles

A beautiful backsplash adds personality and protects your walls, and you don’t need to hire a contractor or learn how to grout to get professional-looking results.
Peel-and-stick tiles have come a long way in recent years, with options that look convincingly like real subway tile, natural stone, or even intricate mosaic patterns.
The best part is that most of these tiles cost between $1-3 per square foot, making a complete backsplash makeover possible for under $75.
Start by cleaning your wall thoroughly and making sure the surface is completely smooth and dry.
Measure your space carefully and order about 10% extra tiles to account for cutting and future repairs.
Begin installation at the center point of your main wall and work outward to ensure balanced placement.
Most peel-and-stick tiles are designed to overlap slightly at the edges, creating seamless-looking grout lines.
Use a sharp utility knife to cut tiles around outlets, corners, and other obstacles – score deeply and snap for clean breaks.
A small roller or your hands can help ensure good adhesion, especially around edges and corners.
Some styles come with matching edge pieces and corner trim that give your installation a truly professional appearance.
Subway tile patterns work in virtually any kitchen style, from farmhouse to contemporary.
Herringbone and chevron patterns add visual interest and movement to your walls.
Marble-look tiles bring elegance without the marble price tag, while metallic finishes can add glamour and reflect light to brighten your space.
The beauty of peel-and-stick tiles is that they’re completely removable if you change your mind or move, making them perfect for renters.
Clean installation is key – any dirt or grease under the tiles will show through and could cause them to lift over time.
With proper installation, these tiles can last for years and completely transform the look of your kitchen for a fraction of traditional tile costs.
Love This Post? You’ll Love My Book!
I wasted THOUSANDS on decorating mistakes you can EASILY AVOID. ✨ My book shares every lesson I learned the hard way—so you can create a home you LOVE without the costly trial and error. 🏡
Get the Book NowInstall Under-Cabinet Lighting for Ambiance and Function
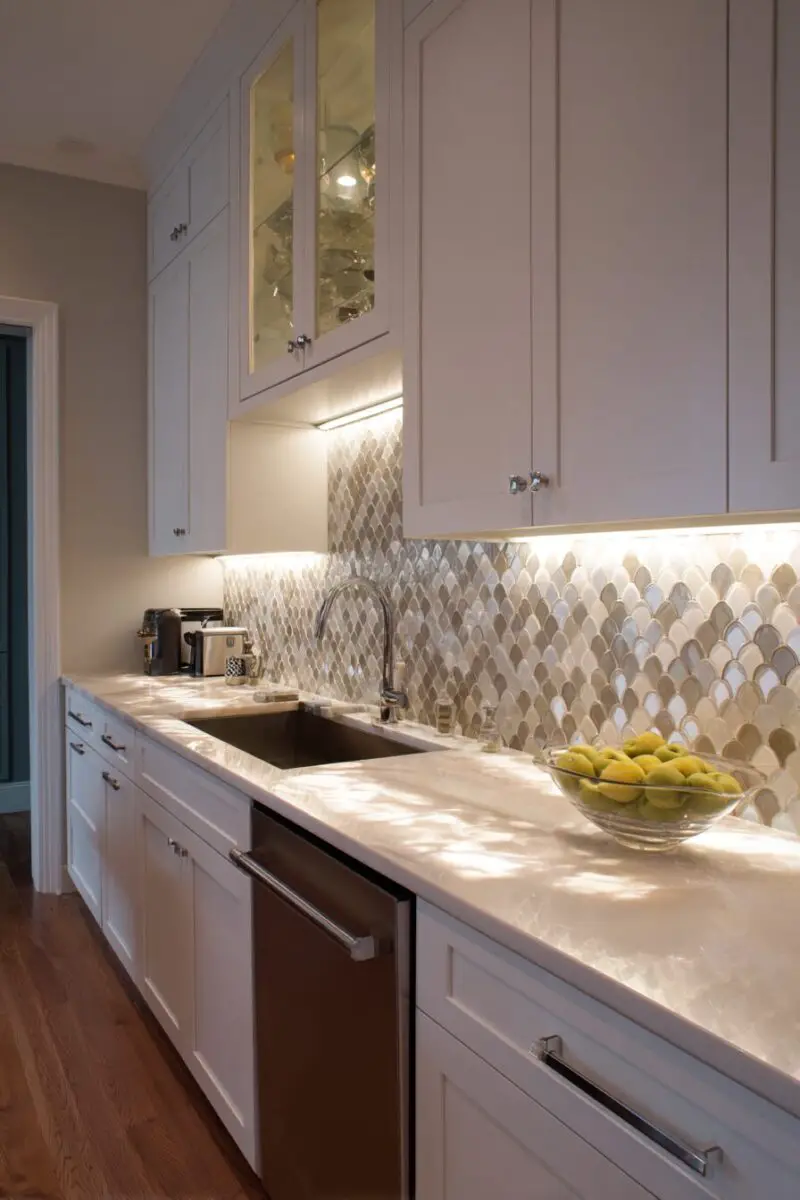
Under-cabinet lighting transforms both the functionality and atmosphere of your kitchen while being surprisingly affordable and easy to install.
Battery-operated LED strip lights eliminate the need for electrical work, making this a perfect weekend DIY project that costs less than $60.
These lights eliminate shadows on your countertops, making food prep safer and more enjoyable.
They also create a warm, welcoming ambiance that makes your kitchen feel like the heart of your home.
Start by measuring the length of your upper cabinets to determine how much lighting you’ll need.
LED strip lights come in various lengths and can usually be cut to fit your exact measurements.
Look for lights with adhesive backing that stick directly to the underside of your cabinets – no tools required.
Warm white LEDs (around 3000K) create a cozy, inviting atmosphere, while cool white (4000K+) provides bright task lighting.
Many modern LED strips come with dimmer controls or even smartphone apps that let you adjust brightness and color throughout the day.
Position the lights toward the front edge of your cabinets to minimize shadows on your work surface.
Some strips come with diffuser covers that create a smoother, more professional light distribution.
Battery-operated options typically last 6-12 months before needing new batteries, while plug-in versions offer continuous power.
If you have outlets near your cabinets, plug-in strips with inline switches give you easy on-off control.
Motion sensor versions automatically turn on when you enter the kitchen, which is incredibly convenient for late-night snacking.
For a more permanent installation, hardwired LED strips can be connected to wall switches, but this requires basic electrical knowledge.
The transformation is immediate – your countertops will look cleaner and brighter, and your entire kitchen will feel more upscale and inviting.
💭 I Wrote a Book About My BIGGEST Decorating Mistakes!
When I decorated my first home, I thought I knew what I was doing. Spoiler alert: I DIDN’T. 😅
💸 I bought a sofa that was WAY TOO BIG for my living room. I chose paint colors that looked amazing in the store but terrible on my walls. I spent THOUSANDS on pieces that didn’t work together. Sound familiar?
“Things I Wish I Knew Before I Decorated My First Home” is your shortcut to avoiding ALL my costly mistakes. ✨ Inside, you’ll find practical, NO-NONSENSE advice that will save you time, money, and a whole lot of decorating regret. 🏡
🎯 Grab Your Copy Now!Replace Your Faucet for an Instant Upgrade
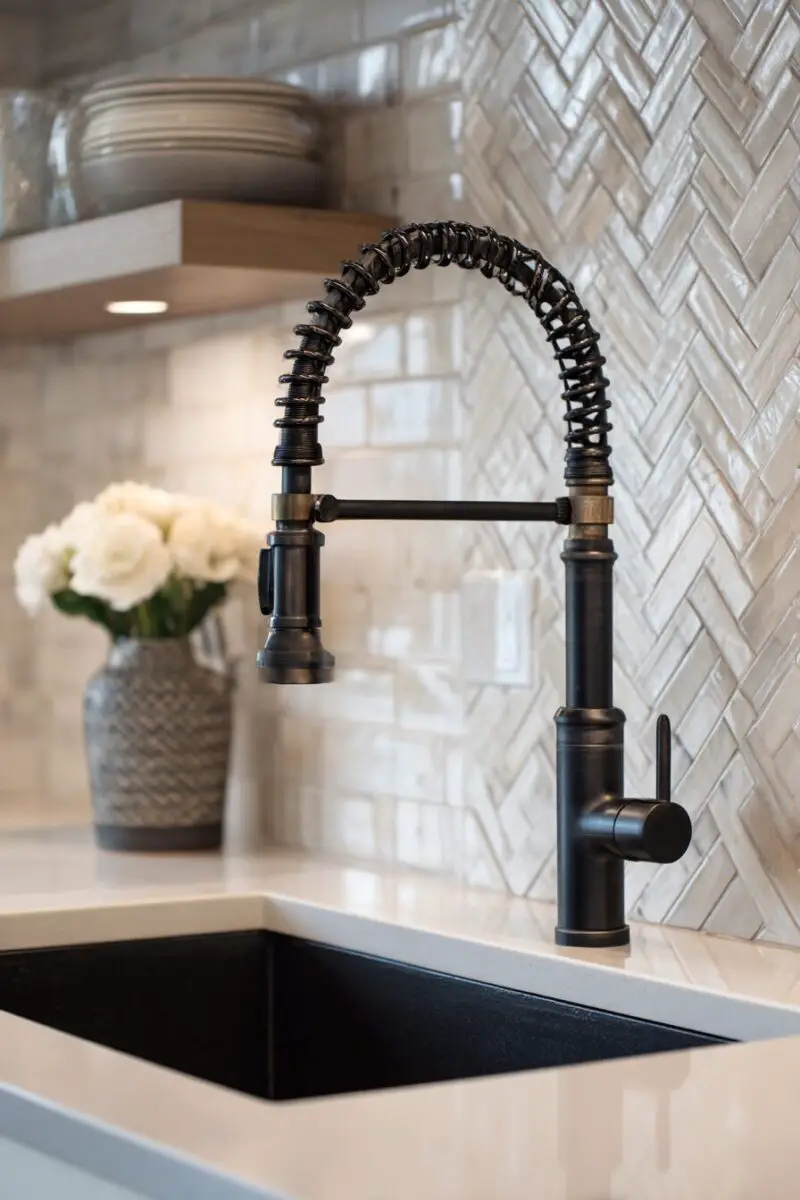
A new kitchen faucet might be the single most impactful upgrade you can make for under $150, and most homeowners can install it themselves in about two hours.
Your faucet gets used dozens of times every day, so upgrading to something beautiful and functional makes a huge difference in your daily kitchen experience.
Modern faucets come with features that would have been considered luxury just a few years ago – pull-down sprayers, soap dispensers, and even touchless operation.
Start by measuring your existing sink holes to ensure your new faucet will fit properly.
Most kitchen sinks have either one large hole for single-handle faucets or three holes for traditional two-handle designs.
If you’re switching styles, deck plates can cover extra holes, or you can add accessories like soap dispensers to fill unused openings.
Single-handle faucets with pull-down sprayers offer maximum versatility and work well in most kitchen styles.
Matte black finishes are incredibly popular right now and hide water spots better than shiny chrome.
Brushed gold adds warmth and pairs beautifully with both light and dark cabinet colors.
Stainless steel coordinates perfectly with stainless appliances and is practically indestructible.
High-arc spouts provide more clearance for filling large pots and washing dishes.
Commercial-style faucets bring professional kitchen aesthetics to your home at a fraction of restaurant equipment costs.
Installation typically involves disconnecting water supply lines, removing the old faucet, and connecting the new one following manufacturer instructions.
Turn off water supply valves under the sink before starting, and have towels ready to catch any drips.
Most new faucets come with detailed instructions and all necessary hardware, making installation straightforward even for beginners.
The difference in both appearance and functionality will be immediately noticeable every time you use your kitchen.
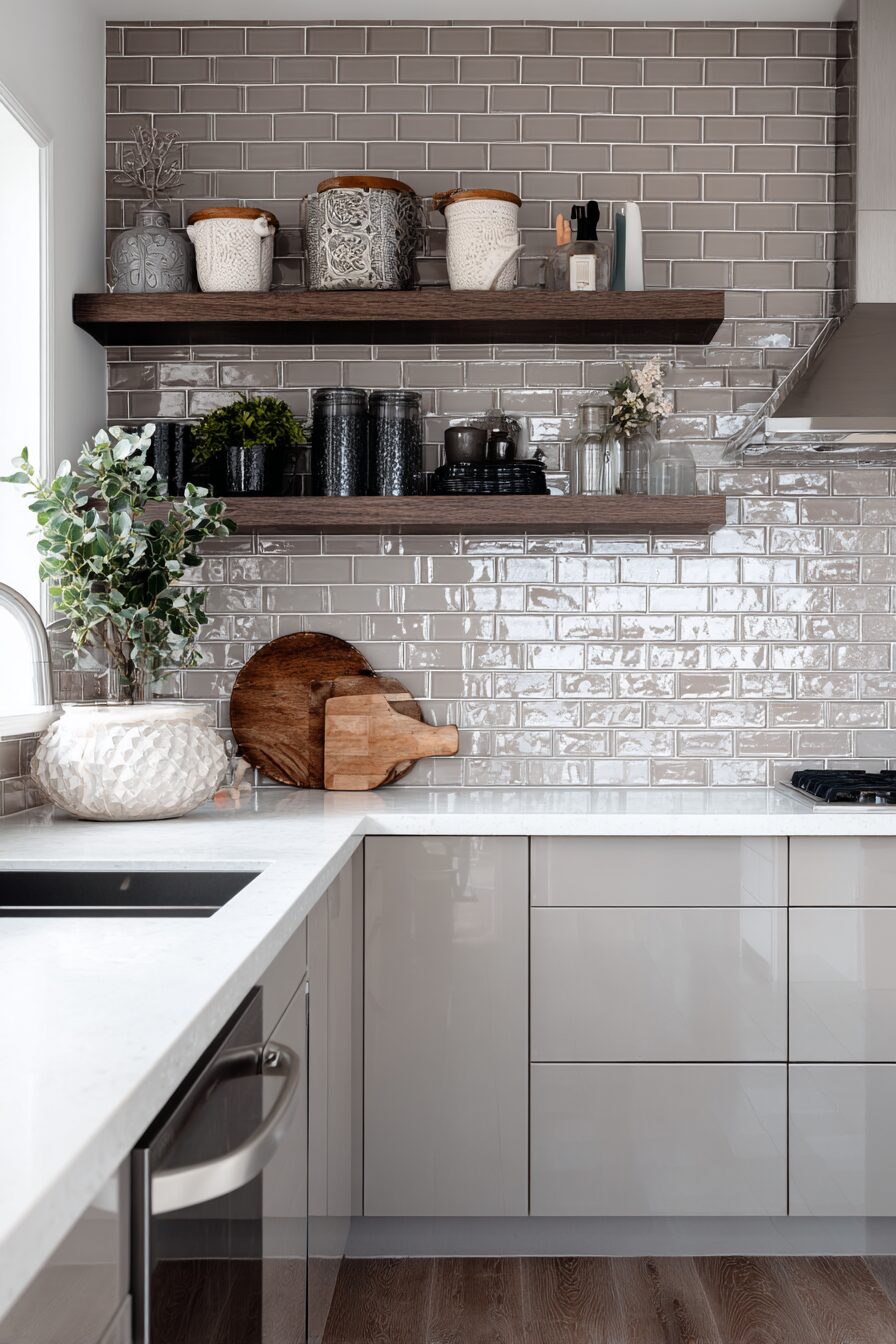
Add Open Shelving for Style and Storage

Open shelving creates visual interest, provides extra storage, and costs a fraction of what you’d pay for new cabinets.
You can install beautiful floating shelves for under $100 and completely change how your kitchen looks and functions.
Open shelves make your kitchen feel larger by creating vertical lines that draw the eye upward.
They also give you a place to display your prettiest dishes, glasses, and kitchen accessories.
Start by determining where shelves would be most useful – above the sink, beside the refrigerator, or in place of a few upper cabinet doors.
Measure carefully and use a level to mark shelf placement on your walls.
Floating shelf brackets should be anchored into wall studs for maximum support, especially if you plan to store heavy items.
Reclaimed wood adds rustic charm and warmth to any kitchen style.
White or painted shelves coordinate with cabinet colors and keep the look cohesive.
Metal brackets in black or bronze add industrial flair and work well in modern or farmhouse kitchens.
Glass shelves create a lighter, more delicate appearance and won’t compete with colorful dishes.
Style your shelves with a mix of functional and decorative items – stack plates and bowls, add a few plants, and include some attractive storage containers.
Keep frequently used items within easy reach, and reserve higher shelves for things you use less often.
Group items in odd numbers and vary heights for the most pleasing visual arrangement.
Don’t overcrowd the shelves – negative space is just as important as the items you display.
Open shelving does require more maintenance than closed cabinets since everything is visible, but the trade-off is a kitchen that feels more open, personal, and welcoming.
This upgrade works especially well in small kitchens where removing some upper cabinets can make the space feel significantly larger.
Love This Post? You’ll Love My Book!
I wasted THOUSANDS on decorating mistakes you can EASILY AVOID. ✨ My book shares every lesson I learned the hard way—so you can create a home you LOVE without the costly trial and error. 🏡
Get the Book NowTransform Countertops with Contact Paper or Paint
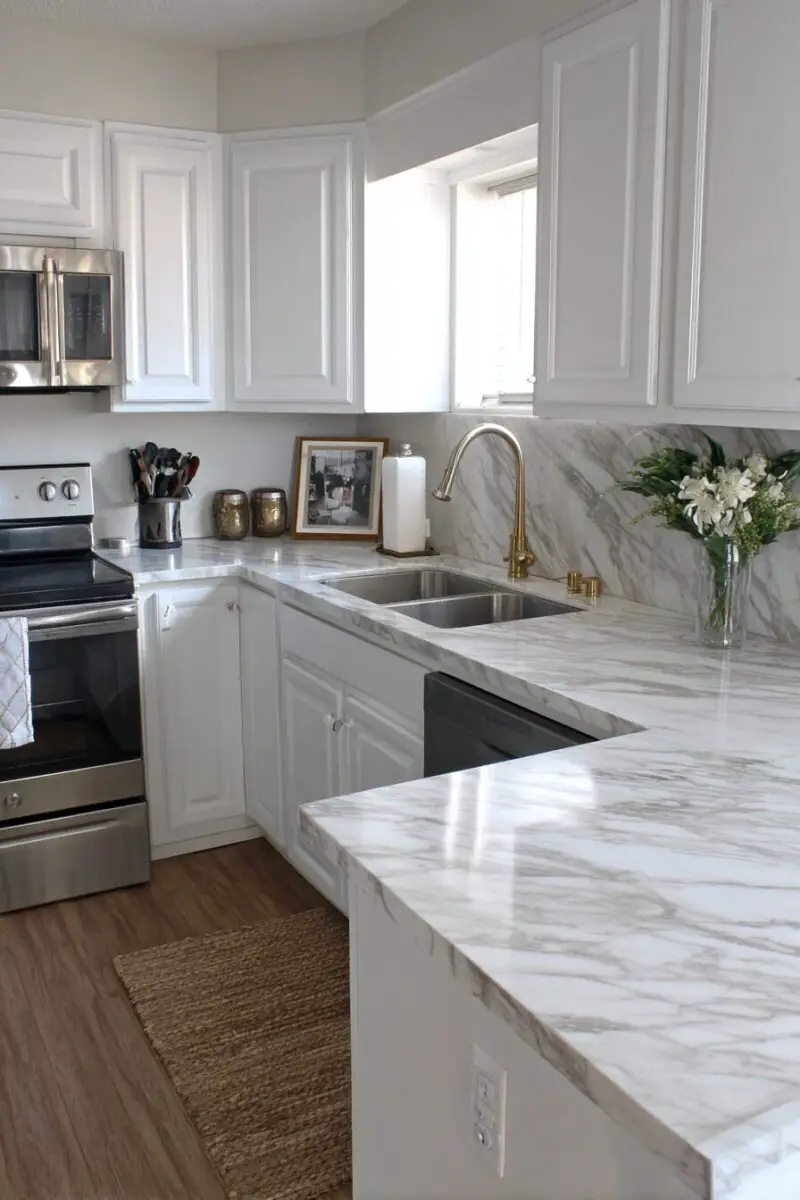
You don’t need to replace your countertops to get a completely different look – contact paper and specialty paints can create stunning transformations for under $50.
Modern contact papers look remarkably realistic and can mimic everything from marble and granite to butcher block and concrete.
This is an especially great option for renters who want to personalize their space without making permanent changes.
Countertop paint kits provide a more permanent solution that can last for years with proper application and care.
Start by thoroughly cleaning your existing countertops and sanding lightly to help the new surface adhere properly.
Remove everything from your counters and tape off areas you don’t want covered, like sinks and backsplashes.
Contact paper requires patience and careful application to avoid bubbles and wrinkles.
Start at one end and slowly peel away the backing while smoothing the paper down with a plastic smoothing tool.
Work out air bubbles as you go, and use a hair dryer to warm stubborn areas that won’t lay flat.
Trim excess paper with a sharp utility knife, leaving about an inch to wrap around edges.
Marble-look contact paper instantly elevates the entire kitchen and pairs beautifully with both light and dark cabinets.
Wood grain patterns add warmth and work perfectly in farmhouse or rustic kitchen styles.
Solid colors like black or white create a clean, modern appearance that coordinates with any design scheme.
Countertop paint kits typically include primer, base coat, decorative chips or veining, and protective topcoat.
Follow manufacturer instructions carefully, allowing proper drying time between each step.
The transformation is dramatic and immediate, giving you the look of expensive stone or custom surfaces for a fraction of the cost.
Both options are completely reversible, so you can experiment with different looks without commitment.
Create a Kitchen Island from Existing Furniture

A kitchen island provides extra counter space, storage, and seating without the expense of custom cabinetry.
You can create a functional island for under $200 by repurposing furniture you already own or finding pieces at thrift stores and garage sales.
Dressers, console tables, and even old desks can be transformed into beautiful kitchen islands with some creativity and basic tools.
The key is finding a piece that’s the right height – standard counter height is 36 inches, though bar height (42 inches) works well if you plan to add stools.
Start by removing any hardware you don’t want and giving the piece a thorough cleaning.
Sand the surface lightly and apply primer before painting to ensure good adhesion and long-lasting results.
Choose a paint color that complements your existing cabinets – matching creates a built-in look, while contrasting colors make the island a focal point.
Add a butcher block or laminate top for a true countertop surface that can handle food prep and daily use.
Install hooks on the sides for hanging utensils, dish towels, or small pots and pans.
Wheels or casters make your island portable, allowing you to move it when you need more floor space.
Locking wheels ensure stability when you’re working on the surface.
Add storage baskets to open shelves for a organized, attractive appearance.
Wine racks, spice storage, and small appliance cubbies can be built into existing openings or drawers.
A towel bar on one side keeps dish towels handy while you’re cooking.
If your piece has drawers, organize them with dividers for utensils, linens, or cooking tools.
This DIY approach lets you create exactly what your kitchen needs while expressing your personal style.
The result is a unique, functional piece that looks like it was designed specifically for your space.
Replace Cabinet Doors with Curtains for Cottage Charm
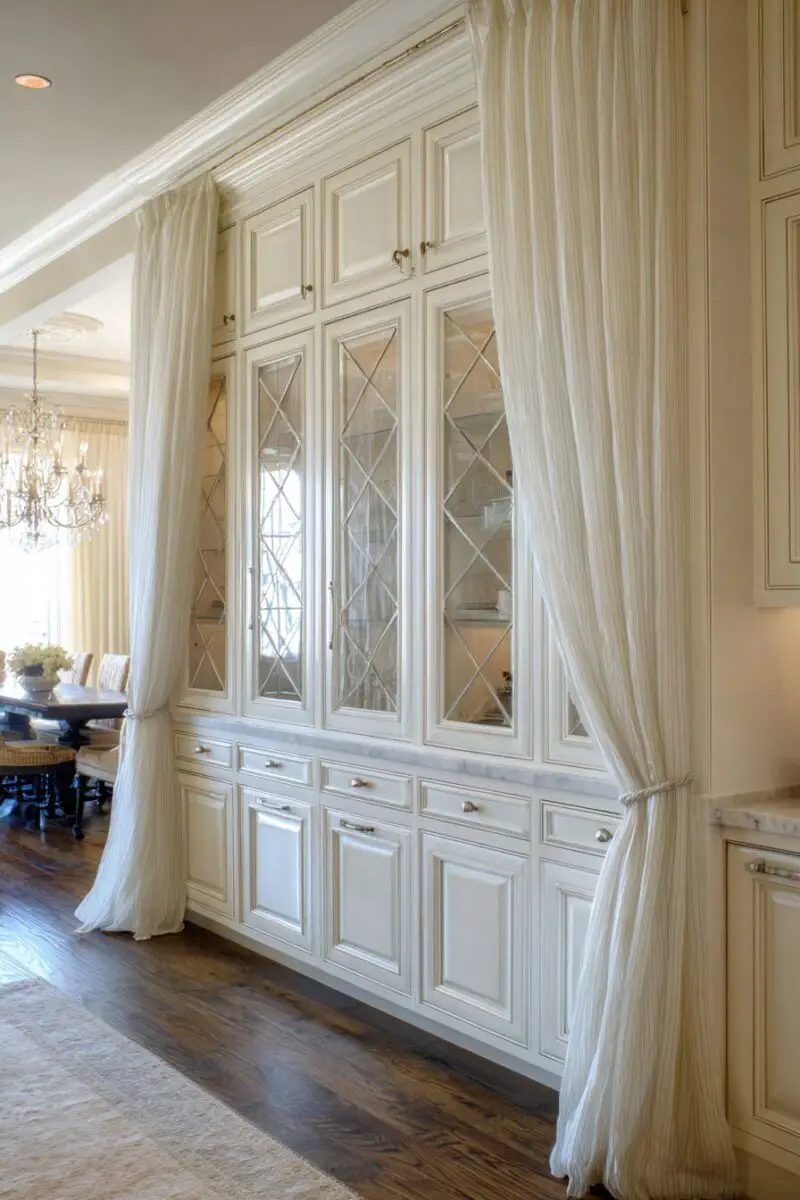
Removing some cabinet doors and hanging curtains instead creates a charming, cottage-style look while saving money on door replacements.
This technique works especially well for lower cabinets where you want to hide less attractive storage while maintaining easy access.
You can complete this transformation for about $40 in fabric and basic sewing supplies.
Start by carefully removing cabinet doors you want to replace – save the hinges and hardware in case you want to change back later.
Measure the cabinet openings to determine how much fabric you’ll need for each curtain panel.
Choose fabrics that coordinate with your kitchen’s color scheme and can handle occasional washing.
Cotton and linen work beautifully and are easy to care for, while canvas and duck cloth provide more structure.
Gingham, florals, and stripes all create different cottage-style looks depending on your preference.
Solid colors work well if your kitchen already has plenty of pattern from backsplashes or flooring.
Simple rod pocket curtains are easiest to make and install – just fold over the top edge and sew a straight seam.
Café rods mounted inside the cabinet frame provide a clean, finished appearance.
Tension rods work well for renters who don’t want to make holes in the cabinet frame.
Make curtains slightly shorter than the cabinet opening so they don’t drag on shelves or stored items.
This look works particularly well for cabinets that store dishes, glassware, or linens you want to keep dust-free but easily accessible.
Mix curtained cabinets with open shelving and traditional doors for an eclectic, personalized appearance.
The soft texture of fabric adds warmth and visual interest to what can sometimes feel like a sterile kitchen environment.
This technique also works great for hiding areas under sinks where plumbing might not be particularly attractive.
Love This Post? You’ll Love My Book!
I wasted THOUSANDS on decorating mistakes you can EASILY AVOID. ✨ My book shares every lesson I learned the hard way—so you can create a home you LOVE without the costly trial and error. 🏡
Get the Book NowInstall Decorative Hooks and Magnetic Strips for Organization
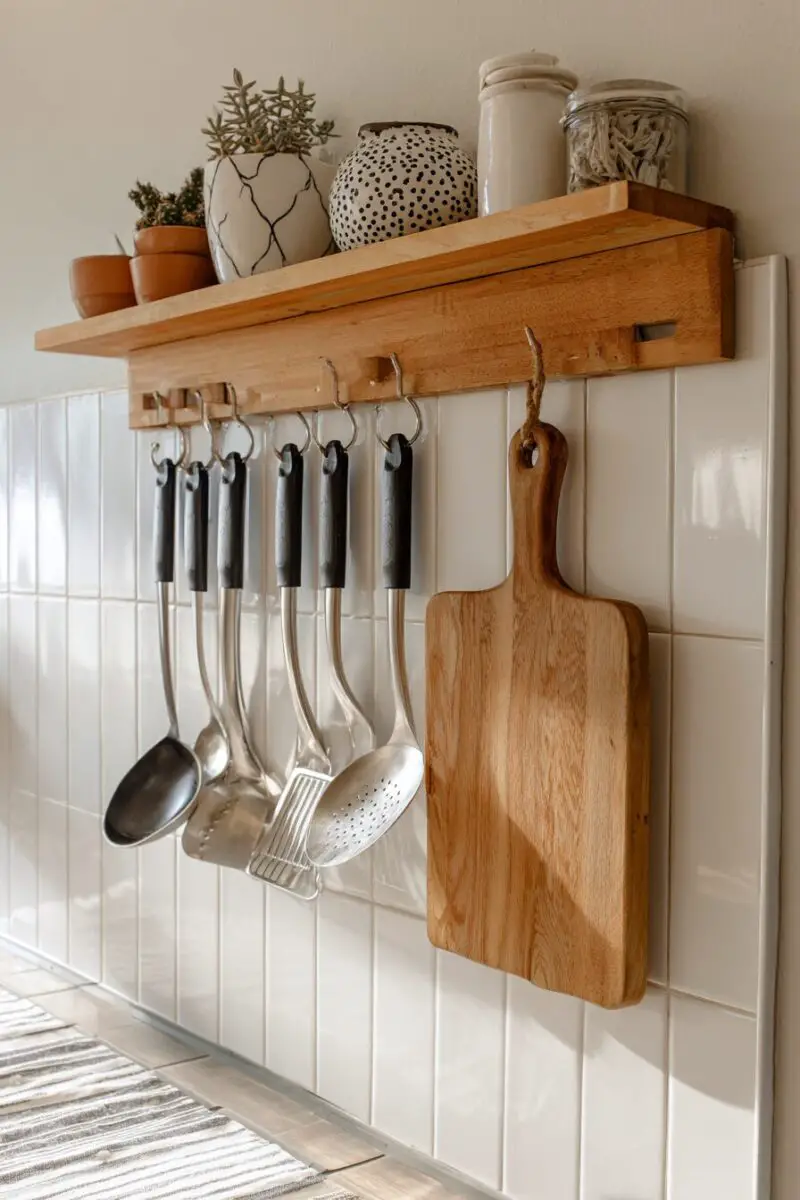
Smart storage solutions keep your kitchen organized while adding personality and style to your walls.
Decorative hooks and magnetic strips provide functional storage that doubles as attractive design elements for less than $75.
These additions free up valuable drawer and cabinet space while keeping frequently used items within easy reach.
Install a magnetic knife strip on your backsplash or inside a cabinet door to safely store sharp knives while freeing up counter space.
Magnetic spice containers stick directly to the strip, creating an organized spice collection that’s both functional and visually appealing.
Heavy-duty hooks can hold everything from dish towels and oven mitts to small pots and cooking utensils.
Install hooks inside cabinet doors for measuring cups, cutting boards, or cleaning supplies.
A rail system with S-hooks provides flexible storage that you can adjust as your needs change.
Decorative hooks come in countless styles, from rustic iron to sleek modern designs that complement any kitchen aesthetic.
Vintage-style hooks add character and charm, while contemporary designs keep things clean and minimal.
Install hooks at different heights to accommodate various items and create visual interest on your walls.
A magnetic strip inside your pantry door can hold small metal containers, measuring spoons, or even scissors.
Under-cabinet magnetic strips keep metal measuring cups and spoons organized and easily accessible.
Command strips and adhesive hooks work well for renters who can’t make holes in walls.
Position hooks and strips where they’ll be most useful – near the stove for cooking utensils, by the sink for dish towels, or near the refrigerator for frequently used tools.
These organizational elements not only improve functionality but also add layers of interest that make your kitchen feel more designed and intentional.
Your kitchen makeover doesn’t have to drain your savings account or take months to complete.
These simple, budget-friendly ideas prove that with a little creativity and effort, you can create a space that feels fresh, functional, and entirely your own.
