Are you staring at your small garden space wondering how to make it special?
Don’t worry!
Small gardens can be just as amazing as big ones – maybe even better!
You just need some creativity and a few simple ideas to get started.
When you have limited space, every inch counts, which means you can focus on making each part of your garden absolutely perfect.
Think of your small garden as a cozy outdoor room where you can relax, grow some plants, and enjoy nature.
Even if your garden is just a tiny balcony or a small patch of yard, there are tons of ways to make it beautiful and functional.
Plus, there’s something extra special about sitting in a garden that you created with your own hands.
1. Create a Vertical Herb Garden Using Pallets

Vertical gardening is perfect when you don’t have much ground space to work with.
An old wooden pallet can be transformed into an amazing herb garden that hangs on your wall.
First, find a pallet in good condition – many stores give them away for free if you just ask.
Sand down any rough edges to prevent splinters when you’re picking your herbs later.
Add a layer of landscape fabric to the back and sides of the pallet to hold in soil.
Staple the fabric securely so soil doesn’t fall out when you stand the pallet upright.
Fill the spaces between the wood slats with good quality potting soil mixed with some compost.
Plant different herbs in each section – basil, mint, rosemary, and thyme all grow well in vertical gardens.
Keep plants that need similar amounts of water together in the same sections.
Water your vertical herb garden carefully at first until the plants establish themselves.
Hang your pallet garden in a spot that gets at least 6 hours of sunlight each day.
The best part about a vertical herb garden is having fresh herbs right at your fingertips when cooking.
Your vertical garden also serves as living wall art, adding color and life to plain fences or walls.
If herbs aren’t your thing, you could plant flowers, succulents, or even small vegetables instead.
As an added bonus, the height of your vertical garden makes it easier to care for without bending over.
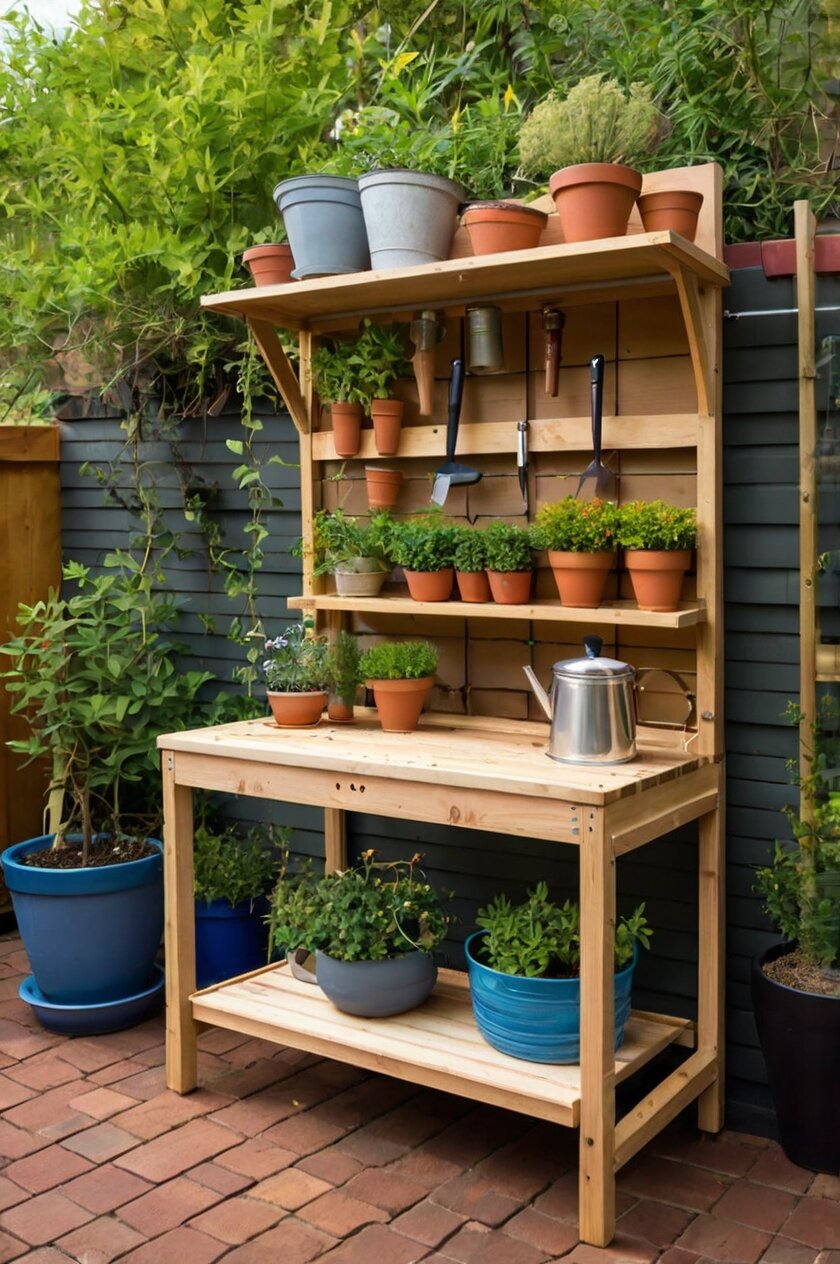
2. Build a Space-Saving Fold-Down Potting Bench

A potting bench is super useful for any gardener, but traditional ones take up too much space in a small garden.
The solution?
A fold-down potting bench that attaches to your wall or fence!
Start with a piece of weather-resistant wood that’s about 3 feet wide and 2 feet deep.
Attach sturdy hinges to one side so it can fold up against the wall when not in use.
Install brackets underneath that swing out to support the bench when it’s in the down position.
Add a chain on each side to stop the bench from falling too far down.
Paint or stain your bench to protect it from the weather and match your garden style.
Include hooks along the back edge to hang gardening tools when the bench is folded up.
Consider adding a small shelf above the bench for storing seed packets and small pots.
When you’re done potting plants, just fold the bench up and your garden space is free again!
This bench gives you a dedicated work space without permanently taking up valuable garden real estate.
You might want to add a small lip around the edges to keep soil from spilling onto the ground.
For extra organization, attach small containers to the inside of the bench to hold plant markers, twine, and other small items.
During winter months, your fold-down bench provides storage space while taking up almost no room.
This is one of those projects that will make you wonder how you ever gardened without it!
3. Make a DIY Pallet Sofa with Built-in Planters

Why buy expensive outdoor furniture when you can make your own custom sofa that includes planters?
Pallets are perfect for this project because they’re sturdy, often free, and already have a built-in design.
You’ll need about 3-4 pallets depending on how big you want your sofa to be.
Sand all the pallets thoroughly to avoid any splinters when you’re relaxing.
Stack two pallets on top of each other for the base of your sofa to give it the right height.
Use another pallet as the backrest, securing it firmly to the base with screws or brackets.
Add caster wheels to the bottom if you want to be able to move your sofa around easily.
Create cushions using outdoor fabric and foam – you can find tutorials online for this part.
The most unique feature comes next – built-in planters on the armrests or along the back!
Use the natural spaces in the pallet structure to create planting pockets.
Line these spaces with landscape fabric before adding soil and plants.
Choose trailing plants like ivy, petunias, or strawberries that will cascade down the sides of your sofa.
Seal all wooden parts with outdoor wood sealer to protect from rain and extend the life of your sofa.
Your pallet sofa becomes both comfortable seating and a beautiful garden feature in one.
The plants help integrate the furniture into your garden, making it feel like a natural part of the space.
This multi-purpose piece is perfect for small gardens where every item needs to work extra hard.
4. Install a Space-Efficient Rain Barrel System

Collecting rainwater is eco-friendly and saves money on your water bill.
Even in a small garden, you can set up a compact rain barrel system that doesn’t take up much room.
Look for slim rain barrels designed to sit flush against walls or fences.
Position your rain barrel under a downspout from your roof or shed to collect the most water.
Make sure to place it on a solid, level base like concrete blocks or a sturdy stand.
The higher your rain barrel sits, the better water pressure you’ll get when using it.
Install a spigot near the bottom of the barrel for easy access to the collected water.
Add an overflow hose that directs excess water away from your home’s foundation.
Consider connecting multiple slim barrels in series if you want to collect more water without using more ground space.
Paint your rain barrel to match your house or garden decor so it looks intentional rather than utilitarian.
Use the collected rainwater for your potted plants, which often need more frequent watering than in-ground plants.
Your plants will appreciate the unchlorinated rainwater – it’s actually better for them than tap water!
During dry spells, you’ll be thankful to have your own water supply for your garden.
A 50-gallon rain barrel can fill up during just one good rainstorm.
For winter in cold climates, you’ll need to disconnect and drain your rain barrel to prevent freezing and cracking.
5. Design a Multi-Level Container Garden


When ground space is limited, think about growing upward with a multi-level container garden.
Start by finding or building a sturdy shelving unit that can withstand outdoor conditions.
Metal plant stands work well, or you can build simple shelves using cinder blocks and wood planks.
Position your shelving unit where it will get the appropriate amount of sunlight for your plants.
Choose containers in varying sizes that fit well on your shelves without hanging over too much.
Make sure all containers have drainage holes to prevent root rot.
Fill the bottom of deep containers with rocks or broken pottery pieces before adding soil to improve drainage and reduce weight.
Place larger plants on lower shelves and smaller ones up high where they’ll be easier to see.
Consider the mature size of plants when positioning them – some may grow much larger than when you bought them.
Group plants with similar water and light needs together to make maintenance easier.
Use the highest shelf for shade-loving plants if the structure itself creates shade.
Add trailing plants to hang down from upper levels, creating a waterfall effect of greenery.
Incorporate plants with different textures, heights, and colors for visual interest.
Water the top level first so excess can drip down to plants below, potentially reducing your watering needs.
Your multi-level garden creates the feeling of a lush, plant-filled space while using minimal ground area.
This approach works great against walls or in corners where you can maximize vertical space.
6. Build a Compact Water Feature from a Pot
Water features add a sense of tranquility to any garden, and they don’t have to be large or complicated.
A simple pot fountain can fit in even the smallest garden space.
Start with a glazed ceramic pot in whatever color matches your garden style.
You’ll need a small submersible pump that you can find at any garden center.
Drill a hole in the bottom of the pot for the pump cord to pass through.
Place the pump inside the pot and run the cord out through the hole.
Add clean rocks or pebbles to the bottom of the pot to elevate the pump slightly and create a natural look.
Fill the pot with water until the pump is completely submerged.
Plug in the pump and adjust the flow rate until you get a gentle, soothing sound.
The sound of trickling water creates a peaceful atmosphere and helps mask street noise.
Add floating plants like mini water lilies if your pot is large enough.
Place your pot fountain where you can see and hear it from your favorite garden sitting spot.
Solar-powered pumps are available if you don’t have an outdoor electrical outlet nearby.
In winter, bring your pot fountain indoors or empty and cover it to prevent freezing damage.
This small water feature attracts beneficial wildlife like birds and butterflies to your garden.
The humidity created around your water feature benefits nearby plants, especially during dry weather.
7. Craft a Hanging Basket Privacy Screen
Privacy can be hard to come by in small gardens, especially in urban areas or apartments.
Creating a hanging basket privacy screen gives you both beauty and seclusion.
Start by installing sturdy hooks or a rod across the area where you want privacy.
Choose matching hanging baskets or mix different styles for an eclectic look.
Hang the baskets at slightly different heights to create a fuller screen effect.
Select trailing plants that will grow downward, filling in the spaces between baskets.
Ivy, ferns, petunias, and sweet potato vine are excellent choices for fullness and coverage.
Mix in some flowering plants for color among the greenery.
Water your hanging baskets regularly as they tend to dry out faster than ground plants.
Add slow-release fertilizer to keep your plants growing vigorously all season.
For winter privacy, consider baskets with evergreen plants like certain ivies or small conifers.
Your living privacy screen can be installed along balcony edges, patio perimeters, or property lines.
The movement of plants in the breeze adds a dynamic quality that static privacy screens don’t have.
This solution works well when you can’t install permanent structures due to rental agreements or HOA rules.
As an added bonus, your screen helps clean the air and provides a bit of natural cooling.
The screen can be easily modified or moved if your privacy needs change over time.
8. Create a Pebble Mosaic Stepping Stone Path
A beautiful path doesn’t need to take up much space but adds structure to a small garden.
Making your own pebble mosaic stepping stones allows you to create custom garden art underfoot.
Start by purchasing concrete mix and collecting smooth, flat pebbles in various colors.
You can find pebbles at craft stores, garden centers, or even collect them from beaches (where permitted).
Use a plastic plant saucer or cake pan as a mold for each stepping stone.
Spray the inside of your mold with cooking oil so the concrete won’t stick.
Mix the concrete according to package directions to a thick but pourable consistency.
Pour the concrete into your mold, filling it about halfway.
Arrange your pebbles on top in a pattern or design that reflects your personality.
Press the pebbles gently into the concrete, leaving their tops exposed.
Allow the stepping stone to cure for at least 48 hours before removing it from the mold.
Create multiple stones with coordinating designs to form a path through your garden.
Install your stepping stones by digging shallow depressions in the soil and setting the stones so they’re level with the ground.
The space between stones can be filled with grass, ground cover plants, or decorative gravel.
Your pebble mosaic path creates a focal point while also providing practical access through your garden.
These handmade stones add a personal touch that store-bought pavers just can’t match.
9. Install a Wall-Mounted Fold-Down Table
Outdoor dining space is important, but a permanent table takes up precious room in a small garden.
A wall-mounted fold-down table solves this problem perfectly!
Look for plans online or modify a fold-down desk design to be weather-resistant.
Choose cedar, teak or pressure-treated lumber that will stand up to outdoor conditions.
Mount the table securely to a wall, fence, or the side of a shed.
When folded up, the table should lay flat against the mounting surface.
Add a simple latch to keep it secure in the up position during windy weather.
When folded down, support the table with fold-out legs or wall-mounted brackets.
Size your table appropriately for your space – even a 24″ x 36″ table can seat two people comfortably.
Paint or stain your table to match your garden decor and protect the wood.
When not in use for dining, your fold-down table becomes a potting surface or display area for plants.
Store folding chairs nearby that can be brought out when needed and tucked away when not in use.
For extra charm, paint a checkerboard on the underside of the table so it becomes a game board when folded up.
This multi-purpose addition to your garden takes up almost no space when not in use.
Your guests will be impressed by your clever space-saving solution.
During winter months, you can detach the table completely if desired, or leave it folded up until spring.
10. Design a Miniature Fairy Garden
Fairy gardens are magical miniature landscapes that pack a lot of charm into a tiny footprint.
You can create an entire enchanted world in just a single container!
Start with a wide, shallow container like a large terracotta pot or wooden half-barrel.
Fill it with high-quality potting soil mixed with some sand for good drainage.
Select miniature plants that look like tiny trees and shrubs in your fairy landscape.
Moss makes perfect “lawns” for your tiny garden residents.
Create paths using small pebbles, crushed shells, or miniature bricks made from cut craft sticks.
Add a fairy house – you can buy one or make your own from natural materials like bark, twigs, and pinecones.
Install a tiny fence using twigs, popsicle sticks, or small branches.
Create a miniature pond using a small mirror or the lid from a jar buried in the soil.
Add fairy garden accessories like tiny benches, ladders, wheelbarrows, and other garden tools.
Position your fairy garden where you can enjoy it up close – on a table, steps, or raised platform.
Children love helping design fairy gardens, making this a perfect family project.
Change your fairy garden with the seasons by adding tiny pumpkins in fall or miniature holiday decorations in winter.
The small scale makes this garden easy to care for, with minimal watering and maintenance needed.
Your fairy garden becomes a whimsical conversation piece that brings joy to visitors of all ages.
11. Construct a Tiered Strawberry Planter
Strawberries are perfect for small gardens because they don’t need much space when grown vertically.
A tiered planter lets you grow dozens of strawberry plants in a footprint of just a few square feet.
Start with three terracotta pots in graduating sizes – large, medium, and small.
Drill several drainage holes in the bottom of each pot if they don’t already have them.
Thread a metal rod through the drainage holes to stack and secure the pots together.
Fill each pot with good quality potting soil mixed with compost.
Plant strawberries around the edges of each pot, spacing them about 6 inches apart.
The cascading growth habit of strawberries makes them perfect for tiered planters.
Water your strawberry tower from the top so moisture trickles down to all levels.
Position your strawberry planter in full sun for the best fruit production.
Add a layer of straw around the plants to keep developing berries clean and dry.
Fertilize monthly with a balanced organic fertilizer to encourage continuous fruiting.
Your tiered planter can produce berries from late spring through fall depending on the varieties you choose.
The vertical design makes harvesting easy and keeps berries away from slugs and other ground pests.
In winter, move your strawberry planter to a protected area or wrap it with burlap in cold climates.
This space-saving solution provides fresh, homegrown strawberries even in the tiniest garden.
12. Make a Shoe Organizer Herb or Flower Garden
An over-the-door shoe organizer becomes an ingenious vertical garden with this simple hack.
Choose a canvas shoe organizer rather than a plastic one for better breathability.
Hang your shoe organizer on a fence, wall, or the side of a shed.
Make drainage holes in the bottom of each pocket using a sharp pair of scissors.
Fill each pocket with lightweight potting mix.
Plant one herb or small flower in each pocket.
Label each pocket with a plant marker or write directly on the canvas with a permanent marker.
Water carefully, allowing excess moisture to drain out the bottom holes.
Herbs that grow well in this system include basil, thyme, oregano, mint, and chives.
For flowers, try pansies, marigolds, alyssum, or other compact varieties.
The beauty of this garden is that it takes up zero ground space!
Position your shoe organizer garden where it gets appropriate sunlight for the plants you’ve chosen.
During heavy rain, you might want to temporarily move or cover your hanging garden to prevent waterlogging.
Rotate your organizer occasionally if you notice plants growing toward the light.
This project costs very little but provides lots of growing space in a tiny footprint.
Your unique vertical garden becomes a conversation piece while providing fresh herbs or flowers all season.
13. Build a Corner Trellis for Climbing Vegetables
Corners are often underutilized in small gardens, but they’re perfect spots for growing vertically.
A corner trellis takes advantage of two walls or fences meeting at a right angle.
You can build a simple corner trellis using wooden lattice panels.
Cut the lattice to fit your corner space, extending as high as you’d like plants to grow.
Secure the lattice to your fence, wall, or posts installed specifically for this purpose.
Plant climbing vegetables like cucumbers, beans, or peas at the base of your trellis.
Train young plants to climb by gently tying stems to the lattice with garden twine.
Soon your plants will grab onto the trellis themselves and continue climbing upward.
The corner location provides some wind protection for delicate climbing plants.
A single cucumber plant can produce dozens of cucumbers while taking up almost no ground space.
Harvest regularly to encourage continued production throughout the growing season.
The vertical growth makes it easier to spot pests and diseases early.
Your corner trellis creates a beautiful green backdrop that enhances your entire garden.
In fall, clean off the trellis and plant cool-season climbers like sweet peas for extended garden interest.
During winter, the trellis structure adds visual interest even without plants growing on it.
This simple DIY project transforms an unused corner into one of the most productive spots in your garden.


