Your kitchen table doesn’t have to be boring anymore.
With the right makeover ideas, you can turn that tired old piece of furniture into the stunning centerpiece your dining area deserves.
Love This Post? You’ll Love My Book!
I wasted THOUSANDS on decorating mistakes you can EASILY AVOID. ✨ My book shares every lesson I learned the hard way—so you can create a home you LOVE without the costly trial and error. 🏡
Get the Book NowEpoxy Resin River Table Magic

Picture a crystal-clear river flowing right through the middle of your dining table.
That’s exactly what you’ll get with an epoxy resin river table makeover that’s guaranteed to stop guests in their tracks.
This technique involves creating a “river” of colored epoxy resin between two pieces of live-edge wood, giving your table an absolutely breathtaking natural aesthetic.
Start by selecting two matching pieces of wood with interesting grain patterns and natural edges.
Sand both pieces thoroughly, working your way up to 220-grit sandpaper for the smoothest possible finish.
Create a dam around the edges using painter’s tape and cardboard to contain the epoxy during the pour.
Mix your epoxy resin according to manufacturer instructions, adding blue, green, or clear tinting to achieve your desired river effect.
Pour the resin slowly and steadily, allowing it to self-level and create that gorgeous glass-like surface.
You can add metallic powders, glitter, or even small decorative elements like shells or stones to make the river effect even more dramatic.
The curing process typically takes 24-48 hours, but the wait is absolutely worth it when you see the final result.
Once fully cured, sand the entire surface with progressively finer grits, starting at 120 and finishing with 400-grit sandpaper.
Apply several coats of high-quality polyurethane finish to protect your masterpiece and give it that professional, furniture-store shine.
This makeover works particularly well with walnut, cherry, or oak wood, as their rich grain patterns complement the flowing resin beautifully.
The contrast between the natural wood texture and the smooth, glossy resin creates an almost hypnotic visual effect that draws the eye.
Your guests won’t be able to stop running their hands along the surface, marveling at how the light plays across the different textures.
The best part about this makeover is that no two tables will ever look exactly the same, making your piece truly one-of-a-kind.
💭 I Wrote a Book About My BIGGEST Decorating Mistakes!
When I decorated my first home, I thought I knew what I was doing. Spoiler alert: I DIDN’T. 😅
💸 I bought a sofa that was WAY TOO BIG for my living room. I chose paint colors that looked amazing in the store but terrible on my walls. I spent THOUSANDS on pieces that didn’t work together. Sound familiar?
“Things I Wish I Knew Before I Decorated My First Home” is your shortcut to avoiding ALL my costly mistakes. ✨ Inside, you’ll find practical, NO-NONSENSE advice that will save you time, money, and a whole lot of decorating regret. 🏡
🎯 Grab Your Copy Now!Farmhouse Charm with Chalk Paint

Nothing says cozy farmhouse vibes quite like a perfectly distressed chalk paint finish that looks like it’s been loved for generations.
This makeover technique transforms any ordinary table into a rustic masterpiece that would fit perfectly in a French countryside cottage.
Chalk paint is incredibly forgiving and perfect for beginners who want professional-looking results without years of experience.
Start by giving your table a light sanding to remove any glossy finish and create a surface that the paint can grip effectively.
You don’t need to sand down to bare wood – just rough up the existing finish enough to help the chalk paint adhere properly.
Choose classic farmhouse colors like antique white, French linen, or soft gray for that authentic vintage appeal.
Apply the first coat of chalk paint using a natural bristle brush, working in long, smooth strokes that follow the wood grain.
Don’t worry about achieving perfect coverage on the first coat – chalk paint is meant to be layered for depth and character.
Allow the first coat to dry completely before applying the second coat, which should give you the full coverage you’re looking for.
Once your base color is completely dry, it’s time to add that gorgeous distressed finish that makes chalk paint so popular.
Use medium-grit sandpaper to gently sand edges, corners, and high-wear areas where natural aging would occur over time.
Focus on areas like table edges, chair backs, and anywhere hands would naturally touch and wear away paint over decades of use.
The key to realistic distressing is subtlety – you want it to look naturally aged, not like you took a sander to a perfectly good table.
Apply a dark wax or glaze to the entire surface, working it into all the grooves and distressed areas with a lint-free cloth.
This step adds incredible depth and makes all those carefully distressed areas pop with authentic-looking age and character.
Finish with a clear protective wax to seal your work and give the surface a soft, touchable finish that invites people to gather around.
Design Your Dream Room in Minutes! – By Madison
🏡 Start Creating FREE →Mosaic Tile Masterpiece

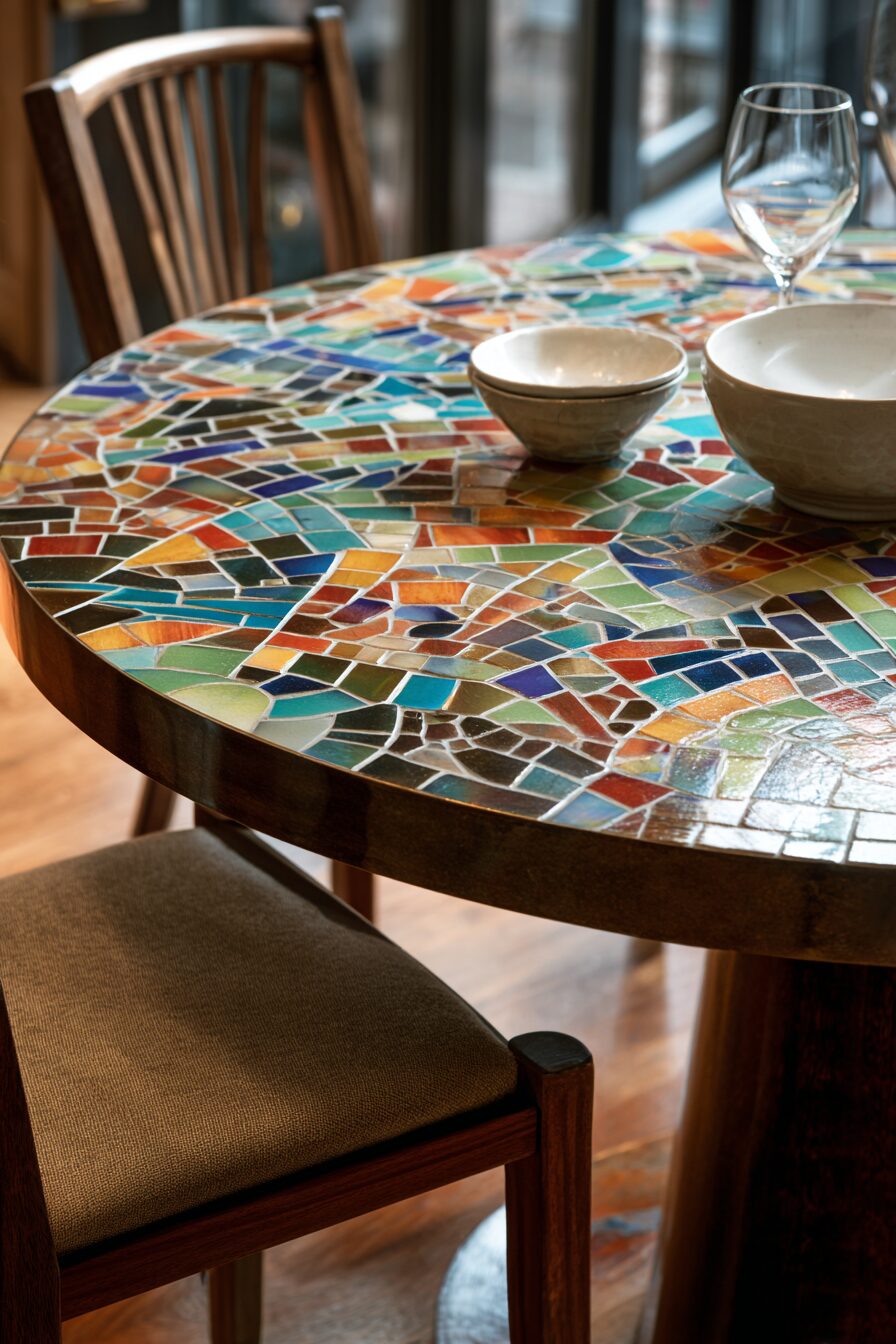
Transform your boring table into an artistic conversation piece with a stunning mosaic tile top that looks like it belongs in a Mediterranean villa.
This technique lets you express your creativity while creating a durable, easy-to-clean surface that’s perfect for everyday family meals.
Mosaic work might seem intimidating, but with the right materials and a bit of patience, you’ll create something absolutely spectacular.
Start by measuring your table top and sketching out your design on paper, playing with different patterns and color combinations.
Popular mosaic patterns include geometric designs, flowing organic shapes, or even recreating favorite artwork in tile form.
Choose tiles that complement your kitchen’s existing color scheme – ceramic, glass, or natural stone tiles all work beautifully for this project.
Remove your table’s existing top if it’s damaged, or sand it thoroughly to create a clean, level surface for your mosaic.
Apply a high-quality primer designed for the material you’re working with, ensuring proper adhesion for your tile adhesive.
Start laying your tiles from the center of the table and work your way outward, using tile spacers to maintain consistent gaps.
Take your time with this step – rushing will result in uneven spacing and a less professional-looking final product.
Use a rubber mallet to gently tap each tile into place, ensuring they’re all level and firmly seated in the adhesive.
Once all tiles are placed and the adhesive has cured according to manufacturer instructions, it’s time for the grouting process.
Mix your grout to a peanut butter-like consistency and work it into all the gaps using a rubber float held at a 45-degree angle.
Clean excess grout from tile surfaces immediately with a damp sponge, being careful not to pull grout out of the joints.
Allow the grout to cure completely before applying a high-quality sealer that will protect your masterpiece from stains and moisture.
The finished result is a completely unique table that serves as functional furniture and beautiful art piece rolled into one stunning package.
Love This Post? You’ll Love My Book!
I wasted THOUSANDS on decorating mistakes you can EASILY AVOID. ✨ My book shares every lesson I learned the hard way—so you can create a home you LOVE without the costly trial and error. 🏡
Get the Book NowReclaimed Wood Rustic Revival

Nothing beats the character and warmth of reclaimed wood for creating a table that tells a story with every weathered board.
This makeover technique celebrates imperfections and natural aging, turning them into the most beautiful features of your new dining centerpiece.
Reclaimed wood carries decades of history in its grain, nail holes, and natural patina that simply can’t be replicated with new materials.
Source your reclaimed wood from old barns, shipping pallets, or architectural salvage companies that specialize in authentic vintage materials.
Look for boards with interesting character marks like nail holes, saw marks, or natural checking that adds to the authentic rustic appeal.
Each piece should be carefully inspected for structural integrity – you want character, not actual damage that could compromise your table’s stability.
Start by cleaning your reclaimed boards thoroughly, removing any loose debris, old nails, or hardware that might interfere with your project.
Sand lightly to smooth any dangerous splinters while preserving the natural character marks that make reclaimed wood so appealing.
Arrange your boards in the most visually pleasing pattern, mixing different widths and character marks for maximum rustic impact.
Some boards might need minor trimming to fit properly, but try to preserve as much of the original character as possible.
Join your boards using traditional woodworking techniques like tongue-and-groove joints or simple edge-gluing for a seamless surface.
Apply a food-safe finish that enhances the natural wood tones while protecting the surface from spills and daily wear.
Tung oil or Danish oil work particularly well because they penetrate the wood and enhance its natural beauty without creating a plastic-like surface.
The natural variations in color and texture create a stunning visual tapestry that makes every meal feel like a gathering in a rustic mountain lodge.
Your finished table will have more personality than any store-bought piece, with each imperfection telling part of its unique story.
💭 I Wrote a Book About My BIGGEST Decorating Mistakes!
When I decorated my first home, I thought I knew what I was doing. Spoiler alert: I DIDN’T. 😅
💸 I bought a sofa that was WAY TOO BIG for my living room. I chose paint colors that looked amazing in the store but terrible on my walls. I spent THOUSANDS on pieces that didn’t work together. Sound familiar?
“Things I Wish I Knew Before I Decorated My First Home” is your shortcut to avoiding ALL my costly mistakes. ✨ Inside, you’ll find practical, NO-NONSENSE advice that will save you time, money, and a whole lot of decorating regret. 🏡
🎯 Grab Your Copy Now!Two-Tone Paint Perfection

Create visual drama and sophisticated style with a two-tone paint technique that makes your table look like it came from an expensive boutique furniture store.
This approach uses contrasting colors to highlight different parts of your table, creating depth and interest that draws the eye.
The key to successful two-tone painting is choosing colors that complement each other while providing enough contrast to make the design pop.
Classic combinations include navy blue with white, charcoal gray with cream, or sage green with warm white for timeless appeal.
Start by thoroughly cleaning and lightly sanding your table to ensure proper paint adhesion on all surfaces.
Prime any previously painted or stained surfaces with a high-quality bonding primer that will prevent bleed-through and ensure even color coverage.
Begin with your lighter color, applying it to the larger surface area – typically the table top and main body of the piece.
Use a high-quality synthetic brush or foam roller for smooth, even coverage that won’t leave brush marks or streaks.
Allow the base color to dry completely before moving on to the second color application, which requires careful masking.
Apply painter’s tape along all edges where the two colors will meet, pressing down firmly to prevent paint bleeding underneath.
Choose areas like table legs, aprons, or drawer fronts for your contrasting color to create clear visual separation between elements.
Apply your second color using the same careful technique, building up coverage with multiple thin coats rather than one thick application.
Remove the painter’s tape while the final coat is still slightly wet to ensure clean, crisp lines between the two colors.
Any minor imperfections can be touched up with a small artist’s brush once everything is completely dry.
Finish with a protective topcoat that will help your beautiful paint job withstand daily use and family life.
The contrast between the two colors creates an almost custom furniture look that makes your table appear much more expensive than it actually was.
Luxurious Marble Contact Paper


Get the high-end look of expensive marble without the crushing price tag by using premium contact paper that looks incredibly realistic.
Today’s contact papers are so sophisticated that even close inspection won’t reveal their true nature to most observers.
This technique works particularly well on tables with smooth, flat surfaces that won’t show the seams of the contact paper application.
Choose a marble pattern that complements your kitchen’s existing finishes – Carrara marble patterns work beautifully with white and gray color schemes.
Start by thoroughly cleaning your table surface and ensuring it’s completely smooth and free from any bumps or imperfections.
Measure your table top carefully and cut your contact paper about two inches larger than needed on all sides for proper wrapping.
Remove the backing paper gradually as you apply the contact paper, starting from one edge and working your way across systematically.
Use a smoothing tool or credit card wrapped in felt to eliminate air bubbles as you go, working from the center outward.
Take extra care around edges and corners, pulling the material taut and trimming with a sharp craft knife for clean, professional-looking seams.
A hair dryer can help make the contact paper more pliable around curved edges and help it conform to slight surface irregularities.
Once your table top is covered, carefully trim excess material, leaving just enough to wrap around the edges for a finished appearance.
For an extra luxurious touch, add matching contact paper to drawer fronts or other flat surfaces on your table base.
The realistic marble patterns available today include subtle veining and color variations that make the finished result virtually indistinguishable from real stone.
This makeover can be completed in a single afternoon, yet the results will make your dining area look like it received a thousand-dollar upgrade.
Guests will be amazed when you tell them your “marble” table top cost less than fifty dollars to create.
Love This Post? You’ll Love My Book!
I wasted THOUSANDS on decorating mistakes you can EASILY AVOID. ✨ My book shares every lesson I learned the hard way—so you can create a home you LOVE without the costly trial and error. 🏡
Get the Book NowStenciled Pattern Paradise

Turn your plain table into a work of art with carefully chosen stencils that add personality and visual interest to every surface.
Stenciling lets you achieve intricate, professional-looking patterns without requiring advanced artistic skills or expensive equipment.
This technique works beautifully over any painted base, allowing you to layer patterns and colors for truly custom results.
Choose stencil patterns that reflect your personal style – geometric designs for modern spaces, florals for traditional settings, or bold graphics for eclectic interiors.
Start with a solid base color that will serve as the background for your stenciled pattern, allowing it to dry completely before stenciling.
Secure your stencil firmly to the surface using removable spray adhesive or painter’s tape to prevent shifting during paint application.
Load your stencil brush with a small amount of paint, dabbing off excess on paper towels to prevent bleeding under the stencil edges.
Apply paint using a straight up-and-down dabbing motion rather than brushing, which could push paint under the stencil and blur your design.
Work systematically across your table surface, repositioning the stencil carefully to maintain pattern alignment and consistent spacing.
For multi-colored patterns, allow each color to dry completely before adding the next layer to prevent unwanted color mixing.
Pay special attention to corners and edges where stencils might not lay perfectly flat, taking extra care to prevent paint bleeding.
Once your entire pattern is complete and fully dry, step back to evaluate the overall effect and touch up any areas that need attention.
Some patterns benefit from a light distressing with fine sandpaper to give them a more organic, hand-painted appearance.
Seal your stenciled masterpiece with several coats of protective finish to ensure your beautiful pattern work will withstand daily use.
The finished result looks like expensive hand-painted furniture that would cost thousands in a high-end boutique store.
Your friends will never believe you created such an intricate, professional-looking design yourself using simple stencils and basic craft paint.
Distressed Vintage Elegance

Create the perfect shabby chic centerpiece with carefully applied distressing techniques that make your table look like a treasured antique.
This technique celebrates the beauty of age and wear, turning what might be considered flaws into the most charming features of your furniture.
Authentic-looking distressing requires patience and restraint – the goal is to mimic natural wear patterns, not random damage.
Start by studying genuinely aged furniture to understand how pieces naturally wear over time in areas of high use and handling.
Apply your base paint color in a slightly uneven manner, allowing some brush strokes and minor imperfections to show through.
Once your base coat is completely dry, apply a second color in areas where natural layering might occur over decades of repainting.
Use different grits of sandpaper to create varying levels of wear, from light scuffing to areas where underlying wood shows through completely.
Focus your heaviest distressing on edges, corners, and anywhere hands would naturally touch the table over years of daily use.
Medium-grit sandpaper works well for creating realistic edge wear, while fine-grit paper creates subtle surface scuffing.
Add authentic-looking dings and dents using a hammer and various sized nails, bolts, or chains for different impact patterns.
These intentional “damage” marks should be applied randomly but thoughtfully, mimicking how furniture naturally accumulates character over time.
Apply dark wax or antiquing glaze to all the distressed areas, allowing it to settle into cracks and worn spots for added depth.
This step is crucial for making your distressing look authentic – the darker areas simulate years of accumulated dirt and handling.
Buff away excess wax or glaze, leaving deeper color only in the recessed areas where natural aging would deposit grime.
The finished table should look like it’s been lovingly used by several generations, with each worn spot telling part of its story.
Modern Hairpin Leg Transformation

Give your traditional table a contemporary makeover with sleek hairpin legs that instantly modernize the entire piece.
This transformation works particularly well with round or rectangular tops, creating clean lines that fit perfectly in modern and mid-century inspired interiors.
Hairpin legs are available in various heights and finishes, allowing you to customize the look to match your specific space and style preferences.
Remove your table’s existing base carefully, taking note of any mounting hardware that might be reused or replaced.
Sand and refinish your table top if needed, or leave it natural if the existing finish complements your new modern aesthetic.
Choose hairpin legs in proportions that suit your table top – thicker legs for heavier tops, and more delicate versions for lighter pieces.
Black powder-coated legs create a bold, industrial look, while brass or copper finishes add warmth and sophistication to the design.
Mark mounting holes carefully using the leg brackets as templates, ensuring perfect alignment for a stable, professional-looking installation.
Pre-drill all screw holes to prevent splitting, especially if you’re working with hardwood or thick table tops.
Attach each leg using the provided mounting hardware, checking that all legs are perfectly level before fully tightening the screws.
The transformation from traditional to modern happens instantly, creating a piece that looks like it came from a contemporary design showroom.
This makeover works particularly well in open-concept spaces where the table’s clean lines won’t compete with other furniture pieces.
The slender profile of hairpin legs makes even large tables appear lighter and less bulky, perfect for smaller dining areas.
Your newly modernized table will bridge the gap between vintage charm and contemporary style, creating a unique piece that works in various decorating schemes.
The best part about this makeover is its reversibility – you can always swap back to traditional legs if your style preferences change over time.
Love This Post? You’ll Love My Book!
I wasted THOUSANDS on decorating mistakes you can EASILY AVOID. ✨ My book shares every lesson I learned the hard way—so you can create a home you LOVE without the costly trial and error. 🏡
Get the Book NowButcher Block Top Replacement

Transform any table into a warm, inviting centerpiece with a gorgeous butcher block top that brings natural beauty to your dining space.
This makeover technique works exceptionally well for tables with sturdy bases but worn or damaged tops that need complete replacement.
Butcher block provides a durable, heat-resistant surface that’s perfect for families who actually use their dining tables for cooking prep and daily meals.
Choose your wood species based on your kitchen’s existing finishes – maple for light, contemporary spaces, or walnut for rich, traditional settings.
Oak provides beautiful grain patterns at a moderate price point, while cherry develops a gorgeous patina that deepens over time.
Measure your existing table base carefully to ensure your new butcher block top will be properly proportioned and stable.
Most home improvement stores can cut butcher block to your exact specifications, saving you time and ensuring perfectly straight edges.
Sand your new top thoroughly, starting with 120-grit sandpaper and working up to 220-grit for an incredibly smooth finish.
Apply food-safe mineral oil or specialized butcher block conditioner to protect the wood and enhance its natural color and grain.
These finishes penetrate deep into the wood fibers, providing protection from within rather than creating a surface coating that can chip or peel.
Allow the first application to soak in completely before applying additional coats – hungry wood might need three or four applications initially.
Mount your new top securely to the existing base using appropriate hardware that allows for natural wood movement with humidity changes.
The rich, natural wood grain creates instant warmth and character that makes your dining area feel more welcoming and homey.
Regular maintenance with mineral oil or butcher block conditioner will keep your new top looking beautiful for decades of family gatherings.
Your investment in a quality butcher block top will pay dividends in both beauty and functionality, creating a table that truly improves with age and use.
Your kitchen table makeover journey doesn’t have to break the bank or require professional skills.
With these ten stunning ideas, you’ll have everything you need to create a dining space that reflects your personal style and makes every meal feel special.
