eometric accent walls have become the ultimate way to add personality and visual interest to any room without committing to a full renovation.
The right pattern can make a small space feel larger, add dimension to flat walls, and showcase your unique style in ways traditional decor simply can’t match.
If you’re a DIY newbie or a seasoned home decorator, these ten geometric accent wall ideas will help you create a stunning focal point that transforms your entire space.
Design Your Dream Room in Minutes! – By Madison
🏡 Start Creating FREE →Classic Herringbone Pattern with a Modern Twist


The herringbone pattern has stood the test of time, but with a few clever tweaks, you can turn this classic design into a conversation-starting masterpiece.
Unlike traditional herringbone floors that use wood, your painted version allows for bold color combinations that would be impossible with natural materials.
Start by measuring your wall and marking a center point from which your pattern will expand outward, creating a balanced look that draws the eye naturally.
Choose three complementary colors that match your existing decor—perhaps a neutral base with two accent colors that pick up tones from your furniture or textiles.
The secret to a perfect herringbone is precise tape lines, so invest in high-quality painter’s tape and a good level to ensure your angles stay consistent throughout the project.
Begin by painting your entire wall in your base color and allowing it to dry completely overnight—rushing this step will lead to bleeding edges that ruin the crisp lines of your design.
Create paper templates of your herringbone shapes to test the scale before committing to tape on your wall—too small and the pattern becomes busy, too large and it loses its sophisticated impact.
When applying the tape, press the edges firmly with a credit card or plastic tool to prevent paint seepage and ensure those razor-sharp lines that make geometric patterns so satisfying.
Work in sections rather than trying to tape the entire wall at once, which helps maintain precision and prevents the frustration of tape peeling off before you’ve finished painting.
After painting each section, remove the tape while the paint is still slightly wet for the cleanest possible lines—waiting until the paint dries completely can result in peeling and uneven edges.
Step back frequently during your painting process to ensure the pattern remains balanced and visually pleasing from different angles in the room.
Tap to Explore These Beauties
See my ideas in action 👇 Tap any image to explore full details.
Hexagonal Honeycomb Grid for Natural Elegance


Hexagons bring the organic beauty of nature indoors, mimicking the perfect geometry found in honeycomb structures while adding a contemporary edge to your living space.
Unlike straight-lined geometric patterns, hexagons create a softer, more organic flow across your wall that feels both structured and naturally inspired.
Begin your hexagon grid by creating a paper or cardboard template that you can trace repeatedly—consistency in size is crucial for a professional-looking finish.
The beauty of hexagons lies in their versatility—you can create a complete grid covering the entire wall or a partial design that appears to scatter and fade toward the edges.
Choose colors that transition gradually from dark to light to create depth, or use contrasting colors for a bold, graphic statement that immediately captures attention.
For an extra dimension of sophistication, leave some hexagons in your base wall color while painting others, creating a semi-transparent effect that adds subtle depth.
When taping your hexagon pattern, work from the center outward to ensure the most visible portion of your wall features the most precise and perfect shapes.
Take advantage of the hexagon’s natural ability to create optical illusions by using alternating colors that make certain shapes appear to advance or recede.
Extend your hexagon pattern partially onto adjacent walls for a wrapped effect that makes the room feel cohesive rather than compartmentalized.
Photograph your progress frequently from different angles to identify any inconsistencies in your pattern before they become too difficult to correct.
Dramatic Mountain Peak Silhouettes


Mountain peak silhouettes transform your wall into a majestic landscape, bringing the serenity and grandeur of nature into your everyday living space.
Unlike more traditional geometric patterns, mountain designs create an immediate emotional connection, evoking feelings of adventure and the great outdoors within your home.
Start by deciding whether you want jagged, dramatic peaks reminiscent of the Rockies or softer, rolling mountains like the Appalachians—this fundamental choice sets the mood for your entire space.
For added drama, incorporate a painted “sunset” or “sunrise” effect above your mountain peaks using subtle gradients of orange, pink, and purple that will cast a perpetual golden hour glow in your room.
The key to realistic mountain silhouettes lies in their irregularity, so avoid making your peaks too perfectly triangular—nature thrives on beautiful imperfection.
Create a mockup on paper first, then project it onto your wall using a digital projector to ensure perfect scaling and placement before committing to paint.
When taping your mountain outlines, create small tears or notches in the straight edge of your tape to mimic the natural roughness of rocky mountaintops.
For a contemporary twist, incorporate geometric elements into your mountains by creating some peaks with perfectly straight lines while keeping others natural.
Experiment with adding metallic accents to suggest sunlight hitting distant peaks, creating focal points that draw the eye across your mountain range.
Remember that less is more with mountain murals—allowing some negative space “sky” preserves the sense of expansiveness that makes mountain vistas so breathtaking in real life.
Find Your Room’s Color Palette
Tap a vibe — get a curated 5‑color palette with hex codes you can copy ✨

💭 I Wrote a Book About My BIGGEST Decorating Mistakes!
When I decorated my first home, I thought I knew what I was doing. Spoiler alert: I DIDN’T. 😅
💸 I bought a sofa that was WAY TOO BIG for my living room. I chose paint colors that looked amazing in the store but terrible on my walls. I spent THOUSANDS on pieces that didn’t work together. Sound familiar?
“Things I Wish I Knew Before I Decorated My First Home” is your shortcut to avoiding ALL my costly mistakes. ✨ Inside, you’ll find practical, NO-NONSENSE advice that will save you time, money, and a whole lot of decorating regret. 🏡
Design Your Dream Room in Minutes! – By Madison
🏡 Start Creating FREE →Bold Color-Blocking with Triangular Sections


Color-blocking with triangles offers unlimited creative potential, allowing you to combine colors in ways that completely transform the energy and proportions of your room.
Unlike rectangular color blocks, triangular sections create dynamic diagonal lines that guide the eye and add movement to otherwise static wall spaces.
Begin by deciding whether you want a balanced, symmetrical arrangement or an asymmetrical design that creates more visual tension and interest across your wall.
Choose colors that either complement each other for a harmonious feel or bold contrasting hues for a statement wall that commands attention the moment someone enters the room.
Start with a completely blank canvas by painting your entire wall white, providing the cleanest possible base for your vibrant color sections.
Create your design on paper first, experimenting with different triangle sizes and arrangements until you find a composition that feels balanced yet interesting.
When taping your triangles, use a laser level to ensure perfectly straight lines—even slight wobbles will be noticeable in geometric designs and diminish the professional appearance.
Work systematically from top to bottom or left to right to avoid smudging fresh paint or accidentally resting your hand on newly painted sections.
For a sophisticated approach, try using different shades of the same color family, creating a monochromatic geometric pattern that adds texture without overwhelming your existing decor.
Remember that negative space can be just as important as painted areas—leaving some triangles in your base wall color creates breathing room and highlights the shapes you’ve chosen to emphasize.
Overlapping Diamond Cascade Effect


Overlapping diamonds create a cascade effect that adds movement and dimension to your wall, transforming a flat surface into what appears to be a dynamic, flowing installation.
Unlike isolated geometric shapes, overlapping diamonds create complex secondary shapes where they intersect, adding layers of visual interest that reveal themselves the longer someone looks at your wall.
Begin by deciding on a focal point—perhaps the center of the wall or one corner—from which your diamonds will appear to flow or emanate outward.
For maximum impact, try diamonds in varying sizes with the largest shapes positioned to create a sense of perspective, as though some are closer to the viewer than others.
Create templates for your different diamond sizes using cardboard or thick paper, allowing you to test different arrangements before committing to paint.
When planning your overlapping sections, remember that you’ll need to paint in layers, starting with the diamonds that appear to be “furthest back” and working forward.
Use low-tack painter’s tape for the most precise lines, pressing the edges firmly with a plastic card to prevent bleeding—the crisp intersections between diamonds are what make this design so striking.
Experiment with transparency effects by mixing your paint with glazing medium, allowing underlying colors to subtly show through where diamonds overlap.
For a contemporary metallic twist, add gold or silver leaf to select diamonds or their intersections, creating catching points that shimmer as natural light moves across your wall throughout the day.
Step back frequently during your painting process to ensure the cascade effect is developing as planned—sometimes small adjustments to a few diamonds can dramatically improve the overall flow.
Sunburst Radiating Lines From Corner

A sunburst pattern radiating from one corner transforms your ordinary wall into a dynamic focal point that seems to expand the very dimensions of your room.
Unlike centralized designs, corner sunbursts create diagonal energy that activates the entire space, making even the smallest rooms feel like they extend beyond their physical boundaries.
Start by selecting a corner—usually the one most visible when entering the room—from which your lines will radiate outward like beams of light.
For maximum impact, map out varying line thicknesses, with some rays boldly commanding attention while others create subtle supporting rhythm throughout the pattern.
Create a template using string pinned to your corner point, allowing you to mark perfectly straight radiating lines before committing to tape and paint.
When applying painter’s tape, work from your corner outward, ensuring each line maintains its trajectory without wavering—precision is essential for the sunburst illusion.
Experiment with negative space by leaving some areas unpainted between your rays, allowing your base wall color to become an active part of the sunburst pattern.
For a sophisticated twist, try using the same color for all your rays but alternate between matte and high-gloss finishes, creating a subtle textural sunburst visible only as light reflects differently across your wall.
Remember that the negative space between your rays becomes narrower near the corner and wider toward the edges—this natural perspective effect is what creates the compelling sunburst illusion.
Interlocking Circle Grid System


Interlocking circles create a mesmerizing geometric pattern that feels both mathematical and organic, offering endless possibilities for creative expression on your accent wall.
Unlike angular geometric designs, circles bring a sense of softness and continuity while still maintaining the crisp, contemporary edge that makes geometric walls so appealing.
Begin by determining the scale of your circles—larger circles create bold, graphic statements while smaller overlapping circles produce more intricate, textile-like patterns.
For perfect circles, invest in circle templates or create your own using string attached to a pushpin to mark consistent arcs before applying painter’s tape.
Start with a grid system marked lightly in pencil to ensure your circles maintain consistent spacing throughout the wall, preventing the pattern from becoming unbalanced.
When planning your design, create a rhythm of negative and positive space by leaving some circles unpainted, allowing the base wall color to become an active part of your pattern.
For a truly unique effect, incorporate metallic or pearlescent paint in select circles that will catch the light differently than your matte finishes, adding dimension as lighting changes throughout the day.
Take advantage of the natural color-mixing that occurs where transparent circles overlap by using paint mixed with glazing medium for subtle blending effects.
Remember that the most visually interesting circle patterns often incorporate some irregularity or asymmetry—perfect mathematical precision can sometimes feel static compared to designs with thoughtful variations.
What’s Your Decor Personality?
5 questions · 30 seconds · Instant style match 🏡
Design Your Dream Room in Minutes! – By Madison
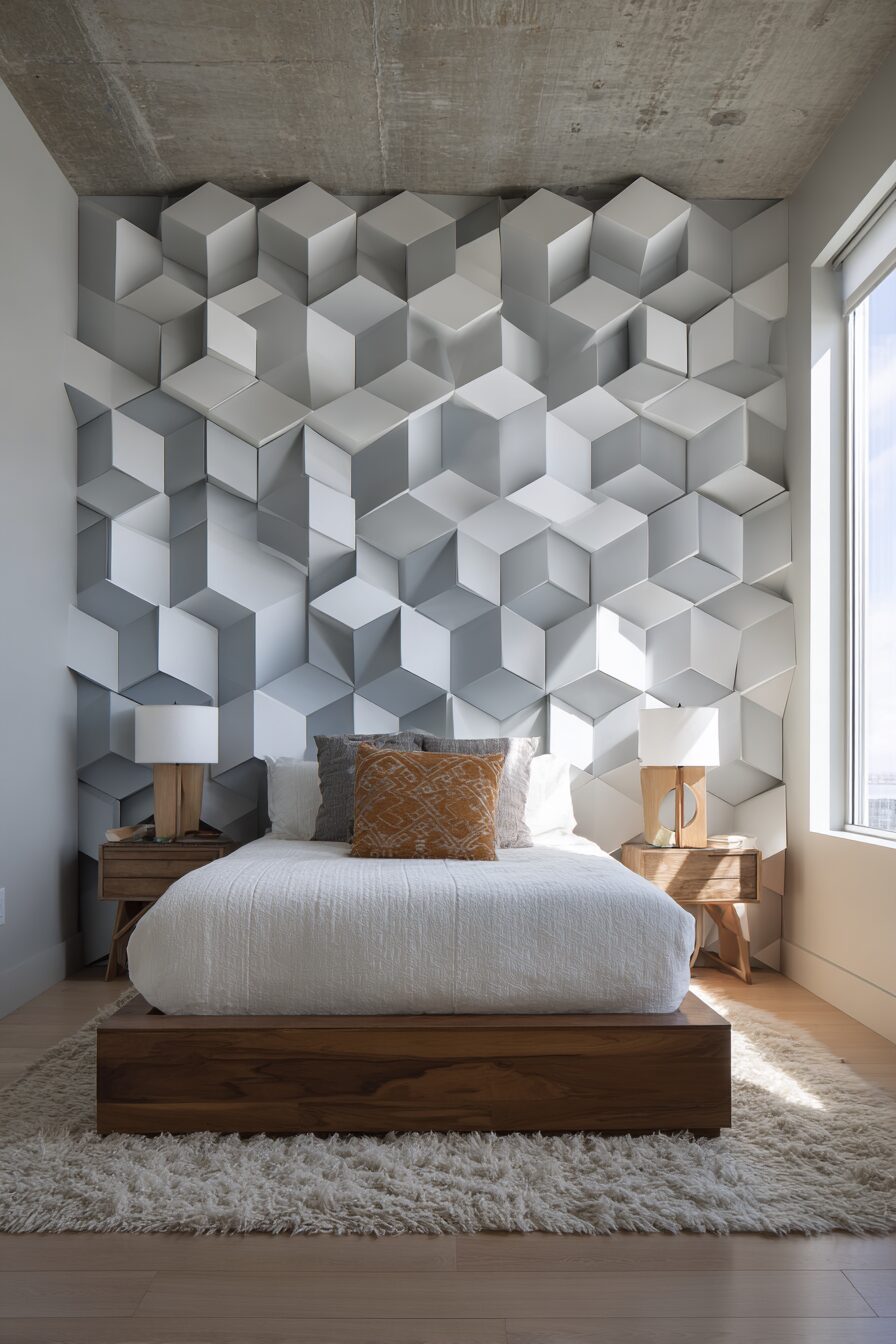
🏡 Start Creating FREE →3D Cube Optical Illusion

The 3D cube optical illusion transforms your flat wall into what appears to be a three-dimensional installation, creating a conversation-starting focal point that plays with perception.
Unlike simpler geometric patterns, the cube illusion engages viewers actively as their brains attempt to make sense of the shifting perspectives, making your wall not just decoration but an experience.
Begin by deciding whether you want your cubes to appear to project outward from the wall or recede inward, as this fundamental choice will determine your entire shading approach.
For maximum impact, position your cubes in a seemingly random arrangement rather than a perfect grid, creating the impression of blocks tumbling or floating across your wall.
Create a small mockup first to practice the precise color placement needed to create the 3D effect—each face of the cube requires specific shading to maintain the illusion.
When taping your design, work systematically through one complete cube before moving to the next, ensuring consistent angles that maintain the 3D effect across the entire pattern.
Experiment with cube size and density, perhaps starting with larger cubes that gradually become smaller toward one side of the wall, creating a sense of perspective and distance.
Remember that lighting will dramatically affect your 3D illusion, so plan your design with your room’s natural and artificial light sources in mind.
For an extra mind-bending effect, consider painting some cubes as wire frames showing all edges rather than solid forms, mixing transparent and solid elements across your design.
Step back frequently during the painting process to ensure the 3D effect is working—what looks right up close may not create the proper illusion when viewed from normal room distances.
Gradient Geometric Ombre Effect

A gradient geometric ombre effect combines the precision of sharp angles with the softness of color transitions, creating a wall that feels both structured and organic simultaneously.
Unlike solid-colored geometric patterns, ombre effects add depth and dimension that can make your wall appear to recede or project depending on your color choices.
Start by selecting a color progression—perhaps from dark to light, warm to cool, or between complementary colors—that will create the emotional atmosphere you want for your space.
For maximum impact, incorporate geometric shapes that either work with or deliberately contrast your gradient direction, creating interesting visual tension.
Create a detailed plan indicating exactly where each color shift will occur across your geometric shapes to ensure a smooth, intentional progression.
When mixing your paint colors, create more intermediate shades than you think you’ll need—subtle transitions make for the most professional-looking ombre effects.
Experiment with different application techniques—spray painting creates the smoothest gradients while brush or roller techniques can add subtle texture to your color transitions.
For a contemporary twist, try a gradient that shifts not just in color but in finish as well, perhaps transitioning from matte to high-gloss across your geometric pattern.
Remember that lighting will dramatically affect how your gradient appears throughout the day, so test your color progression under different lighting conditions before committing.
Room Decorating Budget Calculator
Get a realistic estimate before spending a single dollar 🙌
💭 I Wrote a Book About My BIGGEST Decorating Mistakes!
When I decorated my first home, I thought I knew what I was doing. Spoiler alert: I DIDN’T. 😅
💸 I bought a sofa that was WAY TOO BIG for my living room. I chose paint colors that looked amazing in the store but terrible on my walls. I spent THOUSANDS on pieces that didn’t work together. Sound familiar?
“Things I Wish I Knew Before I Decorated My First Home” is your shortcut to avoiding ALL my costly mistakes. ✨ Inside, you’ll find practical, NO-NONSENSE advice that will save you time, money, and a whole lot of decorating regret. 🏡
Negative Space Geometric Stencil Art

Negative space geometric stencil art flips the typical accent wall approach by focusing on what’s not painted, creating sophisticated patterns through deliberate absences rather than additions.
Unlike fully painted geometric walls, negative space designs maintain more of your base wall color, making them perfect for renters or those hesitant to commit to bold, full-coverage patterns.
Start by selecting a base wall color that will become the “negative space” in your design—this foundational choice will determine how dramatically your pattern stands out.
Consider creating your own custom stencils from cardboard or acetate sheets, allowing for unique geometric patterns that can’t be found in store-bought options.
For maximum impact, overlap your stencils in certain areas to create complex composite shapes that add depth and interest to your geometric composition.
Create a mockup on paper first, experimenting with stencil placement until you find an arrangement that balances negative and positive space effectively.
When applying paint through your stencils, use a nearly-dry brush or roller with minimal paint to prevent bleeding under the edges—the crisp lines between negative and positive space are crucial.
Experiment with stencil density, perhaps clustering shapes more densely in one area of the wall and allowing them to gradually disperse across the surface.
For a sophisticated approach, try using different sheens of the same color rather than contrasting hues—perhaps matte geometric shapes against a satin base wall.
Remember that lighting will dramatically affect how your negative space pattern reads in the room, so test your design under different lighting conditions before finalizing.
Geometric accent walls offer endless possibilities for personalization, allowing you to transform any room with little more than paint, patience, and creativity.
The beauty of these designs lies in their adaptability—scale them up or down, adjust the color palette, or combine elements from different patterns to create something uniquely yours.
Remember that perfect precision isn’t always necessary for a stunning result—sometimes the slight imperfections in a handpainted wall add character and charm that mass-produced decor simply can’t match.
Now grab your painter’s tape, mix those colors, and get ready to create a geometric masterpiece that will transform not just your wall, but the entire feeling of your home.