
Your kitchen doesn’t have to cost a fortune to look like it belongs in a home design magazine.
With some creativity, basic tools, and a weekend or two, you can completely revolutionize your cooking space using simple DIY projects that pack a serious visual punch.
These game-changing ideas will help you create a kitchen that’s not only functional but also reflects your personal style and makes every meal prep session feel like a joy rather than a chore.
Love This Post? You’ll Love My Book!
I wasted THOUSANDS on decorating mistakes you can EASILY AVOID. ✨ My book shares every lesson I learned the hard way—so you can create a home you LOVE without the costly trial and error. 🏡
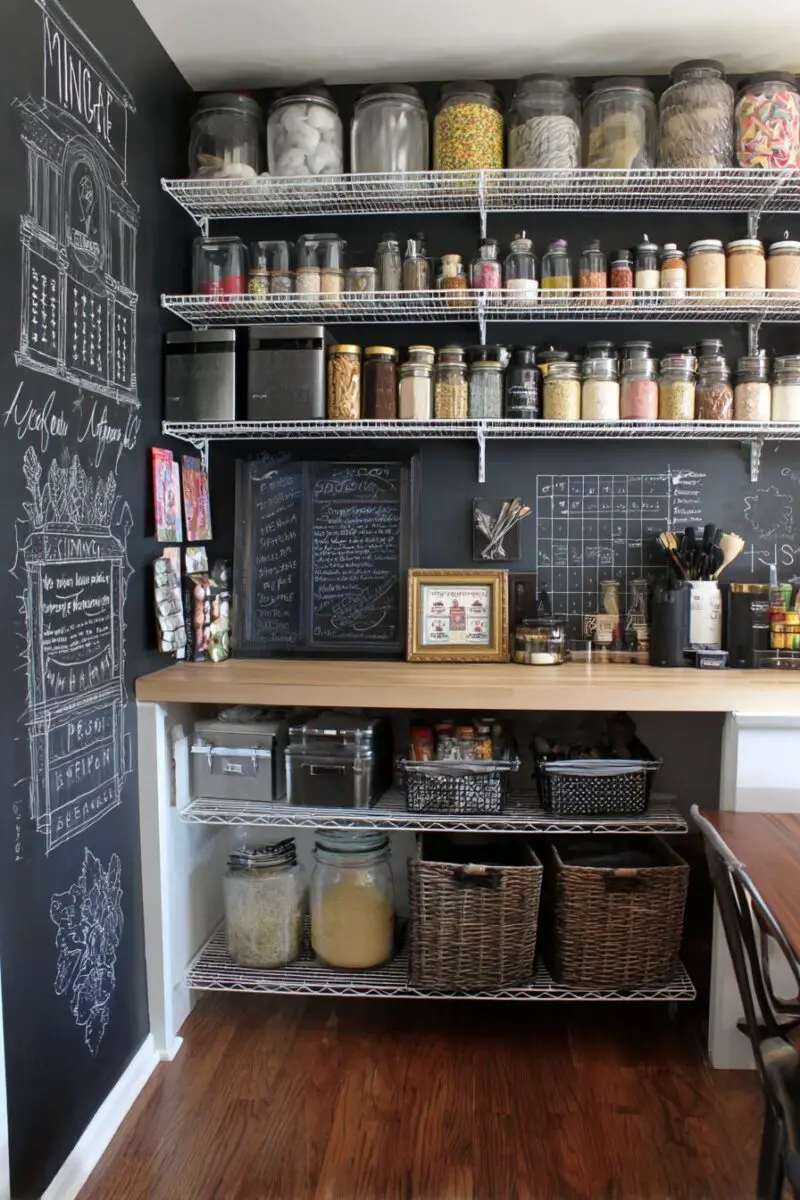
Get the Book NowOpen Shelving Magic That Makes Your Kitchen Feel Twice as Big
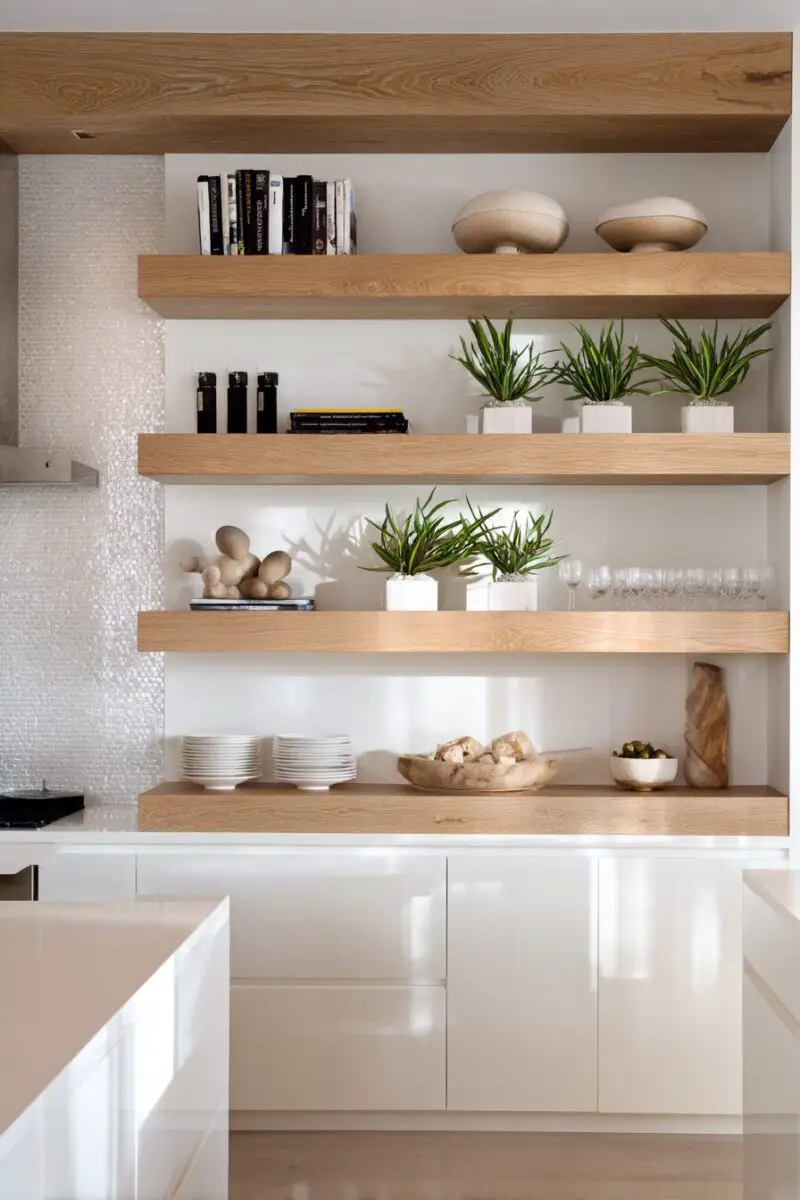
Ripping down those bulky upper cabinets might sound scary, but open shelving creates an instant illusion of space while giving you a chance to display your prettiest dishes and glassware.
Start by removing just one or two cabinet doors to test the waters – you can always go back if you hate it, but chances are you’ll fall in love with the airy, restaurant-style vibe it creates.
The key to making open shelving look intentional rather than messy lies in your styling approach.
Group items by color or material, mix in some greenery with small potted herbs or succulents, and don’t feel pressured to fill every inch of space.
Leave breathing room between your stacks of plates and rows of glasses.
Install floating shelves using sturdy brackets that can handle the weight of your dishes – nothing ruins the aesthetic quite like a sagging shelf loaded with dinner plates.
Paint the wall behind your shelves in a contrasting color to make your dishes pop, or add peel-and-stick wallpaper for a more dramatic backdrop.
Remember that open shelving means your dishes are always on display, so you’ll need to keep things organized, but this actually encourages you to use your nice pieces more often instead of hiding them away.
The maintenance might seem daunting at first, but most people find they actually prefer the accessibility and visual appeal over traditional closed cabinets.
You can start small with just one section and gradually expand as you get comfortable with the look and maintenance routine.

💭 I Wrote a Book About My BIGGEST Decorating Mistakes!
When I decorated my first home, I thought I knew what I was doing. Spoiler alert: I DIDN’T. 😅
💸 I bought a sofa that was WAY TOO BIG for my living room. I chose paint colors that looked amazing in the store but terrible on my walls. I spent THOUSANDS on pieces that didn’t work together. Sound familiar?
“Things I Wish I Knew Before I Decorated My First Home” is your shortcut to avoiding ALL my costly mistakes. ✨ Inside, you’ll find practical, NO-NONSENSE advice that will save you time, money, and a whole lot of decorating regret. 🏡
🎯 Grab Your Copy Now!Peel-and-Stick Backsplash Revolution in Under Four Hours

Forget about hiring a contractor or dealing with messy tile adhesive – modern peel-and-stick tiles have come so far that they’re virtually indistinguishable from the real thing once installed.
You can completely transform your backsplash area in a single afternoon, and if you ever get tired of the look, removal is just as easy as installation.
The secret to a professional-looking result starts with proper surface preparation.
Clean your existing wall thoroughly with degreasing cleaner and let it dry completely before starting your project.
Measure your space carefully and plan your layout on paper first, starting from the center point and working outward to ensure symmetrical spacing around outlets and edges.
Most peel-and-stick tiles come with subtle variations in pattern or color, so mix up tiles from different boxes as you install to create a natural, random look rather than obvious repeating patterns.
Use a sharp utility knife to cut tiles around outlets and edges – the key is scoring deeply and snapping cleanly rather than trying to saw through the material.
A small roller or your hands work perfectly for smoothing out air bubbles, and don’t worry if you need to lift and reposition a tile during installation.
The adhesive gives you a few minutes of working time before it sets permanently.
For areas that get a lot of moisture or heat, like directly behind the stove, add a coat of clear sealant over the seams for extra protection.
The variety of styles available today means you can achieve anything from classic subway tile to trendy geometric patterns or even realistic stone looks.
Design Your Dream Room in Minutes! – By Madison
🏡 Start Creating FREE →Cabinet Hardware Swap That Costs Under Fifty Bucks
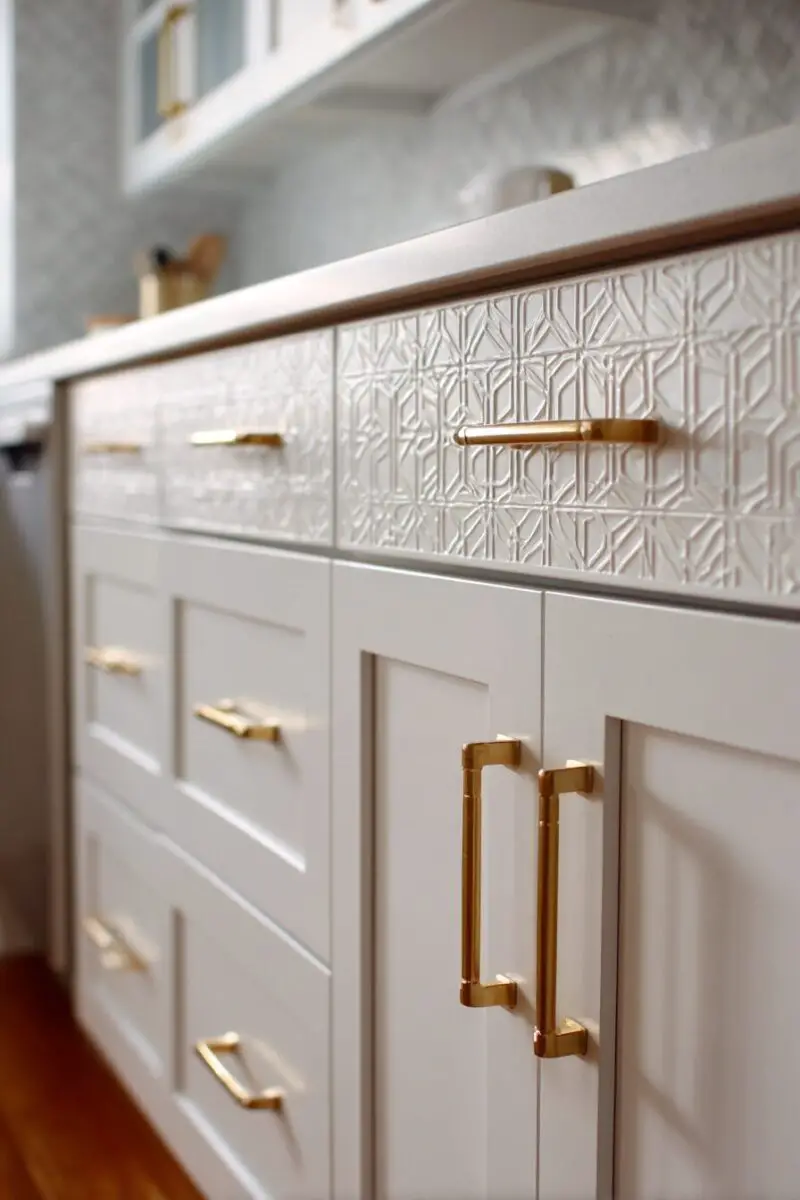
Switching out your cabinet knobs and pulls might be the single most impactful change you can make for the least amount of money and effort.
This simple swap can instantly modernize dated cabinets or completely change the style of your kitchen from traditional to contemporary, farmhouse to industrial, or any direction your heart desires.
Start by removing one existing piece of hardware and taking it to the store with you to ensure you get the right size screws and that new holes will line up with existing ones.
If your new hardware has a different hole spacing, you can fill the old holes with wood filler, sand smooth once dry, and touch up with matching paint before drilling new holes.
The style options are truly endless – brushed gold for warmth, matte black for drama, brass for vintage charm, or sleek stainless steel for a modern edge.
Don’t feel like everything has to match perfectly either; mixing metals can add visual interest and sophistication when done thoughtfully.
You might choose larger pulls for drawers and smaller knobs for doors, or mix round knobs with linear pulls throughout the space.
Pay attention to the weight and feel of the hardware in your hands – cheaper options often feel flimsy and can actually detract from the overall quality impression of your kitchen.
Invest in solid metal pieces that will stand up to daily use and maintain their finish over time.
Installation is straightforward with just a screwdriver, but take your time to ensure everything is aligned properly.
A simple template made from cardboard can help you mark hole locations consistently across multiple cabinet doors.
Love This Post? You’ll Love My Book!
I wasted THOUSANDS on decorating mistakes you can EASILY AVOID. ✨ My book shares every lesson I learned the hard way—so you can create a home you LOVE without the costly trial and error. 🏡
Get the Book NowMason Jar Herb Garden That Brings Life to Any Window
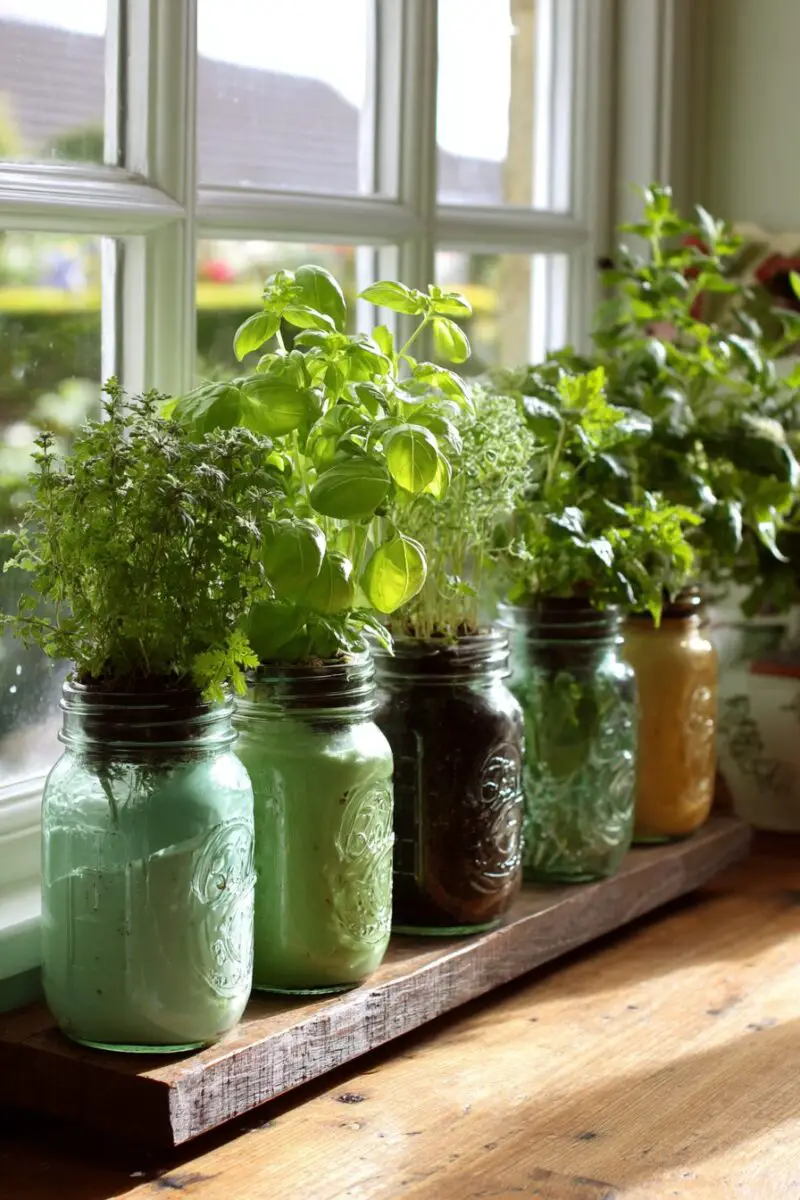
Fresh herbs literally within arm’s reach while you’re cooking transforms both your culinary game and the visual appeal of your kitchen space.
Creating a hanging herb garden using mason jars takes about thirty minutes and costs less than buying herbs at the grocery store for just one month.
You’ll need mason jars, hose clamps that fit around the jar lips, a wooden board or metal rail to mount under a window or on a wall, and some basic potting soil and herb plants.
Drill holes in your mounting board to accommodate the hose clamps, then secure the board to your wall with appropriate anchors for your wall type.
The beauty of this system lies in its flexibility – you can easily remove individual jars for watering or harvesting, and you can swap out different herbs based on your cooking needs or the seasons.
Start with foolproof herbs like basil, parsley, cilantro, and chives that grow quickly and don’t require much fuss.
Place your herb garden in a spot that gets at least four to six hours of indirect sunlight daily.
South-facing windows work best, but east or west-facing locations can work too with the right herb varieties.
Water your herbs when the soil feels dry about an inch down, and don’t forget to pinch off flowers to keep the leaves growing and flavorful.
Regular harvesting actually encourages more growth, so don’t be shy about snipping what you need for cooking.
You can expand this concept by creating multiple rows or adding labels to your jars for a more organized look.
Some people like to paint their mason jars or wrap them with twine for a more decorative appearance that matches their kitchen style.
💭 I Wrote a Book About My BIGGEST Decorating Mistakes!
When I decorated my first home, I thought I knew what I was doing. Spoiler alert: I DIDN’T. 😅
💸 I bought a sofa that was WAY TOO BIG for my living room. I chose paint colors that looked amazing in the store but terrible on my walls. I spent THOUSANDS on pieces that didn’t work together. Sound familiar?
“Things I Wish I Knew Before I Decorated My First Home” is your shortcut to avoiding ALL my costly mistakes. ✨ Inside, you’ll find practical, NO-NONSENSE advice that will save you time, money, and a whole lot of decorating regret. 🏡
🎯 Grab Your Copy Now!Magnetic Spice Rack That Saves Precious Counter Space
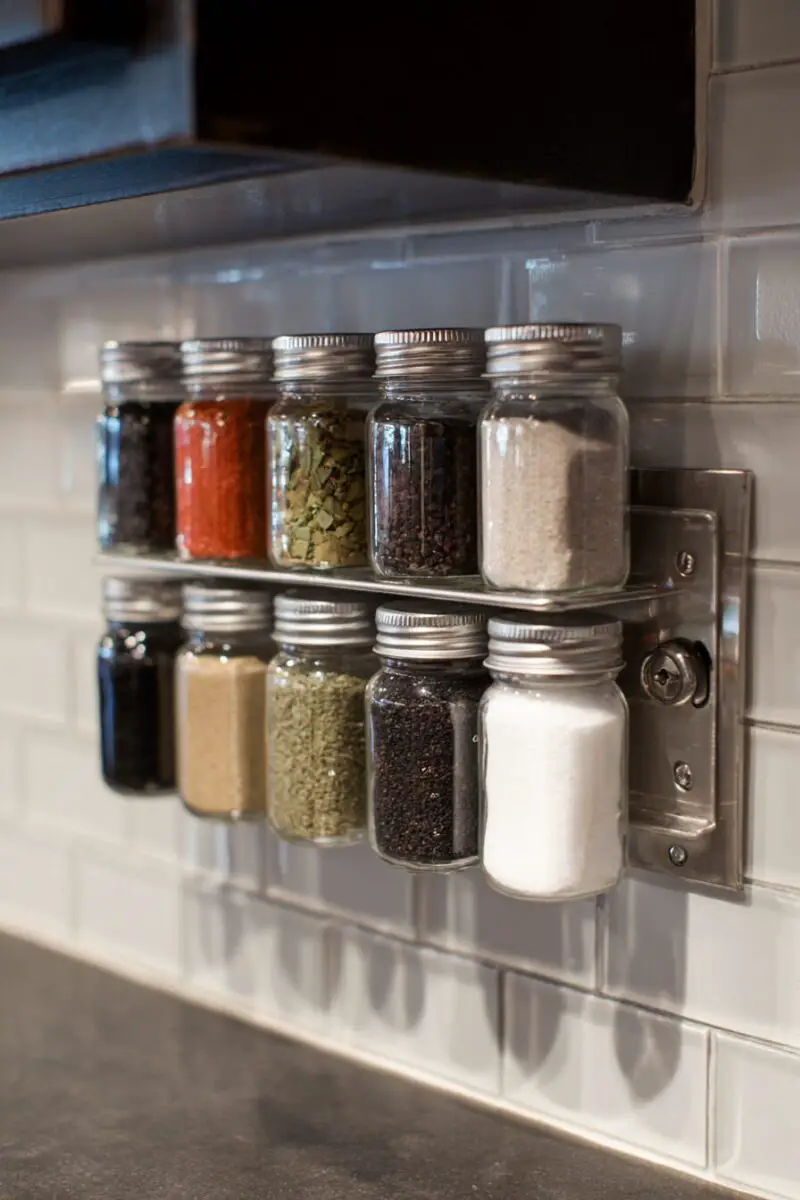
Transform any blank wall or the side of your refrigerator into valuable storage space with a magnetic spice organization system that keeps your seasonings visible and easily accessible.
You can buy magnetic spice containers or create your own using small mason jars and adhesive magnetic strips from the hardware store.
This approach works especially well for people who love to cook and have accumulated a large collection of spices that currently takes up valuable cabinet space.
The visibility factor alone will probably inspire you to use spices you’d forgotten you owned and experiment with new flavor combinations.
Start by taking inventory of your current spice collection and deciding which ones you use most frequently – these should go in the most accessible spots on your magnetic rack.
Uniform containers create the cleanest look, but you can also repurpose interesting small jars and tins for a more eclectic vibe.
Clear labels are essential since many spices look similar, and you can get creative with chalkboard labels, printed tags, or even hand-lettering for a personal touch.
Group spices logically – perhaps all your baking spices together, international flavors in another section, and everyday seasonings in the most convenient spots.
The magnetic system makes it easy to rearrange and reorganize as your cooking habits change or as you discover new favorite ingredients.
Make sure your magnetic containers are truly airtight to keep spices fresh and prevent them from losing potency over time.
If you’re using mason jars, the standard lids work fine, but you can also find specialized spice jar lids with built-in shakers for easy dispensing.
Test the magnetic strength before loading up all your containers – you want to be confident they’ll stay put even when the jars are full.
Chalkboard Paint Command Center for the Organized Family
Turn any blank wall area into a functional command center that keeps your family organized while adding a fun, interactive element to your kitchen design.
Chalkboard paint has evolved far beyond basic black – you can now find it in colors, or you can tint regular chalkboard paint to match your kitchen’s color scheme.
This project works beautifully on a section of wall near your kitchen table, on the inside of a pantry door, or even on the front of your refrigerator if you’re feeling bold.
Start with proper surface preparation by cleaning thoroughly and applying primer if you’re going over a dark color or glossy finish.
Apply the chalkboard paint in thin, even coats with a high-quality roller, and plan on two to three coats for the best coverage and durability.
Once your paint is completely cured according to the manufacturer’s directions, season the surface by rubbing chalk all over it and then erasing completely.
This step prevents permanent marking when you write on your new chalkboard for the first time.
Now you can use your command center for grocery lists, weekly meal planning, family schedules, or even letting kids practice writing and drawing.
Add small shelves or hooks nearby to hold chalk, erasers, and other supplies so everything you need is within easy reach.
Some families like to divide their chalkboard into sections with painted lines or decorative tape to create designated areas for different types of information.
You might have a section for the weekly menu, another for grocery items as you run out, and a space for important reminders or family messages.
The interactive nature of a chalkboard makes it more likely that family members will actually use and update it compared to static organization systems.
Love This Post? You’ll Love My Book!
I wasted THOUSANDS on decorating mistakes you can EASILY AVOID. ✨ My book shares every lesson I learned the hard way—so you can create a home you LOVE without the costly trial and error. 🏡
Get the Book NowUnder-Cabinet LED Strip Lighting for Professional Ambiance
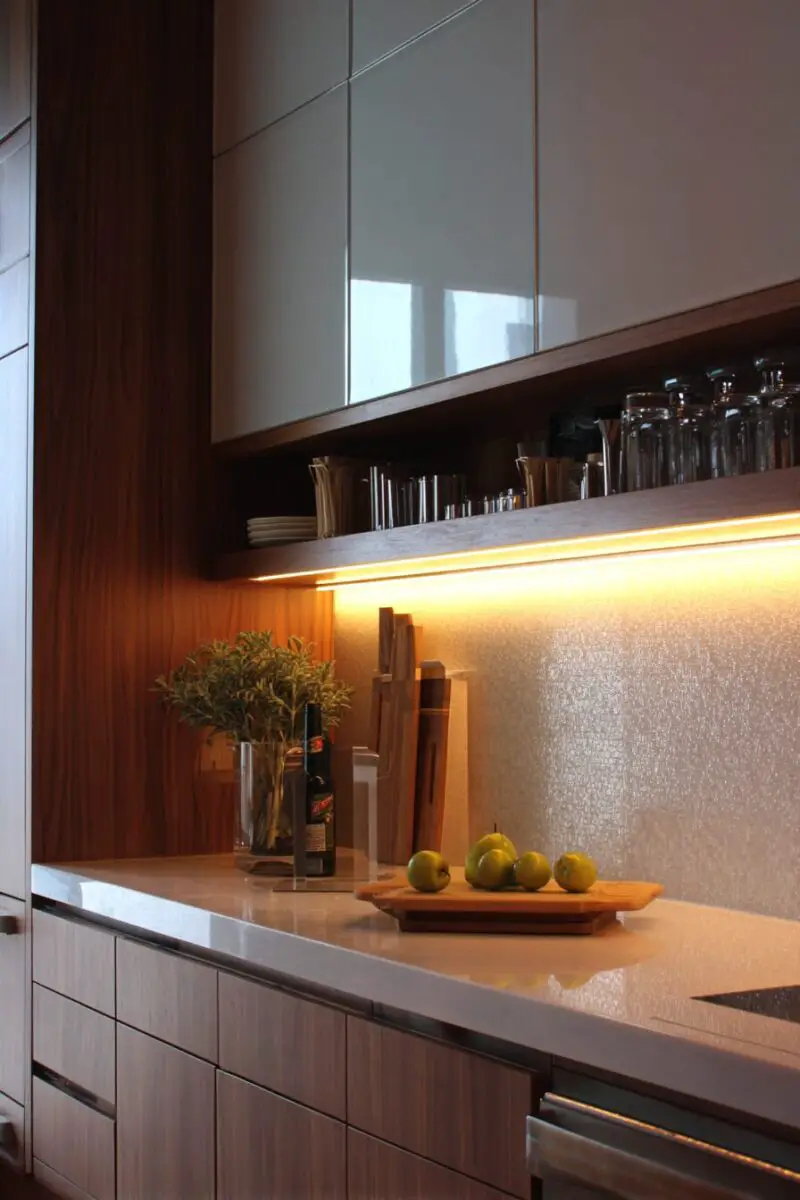
Proper task lighting transforms your kitchen from a purely functional space into an inviting area where you actually want to spend time, and under-cabinet LED strips provide the perfect solution.
These lights eliminate shadows on your countertops while you’re prepping food and create a warm, restaurant-quality ambiance that makes your kitchen feel more expensive and thoughtfully designed.
The installation process is surprisingly straightforward, especially with battery-powered options that require no electrical work whatsoever.
Measure the length of your cabinets first, then choose between plug-in strips that connect to an outlet, hardwired options that connect to your electrical system, or battery-powered strips for the easiest installation.
Clean the underside of your cabinets thoroughly before installation, as the adhesive backing on most LED strips works best on completely clean surfaces.
Position the strips toward the front edge of your cabinets rather than the back to minimize shadows and maximize the light hitting your work surfaces.
Many modern LED strips come with dimming capabilities and color temperature options, allowing you to adjust from bright white for food prep to warm, cozy lighting for evening entertaining.
Some even include remote controls or smartphone apps for easy adjustment without reaching under cabinets.
The energy efficiency of LED technology means these lights cost virtually nothing to operate and last for years without replacement.
You can connect multiple strips together for longer runs, and many systems allow you to control different zones independently.
Hidden junction boxes and cord covers help maintain a clean, professional appearance without visible wires.
The transformation in both functionality and atmosphere will be immediately noticeable, making this one of the most satisfying DIY upgrades you can tackle.
Floating Island from Repurposed Materials for Extra Storage
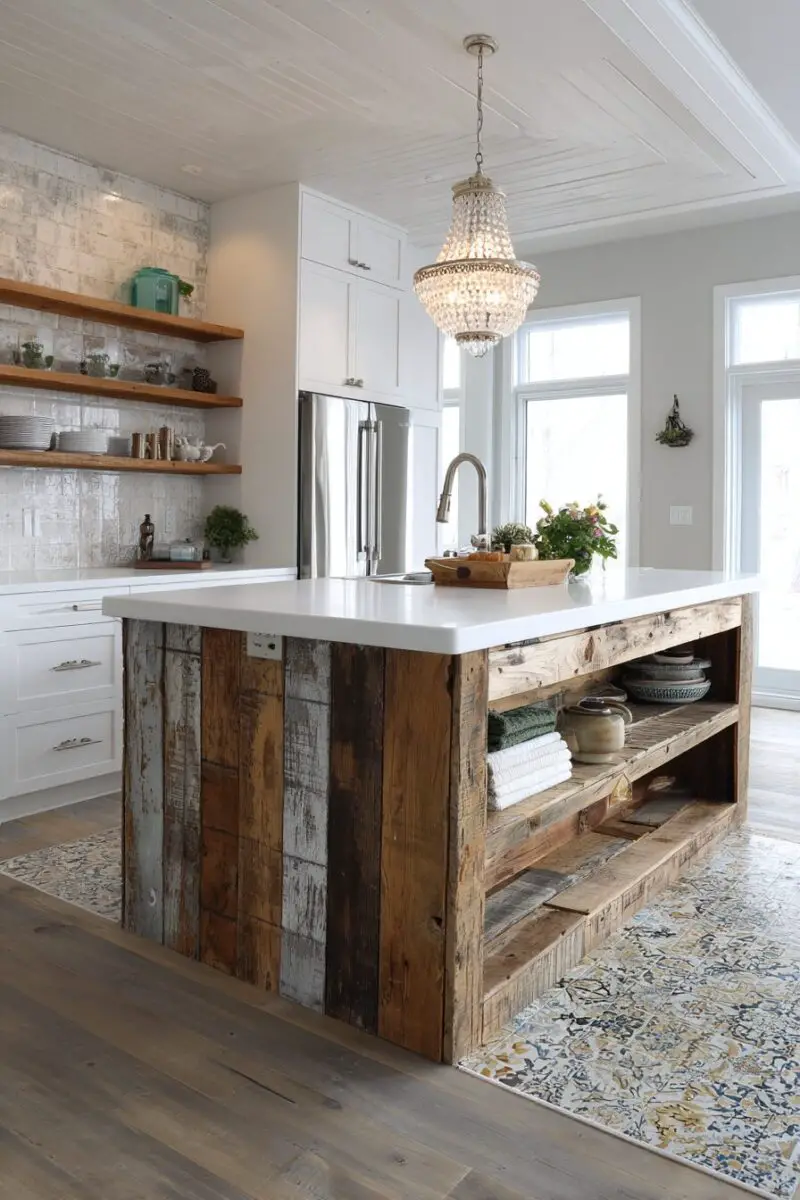
Create additional workspace and storage without the cost of a custom kitchen island by repurposing materials and getting creative with design.
Old dressers, console tables, or even stacking butcher block on top of base cabinets from the hardware store can become beautiful, functional islands with some planning and basic DIY skills.
The key to success lies in making sure your finished piece is the right height for comfortable food prep – typically 36 inches for the work surface.
Sand any existing finishes completely and apply a high-quality primer before painting or staining your base piece.
For the top surface, butcher block creates a warm, natural look and can handle food prep, while marble or quartz remnants from countertop shops offer a more upscale appearance.
Stone surfaces need professional cutting and polishing, but many countertop fabricators sell remnant pieces at significant discounts.
Add functionality with hooks on the sides for hanging utensils, towels, or small pots and pans.
Install a wine rack, spice storage, or pull-out drawers inside any existing cabinet space.
Wheels or casters on the bottom make your island portable, allowing you to move it out of the way when you need more floor space or roll it outside for backyard entertaining.
Make sure any wheels you choose can support the weight of your finished island plus anything you’ll store on or in it.
Locking wheels on at least two corners prevent unwanted rolling during use.
The beauty of creating your own island lies in customizing it exactly to your needs and space constraints.
You might want a narrow piece that fits between your kitchen and dining area, or a larger statement piece that becomes the focal point of your kitchen.
Paint or stain the base to coordinate with your existing cabinets, or choose a contrasting color to make it a true focal point.
Window Treatment Drama with Café Curtains or Roman Shades
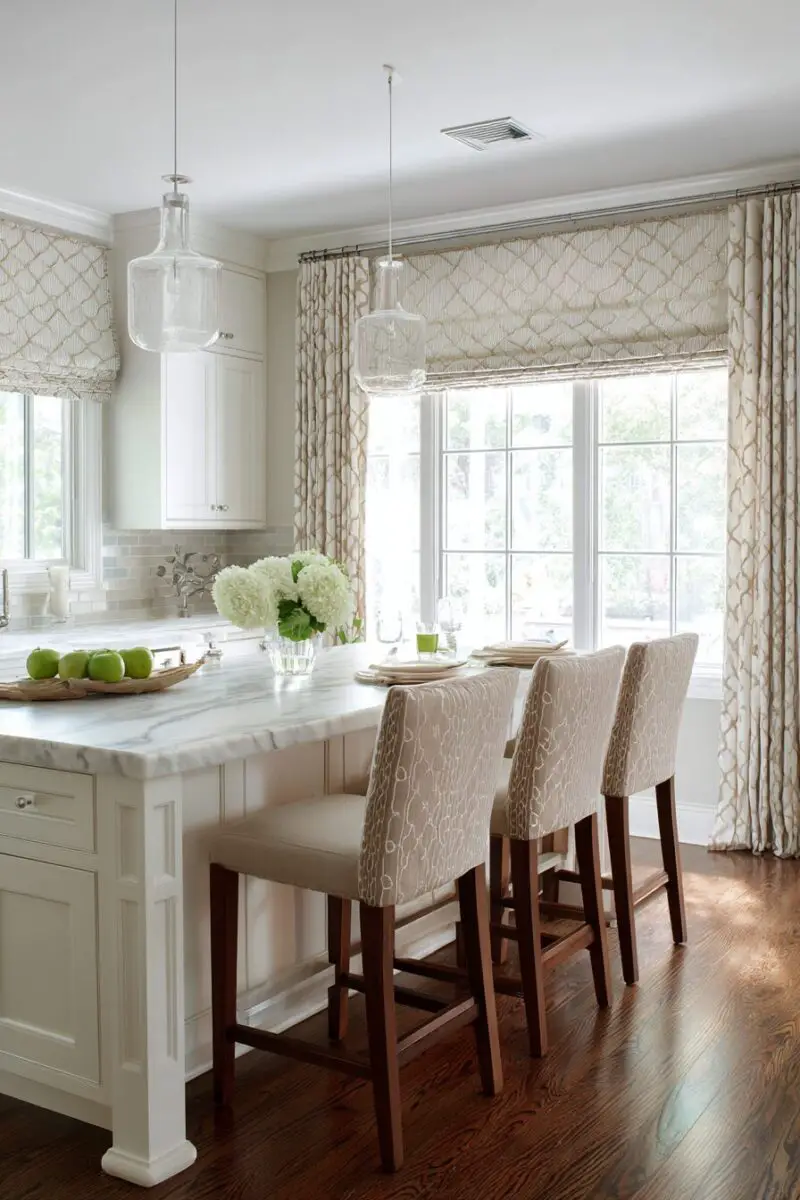
The right window treatment can completely change the feeling of your kitchen, making it feel more finished and intentional while providing privacy and light control.
Café curtains hung halfway up your windows maintain privacy while still allowing natural light to flood your space, creating that perfect coffee shop or European bistro vibe.
Roman shades offer a more tailored, sophisticated look and work especially well in kitchens with traditional or transitional design styles.
For café curtains, you’ll need tension rods or small curtain rods that fit within your window frame, plus fabric that coordinates with your kitchen’s color scheme.
Cotton, linen, or cotton blends work best in kitchen environments since they’re easy to wash and maintain.
Measure your windows carefully and decide how much coverage you want – typically café curtains cover the bottom third to half of the window.
Hem the top edge to create a rod pocket, or add simple clip rings for a more casual look that’s easy to remove for washing.
Roman shades require more precise measuring and construction but create a much more polished appearance.
You can find kits that include all the hardware and detailed instructions, or purchase pre-made shades and customize them with trim, contrasting fabric borders, or decorative elements.
The key to professional-looking results lies in precise measuring and ensuring your mounting hardware is level and secure.
Both options allow you to introduce pattern, color, or texture to your kitchen without overwhelming the space.
Subtle patterns work well in busy kitchens, while bold prints can become a focal point in more minimalist spaces.
Don’t forget about functionality – treatments in kitchen windows need to handle moisture, grease, and frequent opening and closing, so choose durable fabrics and hardware that will stand up to daily use.
Love This Post? You’ll Love My Book!
I wasted THOUSANDS on decorating mistakes you can EASILY AVOID. ✨ My book shares every lesson I learned the hard way—so you can create a home you LOVE without the costly trial and error. 🏡
Get the Book NowVintage-Inspired Pot Rack That Doubles as Kitchen Art
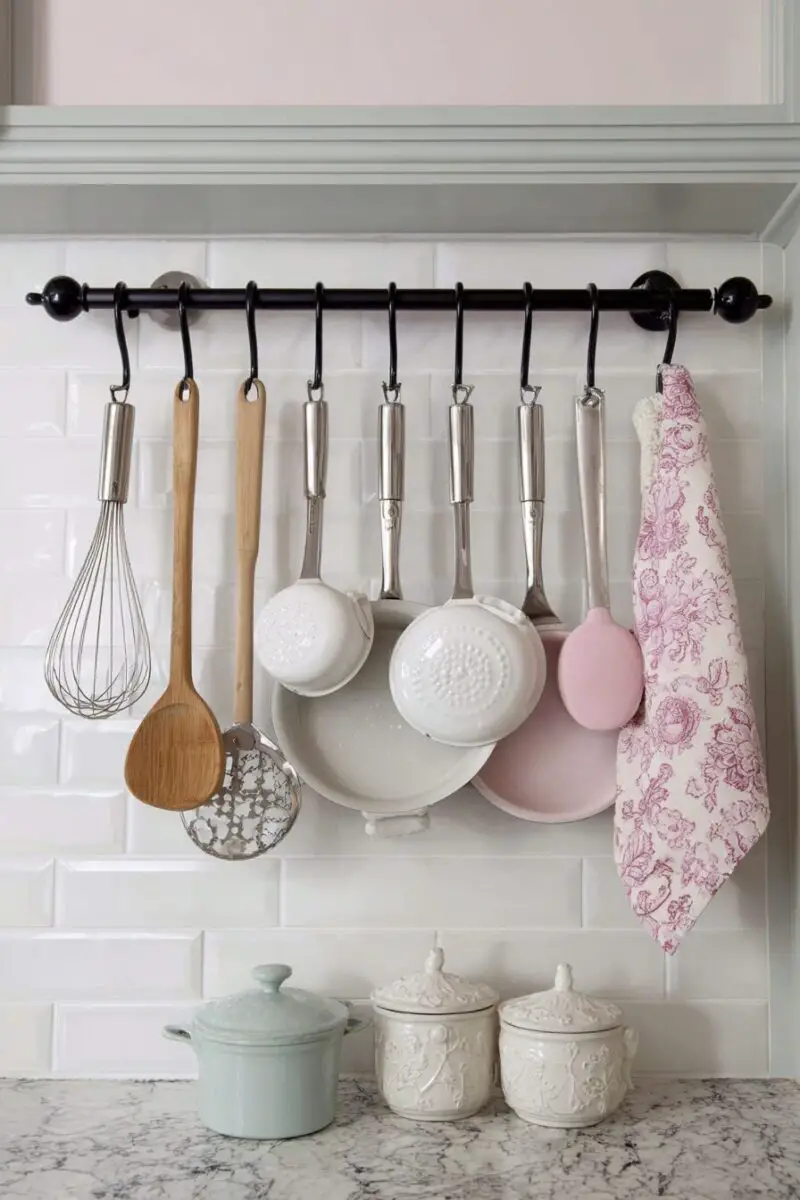
Hanging pots and pans not only frees up valuable cabinet space but also adds visual interest and a professional kitchen vibe that makes your space feel more serious about cooking.
You can create a stunning pot rack using reclaimed wood, vintage-style hooks, and some basic hardware store supplies for a fraction of what designer versions cost.
Start with a piece of reclaimed barn wood, driftwood, or even a vintage ladder that speaks to your personal style.
Sand the wood smooth and apply a food-safe finish if your pots will come into direct contact with the rack.
Drill pilot holes for your hooks, spacing them evenly and ensuring they’re large enough to accommodate your pot handles without crowding.
Choose hooks that can support the weight of your heaviest pots – cast iron pieces require serious hardware.
Mount your rack securely to ceiling joists or wall studs using appropriate hardware for your ceiling type and the weight load.
The visual impact of beautiful cookware displayed as functional art transforms your kitchen’s aesthetic while keeping your most-used items easily accessible.
Copper pots create a warm, traditional feel, while stainless steel pieces contribute to a more modern, professional appearance.
You can mix and match different materials and finishes for an eclectic look that reflects your personal cooking style.
Add small shelves to your rack for storing spices, oils, or other frequently used ingredients.
Some people incorporate lighting into their pot racks, either with small pendant lights or LED strips that highlight the cookware display.
The key to making a pot rack look intentional rather than cluttered lies in selecting pieces that work well together visually and limiting the display to items you actually use regularly.
Store your everyday pots and pans on the rack, and keep specialty items or mismatched pieces in cabinets.
These DIY kitchen projects prove that creating your dream cooking space doesn’t require a massive budget or professional contractors.
Each idea transforms not just the look of your kitchen but also how you use and enjoy the space every day.
Start with one project that excites you most, and watch how that small change inspires you to tackle the next transformation.
