
Living in a studio apartment can feel like a puzzle sometimes.
You’ve got one room to fit your entire life: sleeping, cooking, working, and hanging out.
But don’t worry!
Small spaces can actually be super cozy and practical when you set them up right.
With some clever tricks, your tiny apartment can feel spacious and stylish.
I’ve been in your shoes and know the struggle of making every inch count.
So let’s go:
✨Click to Get My 101 FREE Designer Room Ideas
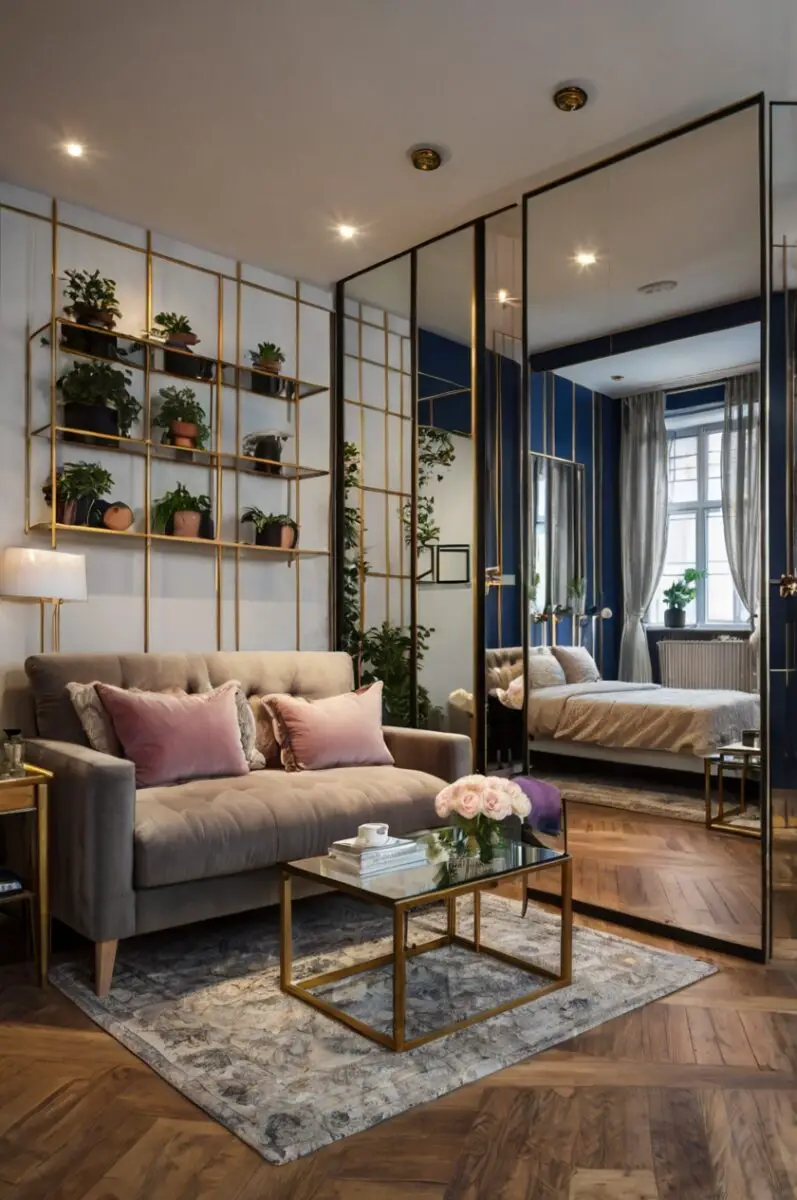
Use Room Dividers for Flexible Zoning

Room dividers are your secret weapon in studio apartment living.
They create the illusion of separate rooms without permanent walls.
Try a bookshelf that works double-duty as storage and a divider between your sleeping and living areas.
Folding screens offer privacy when you need it and can be tucked away when you want your space to feel open.
Hanging curtains from the ceiling is another affordable option that adds softness to your space.
Consider a ceiling-mounted sliding panel system for a modern look that’s easily adjustable.
Plant dividers bring life to your space while creating natural boundaries.
The key is choosing dividers that maintain light flow throughout your apartment.
Don’t block windows with solid dividers or you’ll make your space feel smaller.
Look for see-through or partial dividers that define areas while keeping your studio feeling open.
The beauty of dividers is that you can move them when you want a change or need to host friends.
Your studio will feel more organized when you have visual cues separating your sleeping area from your dining space.
Even something as simple as a row of tall plants or a strategic rug placement can help define different zones.
Think of your studio as a collection of mini-rooms rather than one undivided box.
Invest in Multifunctional Furniture
Multifunctional furniture is absolutely essential for making a studio apartment work.
Every piece in your space should earn its keep by serving at least two purposes.
A sofa bed or futon is the classic example – seating by day, bed by night.
Consider a coffee table with hidden storage compartments to stash magazines, remotes, and other items.
Murphy beds (wall beds) are making a huge comeback in small-space design and for good reason.
When folded up, a Murphy bed frees up valuable floor space for daytime activities.
Look for dining tables that can expand when you have guests but shrink for daily use.
Nesting tables provide extra surfaces when needed but can be tucked away to save space.
Ottoman storage cubes work as seating, footrests, and secret storage compartments.
Consider a desk that transforms into a dining table when work hours are over.
Kitchen carts provide extra counter space and can double as a bar or serving station during parties.
Beds with drawers underneath utilize otherwise wasted space for storing seasonal clothes or extra bedding.
The trick is thinking about how you actually live in your space throughout the day.
Map out your daily activities and choose furniture that can adapt to different needs as the hours change.
Quality matters with multifunctional pieces – they need to withstand frequent transformations.
Go Vertical with Smart Storage Solutions


When floor space is limited, the walls become your best friend.
Thinking vertically is a game-changer for studio apartments.
Install floating shelves all the way up to the ceiling to maximize storage without taking up floor space.
Wall-mounted cabinets in kitchens and bathrooms free up valuable counter space.
Look for tall, narrow bookcases that provide tons of storage with a small footprint.
Consider an over-the-door organizer for shoes, accessories, or pantry items.
Magnetic strips mounted on walls can hold everything from knives in the kitchen to makeup in the bathroom.
Wall hooks and pegs create storage for coats, bags, and accessories without needing a proper closet.
Install a ceiling-mounted clothing rack if closet space is limited or non-existent.
Use the space above kitchen cabinets for storing items you don’t use daily.
Under-bed storage containers make use of space that would otherwise go to waste.
Consider furniture with built-in storage like platform beds with drawers underneath.
High shelving around the perimeter of the room creates a library-like effect while freeing up wall space at eye level.
Remember to use the backs of doors for hooks, racks, or hanging organizers.
The trick is creating storage that draws the eye upward, making your ceilings appear higher and your space larger.
Create Optical Illusions with Mirrors and Lighting
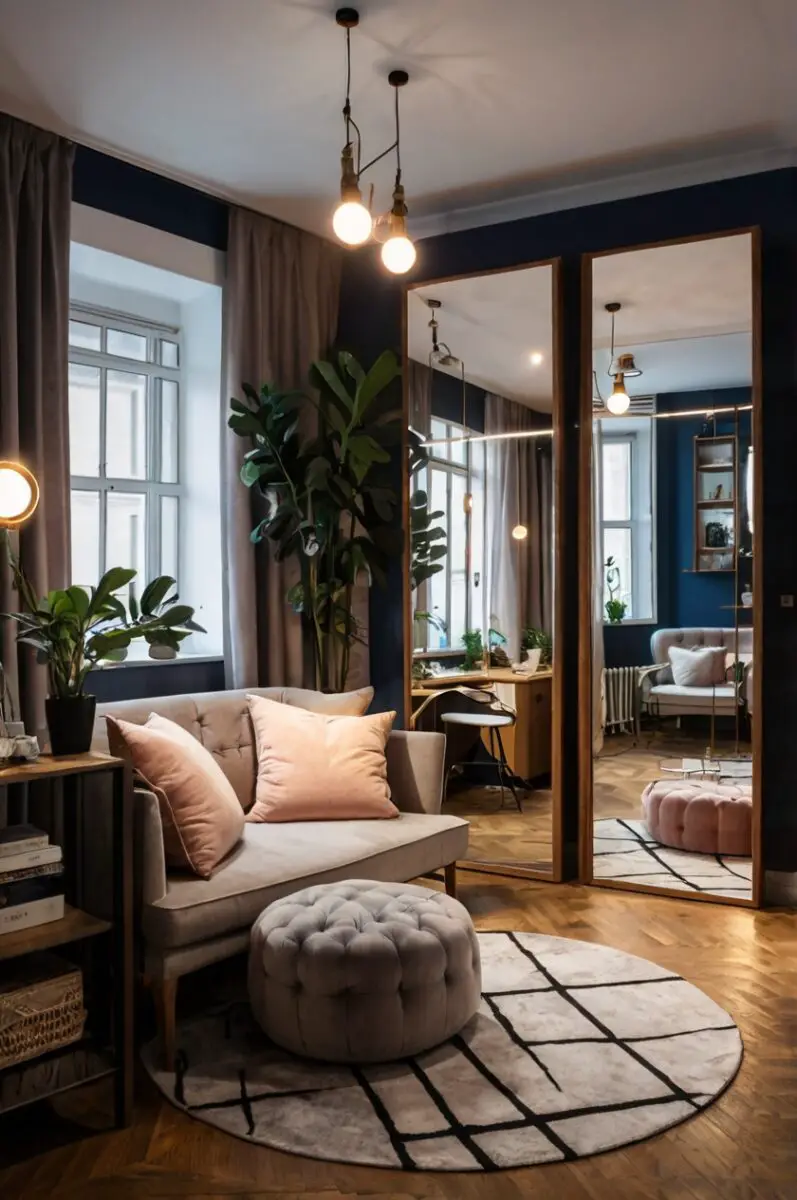
Mirrors are like magic wands in small spaces – they instantly make rooms feel bigger.
Place a large mirror opposite a window to bounce natural light throughout your studio.
Consider a wall of mirrors to visually double your space in an instant.
Even small mirrors grouped together can create an interesting focal point while making your space feel more open.
Mirrored furniture like nightstands or coffee tables add function while visually disappearing.
Lighting is equally important in creating the illusion of space.
Avoid relying on just one overhead light which can create harsh shadows.
Instead, create layers of light with floor lamps, table lamps, and wall sconces.
String lights add whimsy and soft illumination to cozy nooks.
Under-cabinet lighting in kitchens not only helps with tasks but makes the space feel larger.
Consider track lighting that can be adjusted to highlight different areas as needed.
Light colors reflect more light, so opt for lampshades in white or light neutral tones.
Place floor lamps in corners to draw the eye upward and outward.
Make sure windows are unblocked to maximize natural light – the most valuable resource in a small space.
Glass or lucite furniture allows light to pass through, creating a lighter visual impact than solid pieces.
✨Click to Get My 101 FREE Designer Room Ideas
Choose a Cohesive Color Scheme
In a studio apartment, your entire home is visible at once, making color consistency super important.
Stick to a limited color palette to create a harmonious feel throughout your space.
Light colors generally make spaces feel larger, but don’t be afraid of darker accents for depth.
Consider an all-white base with pops of one or two accent colors.
When everything flows together visually, your studio will feel more intentional and less crowded.
Choose furniture that fits within your color scheme rather than stands out too boldly.
Painting walls and trim the same color eliminates visual breaks that can make a space feel choppy.
Consider carrying your main color onto your ceiling for a cozy, enveloping feel.
Use different shades and textures of the same color for visual interest without overwhelm.
Your floor covering should complement your overall color scheme rather than fighting with it.
Artwork should enhance your color story, not compete with it.
Even small appliances and kitchen items should be considered in your color planning.
Bathrooms should feel like a natural extension of your main living space, not a jarring different environment.
Think about seasonality – can you swap out small accessories to refresh your color scheme occasionally?
Remember that color affects mood – blues and greens tend to be calming, while yellows and oranges energize.
Embrace Minimalism and Thoughtful Decluttering
In a studio apartment, clutter isn’t just annoying – it can make your space feel tiny and chaotic.
Adopting a minimalist mindset is one of the most powerful things you can do for your small space.
This doesn’t mean living with nothing – it means being intentional about what you bring home.
Ask yourself if each item serves a purpose or brings you joy before keeping it.
Create a one-in-one-out rule: when you buy something new, something old has to go.
Digital solutions can help reduce physical stuff – scan documents instead of keeping paper copies.
Consider digital subscriptions instead of physical books and magazines when possible.
Regularly audit your belongings – what made sense last year might not fit your life now.
Storage solutions should be intentional, not just places to hide more stuff.
Visible surfaces should be mostly clear – think of them as valuable real estate.
Display only your most beautiful and meaningful items rather than everything you own.
Kitchen counters should hold only the appliances you use daily – store the rest.
Develop systems for dealing with mail and papers immediately rather than letting them pile up.
Seasonal rotation helps too – store winter clothes during summer months and vice versa.
Remember that empty space isn’t wasted space – it’s what makes your studio feel airy and comfortable.
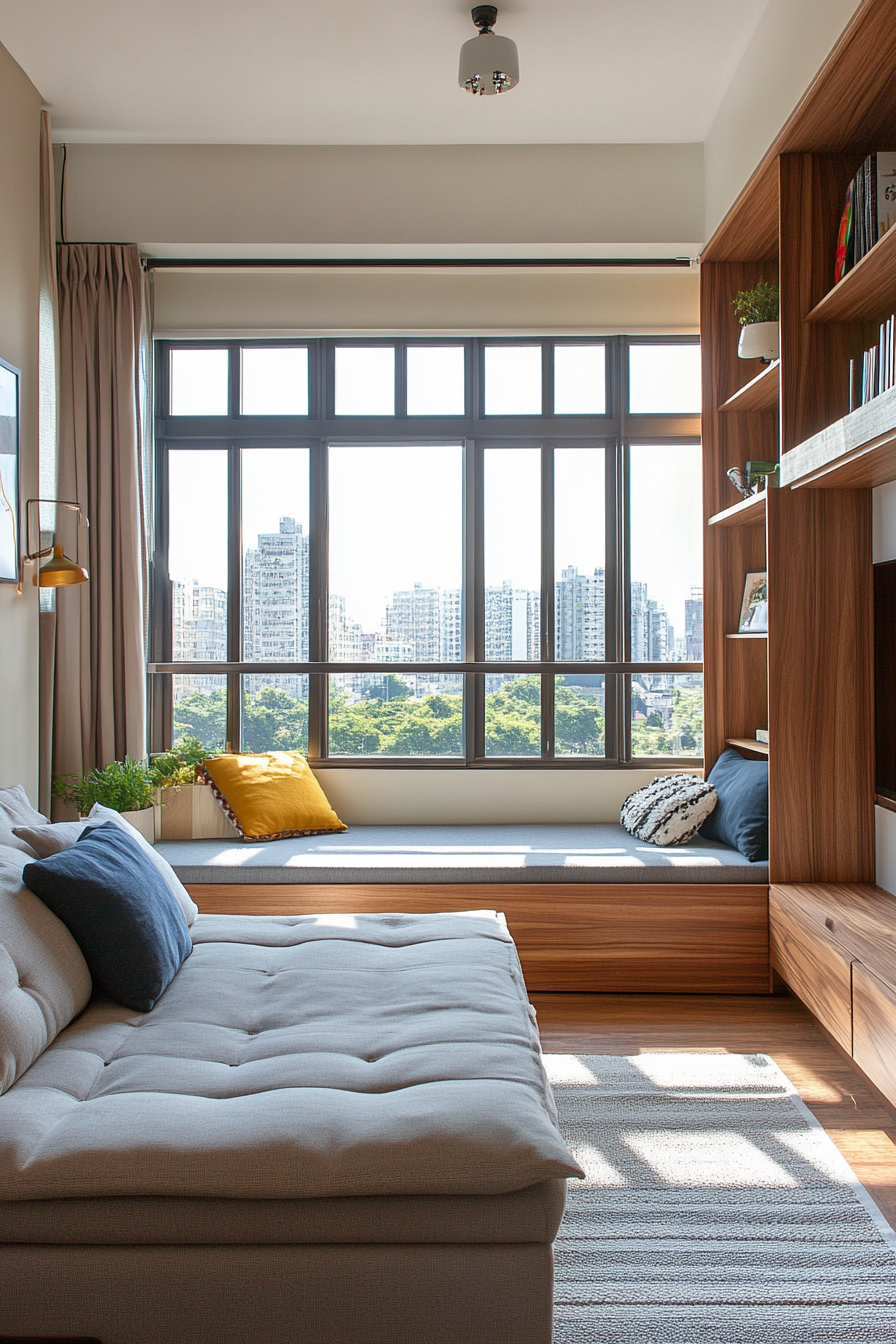
Define Zones with Area Rugs
Area rugs are powerful tools for creating distinct spaces within your open studio floor plan.
Think of rugs as invisible room dividers that tell people “this is the living area” or “this is the bedroom space.”
Choose different rugs for different zones to visually separate your studio into functional areas.
A plush, cozy rug under your bed creates a bedroom feel without walls.
A more durable, patterned rug can define your living area.
Make sure rugs are appropriately sized – too small and they’ll make your space feel choppy.
For living areas, the rug should be large enough that at least the front legs of furniture sit on it.
In bedroom zones, the rug should extend beyond the sides of the bed.
Consider the flow between different zones when placing rugs – they should feel connected but distinct.
Layering rugs is an advanced move that adds texture and further defines spaces.
Round rugs create soft boundaries and can work well in transition areas.
The colors and patterns of your rugs should complement your overall color scheme.
Washable rugs are practical for studio living where one spill can affect your whole home.
Low-pile rugs are easier to clean and don’t visually clutter a small space.
Consider seasonal rug swaps to refresh your space – lighter materials in summer, cozier options in winter.
Maximize Natural Light with Window Treatments
Natural light is precious in a studio apartment – the right window treatments can make or break your space.
Avoid heavy, dark curtains that block light and make your studio feel smaller.
Instead, opt for sheer curtains that provide privacy while letting light filter through.
Hanging curtains from ceiling to floor creates the illusion of higher ceilings and larger windows.
Mount curtain rods several inches wider than your windows so that when open, curtains don’t block any glass.
Consider light-filtering roller shades that can be adjusted throughout the day as needed.
Top-down, bottom-up blinds offer flexibility – you can keep the bottom closed for privacy while the top lets in light.
Avoid blocking windows with furniture whenever possible.
Reflective surfaces near windows help bounce light deeper into your space.
Consider window film for privacy on lower windows while keeping the upper portions clear for light.
For bedtime darkness needs, layer blackout curtains behind sheers that can be pulled closed only at night.
Keep window sills clear to maximize light flow.
Clean your windows regularly – dirty glass can significantly reduce natural light.
If you need color, choose curtains in the same tone as your walls for a seamless look.
Remember that natural light makes everything look better – it’s worth designing around!
✨Click to Get My 101 FREE Designer Room Ideas
Create a Focal Point to Draw the Eye
Every room needs a focal point, but this is especially important in a studio where space is limited.
A focal point gives the eye somewhere to rest and can make your studio feel intentionally designed rather than cramped.
Consider a statement wall with bold wallpaper or an accent paint color.
A large piece of artwork can serve as a focal point while adding personality.
Your bed can be a focal point with a striking headboard or luxurious bedding.
A beautiful rug can anchor your space and serve as a natural focal point.
Lighting fixtures like a dramatic pendant lamp can draw the eye upward and create interest.
A gallery wall of smaller artworks can create a collective focal point with personal meaning.
Consider your view – if you have great windows, make them the star of your space.
A statement piece of furniture like a distinctive chair or colorful sofa can be your focal point.
Built-in shelving filled with beautifully arranged objects creates a focal wall.
Your television can be a focal point if well integrated into a thoughtful wall arrangement.
A sculptural plant like a fiddle leaf fig can create a living focal point.
Mirrors can serve as focal points while also making your space feel larger.
Remember that your focal point should be something you love looking at every day.
Incorporate Hidden and Convertible Workspaces
Working from home in a studio apartment presents unique challenges that clever design can solve.
A dedicated workspace is important, but it shouldn’t dominate your living environment.
Consider a wall-mounted desk that folds down only when needed.
A secretary desk with a fold-down surface and built-in storage closes up to hide work clutter.
Look for coffee tables that raise to desk height for flexible working options.
A small rolling cart can serve as a mobile workstation that tucks away after hours.
Consider a slim console table behind your sofa that doubles as a desk during work hours.
Murphy beds with built-in desks offer the ultimate space-saving solution.
A closet can be converted into a “cloffice” with a small desk and shelving.
Room dividers with built-in desk surfaces create work zones that can be hidden.
Nesting tables provide expandable work surface only when needed.
Consider a small laptop stand that can be used from your sofa or bed for casual work.
Cable management is crucial – invest in solutions that keep cords tidy and out of sight.
Storage ottomans can hold work supplies and serve as extra seating or tables.
Remember that good lighting is essential for a workspace – incorporate task lighting that doesn’t disturb your living areas.
Use Smart Technology to Save Space
Smart technology can be a game-changer in small studio apartments.
Voice-controlled systems like Alexa or Google Home eliminate the need for multiple remotes and controls.
Smart lighting systems allow you to create different moods without multiple lamps.
Wireless speakers eliminate the need for bulky sound systems with wires.
Smart TVs combined with streaming services replace DVD collections and bulky media centers.
Digital assistants can manage your calendar, shopping lists, and reminders without paper clutter.
Smart thermostats make your space more comfortable while saving energy.
Consider a projector instead of a TV – when not in use, there’s nothing taking up wall space.
E-readers replace bookshelves full of physical books (though keeping some favorites is always nice).
Smart storage solutions like vacuum-seal bags controlled by apps maximize closet space.
Wireless charging stations eliminate cord clutter on surfaces.
Smart locks eliminate the need for key bowls and hooks by the door.
Digital photo frames display hundreds of photos without taking up shelf space.
Smart kitchen appliances that serve multiple purposes save valuable counter space.
Remember that the goal is simplification – only adopt technology that truly makes your life easier in your small space.
Bring the Outdoors In with Strategic Greenery
Plants add life to any space, but they’re especially valuable in studio apartments.
Greenery softens the boundaries between different zones while purifying your air.
Hanging plants draw the eye upward and don’t take up valuable floor or surface space.
Consider a living wall as a gorgeous focal point that doesn’t take up floor space.
Tall plants like fiddle leaf figs or palms can act as natural room dividers.
Small herb gardens in the kitchen area add freshness to your cooking and your air.
Plant stands at varying heights create visual interest without a large footprint.
Window boxes bring nature in while keeping precious interior space free.
Air plants and small succulents can be displayed on narrow shelves or wall-mounted fixtures.
If natural light is limited, many beautiful artificial plants look incredibly realistic today.
Plants with trailing vines like pothos or ivy can soften storage shelves or room dividers.
Consider the vertical space above kitchen cabinets for plants that thrive in indirect light.
Plant selection should match your light conditions and your schedule for care.
Group plants together for greater visual impact and to create a mini-oasis feeling.
Remember that plants bring a dynamic element to your space – they grow and change with you.
✨Click to Get My 101 FREE Designer Room Ideas
Design with Intention for Your Lifestyle
The most successful studio apartments reflect the specific needs and habits of the people living in them.
Take time to assess how you actually live day-to-day before making design decisions.
If you cook often, prioritize kitchen functionality over a larger living area.
If you work from home, a proper ergonomic workspace might be your top priority.
Night owls might need better blackout solutions than early risers.
Social butterflies need flexible seating arrangements for hosting friends.
Consider your daily routines and design your space to make them easier, not harder.
Your entry area should accommodate your specific coming-and-going habits.
Storage should be designed around what you actually own, not generic solutions.
If you exercise at home, create a space that makes this easy, not something you have to set up each time.
Your bed placement should reflect whether you’re a light or heavy sleeper.
Think about sound control if you’re sensitive to noise or have video calls during the day.
Consider temperature variations in your space when deciding where to place your bed or desk.
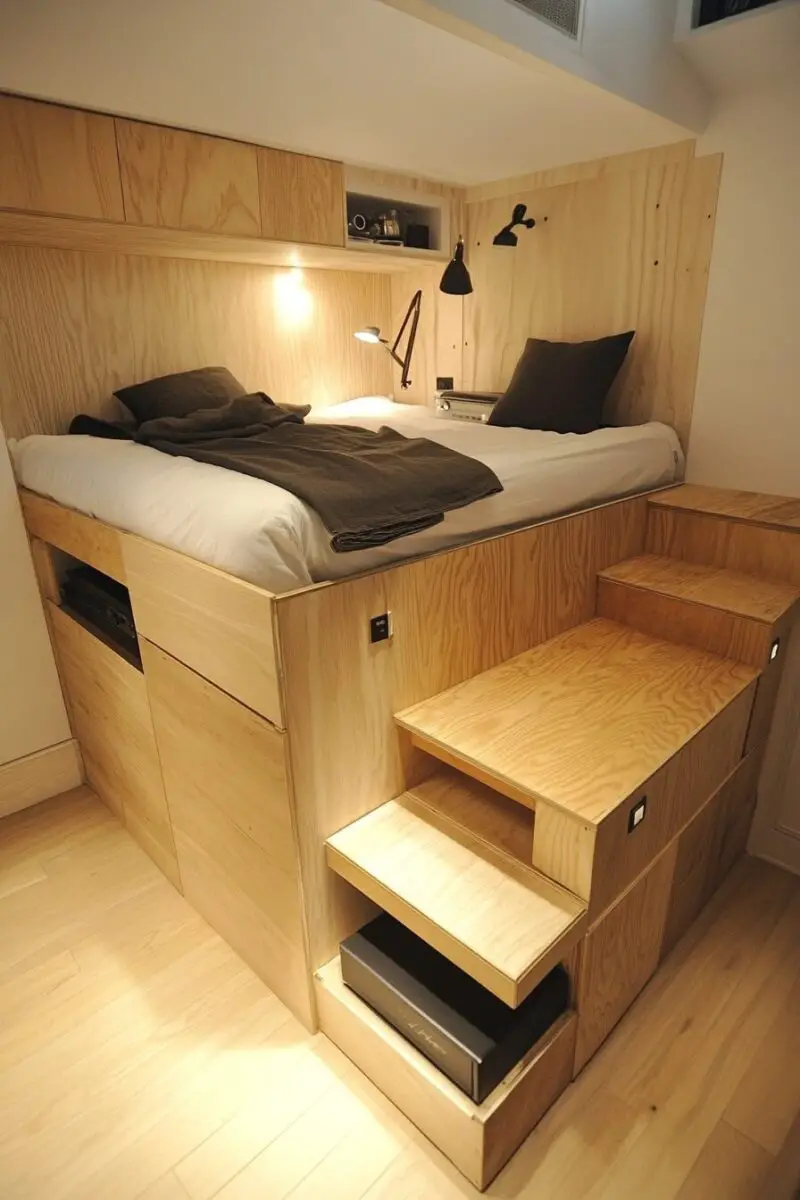
The Murphy Bed


The murphy bed reigns as one of the ultimate space-savers for studio apartments.
These beds fold vertically up against the wall, often into a cabinet or closet.
This allows your bedroom to seamlessly transition into a living area when the bed is up.
Murphy beds come in many different styles—you can opt for a basic model or go high-end with an artful, designer version.
Make sure to pick one sturdy enough for regular use.
Measure carefully so the bed doesn’t stick out too far when folded down.
And pay attention to clearance so you have room to stand next to the bed when it’s folded up.
If you place the bed toward the corner, you’ll open up valuable floor space when it’s stowed away.
Install bookshelves or cabinets on the end for extra storage.
You can even use the bed to divide zones—one half of the room as bedroom, the other as living room.
Add drapes around the bed to make it feel cozier.
The Multi-Purpose Room

For some studio residents, separating spaces feels forced.
The whole point of a studio is to have one open, free-flowing room.
If this speaks to you, the multi-purpose layout may be ideal.
This approach embraces the studio vibe with an airy, loft-like feel.
Furniture and zones are blended seamlessly together.
For example, float a sofa near the kitchen to create a casual dining area.
Stow your bed behind a screen instead of a wall.
Add shelves or room dividers to suggest different zones.
Make sure to pick furniture that supports the multipurpose theme.
Look for sleek, low-profile beds and sofas that don’t dominate the space.
Tables on wheels or nesting tables provide flexibility for moving around.
Store items attractively in open shelves or baskets to avoid clutter.
When designing a multi-purpose studio, pay special attention to flooring.
Area rugs help define spaces subtly.
Transitioning from wood in the living room to tile in the kitchen adds visual delineation.
Keep backgrounds neutral to prevent choppiness in the open space.
The multi-purpose room encourages creativity and customization.
Reconfigure as your needs change.
Feeling social?
Pull furniture toward the center.
Need quiet?
Tuck the bed around a corner.
This adaptable approach makes the most of your limited square footage.
The Separate Sleeping Nook

Not sold on the murphy bed?
Try sectioning off the sleeping area instead.
Use screens, curtains, or half walls to cordon off a small nook for your bed.
This keeps the sleeping area private and darker for optimal rest, while preserving an open feel in the main room.
Place the nook next to windows or daylight when possible.
This prevents it from feeling isolated or dark.
Floating curtains around the bed softens the boundaries and provides needed insulation.
Make sure to leave enough floor space around the bed for walking.
A narrow table or low dresser can take advantage of unused space beside the bed.
The separate sleeping nook works best in square or rectangular studio layouts.
Look for units with high, lofted ceilings to avoid an overly-cramped feel.
Include storage under the bed and functional side tables to meet space needs in the smaller footprint.
A cozy armchair or floor lamp in the corner makes the nook more inviting.
With a distinct sleeping zone, you can center the main living area without sacrificing privacy.
Pull back the curtains to make one contiguous space during the day.
The sleeping nook offers the separation of a 1-bedroom in a flexible studio layout.
✨Click to Get My 101 FREE Designer Room Ideas
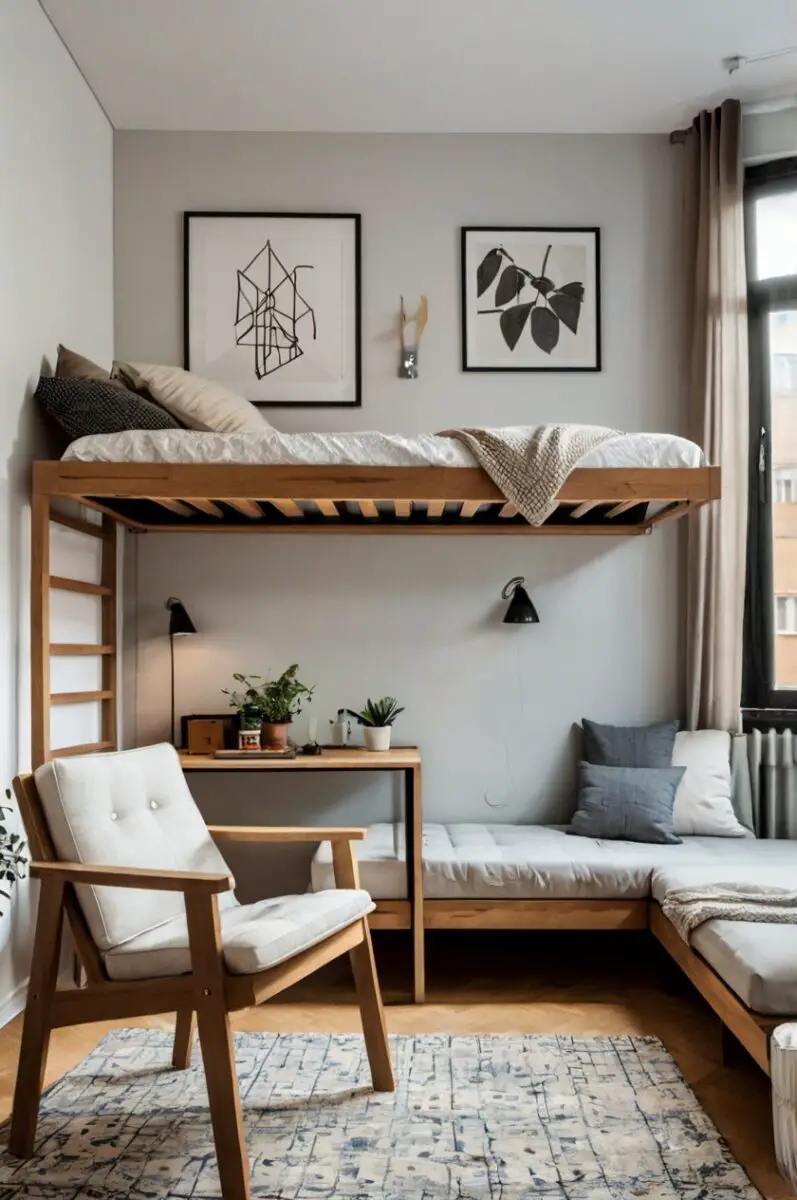
The Elevated Sleeping Loft


Lifting up your bed creates an entirely new dimension of space below.
Lofted beds essentially add an upper floor—increasing your precious square footage.
Arrange your bed on a platform, or invest in a bunk bed sans the lower bunk.
Use the space underneath for your living and storage areas.
Lofts work especially well in taller studios.
Place the bed against the high wall or interior window for a cozier feel.
Make sure to allow enough clearance so you aren’t bumping your head at night.
Sturdy ladders or stairs should provide access.
Under-bed drawers on casters allow you to pull storage in and out easily.
For truly tiny spaces, you can even loft your bed above your sofa, desk, or dining table.
Get creative with vertical bookshelves and ladders for character.
Floating your bed really opens up options.
Define the lower living zone with an area rug and comfy seating.
Your studio will feel much more spacious.
The elevated sleeping loft adds usable space without remodeling.
Just make sure your landlord approves before installing.
Lofts lend studios an urban, industrial vibe filled with possibility.
Unleash the vertical dimensions through smart studio layout ideas.
The Desk Divider

For studio dwellers working from home, carving out an office niche is essential.
Rather than cramming a small desk in the corner, use it as a room divider for better flow.
The long desk effectively splits the room while boosting functionality.
Place the desk perpendicular to the room, with the work surface facing outward.
This allows you to use both sides—one for work, the opposite for eating or activities.
Install shelving above for books, office supplies, or displays.
A narrow console table behind the chair adds space for printing, storage, or extra seating.
Pay attention to sightlines when positioning the dividing desk.
Make sure your workspace doesn’t directly face the bed or sofa.
Angle it slightly so you avoid staring directly at other zones.
Install an inspiring bulletin board above eye level.
The dividing desk adds privacy and productivity to a studio.
Dedicate extra space around the desk area to enhance focus.
Float a small rug beneath and use an armature lamp to create a work oasis.
Then close it off at night with room dividers or curtains.
With some creativity, a single desk can transform your entire studio apartment layout.
This savvy trick stretches functionality from one central piece.
The Hidden Office Nook

Maybe having your workspace exposed feels distracting, even with a divider.
If so, consider tucking your office area into a nook at the edge of the room.
This hides your work mess when you’re finished without eating up space.
Look for a narrow area off the main living zone to retrofit into a work nook.
This could be next to the front door, behind the kitchen, or even in the sleeping area.
Make sure to allow at least a 30-inch wide path for sitting comfortably.
Install a butcher block counter or fold-down desk to maximize efficiency.
Add shelving above or modular stacked desks for extra storage.
Floating curtains around the perimeter of the nook creates a private feel when working.
When not in use, simply slide back the curtains and the office recedes discreetly into the background.
With a hidden office nook, you avoid the exposed look of a dividing desk.
This appeals if you prefer to compartmentalize work and living zones.
When designing your studio, look for unused cavities or corners that could double as mini offices.
Get creative with layout to multiply your workspace options.
The Expanded Kitchen

In most studios, the kitchen occupies one wall of the apartment.
While handy for smaller meals, this limited prep space won’t suffice for avid home cooks.
Expand your kitchen’s footprint for increased functionality.
One approach is to extend the counter space perpendicular to the existing cabinets.
Add a rolling butcher block or island to gain extra work area outside the kitchen footprint.
You can buy stands or DIY one from old drawers or shelves.
Install hooks above for hanging utensils and pots.
For a more built-in look, add lower or wall cabinets extending from existing ones.
Floating shelves above provide accessible storage for spices, oils and other essentials.
Use the extended countertop as a casual dining perch overlooking the main room.
Another idea is using the lack of walls to your advantage.
Absorb dining, office, or other areas into an extended galley kitchen.
Add barstools along the counter to boost seating.
Install racks above or below for dishware.
With an expanded kitchen, you gain much needed prep space without sacrificing precious square footage.
The Wall-Mounted Table


Furniture that folds, converts or mounts on the wall is perfect for small studio spaces.
A wall-mounted table can act as your dining surface, office desk, coffee bar, or standing work area.
Use it as a space transformer to serve multiple needs.
Look for wall-mounted tables with flip-down surfaces that fold back up and out of the way.
Pick a size and location based on your needs.
As a dining table, go for a width that allows two chairs to tuck underneath when folded up.
For a desk, make sure your chair fits comfortably with the surface lowered.
Install the hinged table near the kitchen for quick morning coffee.
Or flip it down in the living area for guests and extra seating when entertaining.
You can even mount one side-by-side with your bed for the ultimate space-saving desk-dining-nightstand combo.
When not in use, the wall-mounted table disappears discreetly against the wall.
This leaves prime floor area wide open for living.
With smart placement, a single table can multitask in several zones as your needs change.
The Shelving Room Divider


For a more decorative take on dividing your studio, consider installing shelving.
Free-standing bookshelves, ladder étagères, or custom cabinetry can separate sleeping and living areas.
Open shelving maintains an airy feel, while providing ample storage.
Place taller shelving units perpendicular to the room like a divider wall.
Make sure to leave walkways between sections so the flow doesn’t feel disrupted.
Floating wall shelves mounted creatively can also divide functional zones.
Mix closed cabinets and open display shelves.
Use baskets, bins and folders to corral clutter out of sight.
The shelving unit becomes both beautiful architectural detail and functional storage system.
Take time arranging items on the shelves.
Weave in greenery, art, books, and special objects.
The shelves should enhance the room’s aesthetic—not appear like an imposing storage unit.
When designed with care, your shelving divider will elevate the entire space.
The Multi-Purpose Furniture
From murphy beds to wall-mounted tables, furniture that adapts is a studio dweller’s best friend.
In your layout, look for pieces that can switch functions depending on your needs.
The more flexibility, the better.
Tables with drop-down leaves, nested coffee tables, or retractable desk surfaces increase options.
Convertible sofa beds allow your living room to double as a guest room when needed.
Look for caster wheels, flip-tops, and other transforming features.
Don’t forget vertical space in a studio.
Wall-mounted racks can hang bikes, clothing, or PVC pipes for extra shelving.
Convertible ladder shelves provide display space that retracts when not in use.
Hanging pegboards with customizable hooks accommodate changing storage needs.
Combining smart, adaptable furniture allows you to make the most of every inch.
Truly consider pieces from all angles.
Could that bench flip up to reveal storage?
Would casters make rearranging easier?
The more inventive the furniture, the more functional your layout.
The Combined Living and Dining Zone

With limited space, many studios opt to combine living and dining areas.
This flowing layout shares circulation paths to maximize square footage.
But the setup also comes with pitfalls.
An undefined dining area can devolve into just an extension of the living room.
When combining spaces, create visual distinction between zones.
Position the dining table closer to the kitchen for connection.
Angle a console with barstools toward the table for extra seating.
Float an area rug under the table to define the space.
Include dedicated dining storage, like a tall hutch or built-in buffet.
This strengthens the dining function.
Use lighting and decorative details to differentiate dining from living.
For example, hang a statement pendant over the table or display special dishware.
Blended areas require thoughtfulness to maintain functionality.
With careful planning, a combined living dining space feels harmonious yet properly defined.
Don’t let one zone encroach on the other.
Even in a studio, dining and living can co-exist beautifully.
✨Click to Get My 101 FREE Designer Room Ideas
The Textural Definition

Beyond furnishings, leverage textures, colors and materials to define spaces in an open studio.
Rugs, pillows, throws and wall textures add visual richness while creating implied zones.
Play up these tactile elements for smart segmentation.
Naturally delineate areas with flooring materials.
Transition from wood in the living room to tile, brick or concrete as you enter the kitchen.
Light-colored, cozy rugs can frame seating areas.
Try small jute rugs under dining chairs.
Vary wall colors and finishes to set a different mood in each zone.
For example, use brick or wood panels as an accent wall behind the sofa.
Paint or wallpaper the sleeping nook in a darker, saturated color for coziness.
Pillows, curtains, and furniture coverings extend the textures throughout the space.
Use plush pillows and blankets to make the seating inviting.
Sheer drapes around the bed soften and define that area.
Employ textures boldly but thoughtfully.
The beauty of an open layout is highlighting how colors, patterns and materials interact across zones.
Don’t be afraid to transition and accentuate with your textural choices.
Play up these tactile tools to provide definition even without walls.
The Unified Color Palette


On the flip side, you can visually connect a studio through color.
Using a unified color palette keeps the open space feeling coordinated, not choppy.
This helps the design feel holistic.
Look for a color scheme with subtle variations.
For example, soft blues and greens with grayish undertones.
You might use the deepest shade in the sleeping nook, medium tones in the main living space, and lightest hues in the kitchen.
Repeat paint colors in accent furniture or textiles.
Navy dining chairs pick up the blue on the accent wall in the living area.
A jade green throw pillow echoes the kitchen backsplash tile.
These threads draw the separate zones together.
Aim to transition colors gradually between areas.
Avoid strong color contrasts, which visually disconnect zones.
Soft, harmonious hues and tones keep the studio palette tranquil.
The unified color approach plays up the beauty of an open plan.
Carefully linking colors provides continuity without sacrificing distinction in each functional space.
Look for ways furniture, colors and textures maximize square footage through versatility and flow.
The priority should be enhancing function and livability.
Optimize storage, work, dining and sleeping areas based on how you live day-to-day.
