ransforming your outdoor space doesn’t have to break the bank or require professional help.
Painted pavers offer an affordable, DIY-friendly way to add personality and pizzazz to patios, walkways, and garden areas.
Here are top stunning painted paver ideas that’ll completely transform your outdoor living areas with just some paint and creativity.
Eye-Catching Geometric Patterns


Geometric patterns create a modern, sophisticated look that instantly elevates your outdoor space.
You can achieve this look using painter’s tape to create clean, sharp lines on your pavers.
The key to successful geometric designs is choosing colors that complement your existing outdoor décor.
Start by thoroughly cleaning your pavers and applying a primer designed for outdoor use.
Once dry, measure and apply painter’s tape in your desired pattern – triangles, diamonds, and hexagons work particularly well.
Apply your chosen paint colors using a weather-resistant exterior paint.
Remember to remove the tape while the paint is still slightly wet to achieve the cleanest lines.
For added durability, seal your finished pavers with a clear outdoor sealant.
This design works particularly well for creating defined areas in your yard, such as a dining space or conversation pit.
The bold lines of geometric patterns draw the eye and can make smaller spaces appear larger and more intentionally designed.
Try creating a cohesive pattern across multiple pavers for a rug-like effect, or paint each paver with its own unique geometric design for an eclectic look.
Tap to Explore These Beauties
See my ideas in action 👇 Tap any image to explore full details.
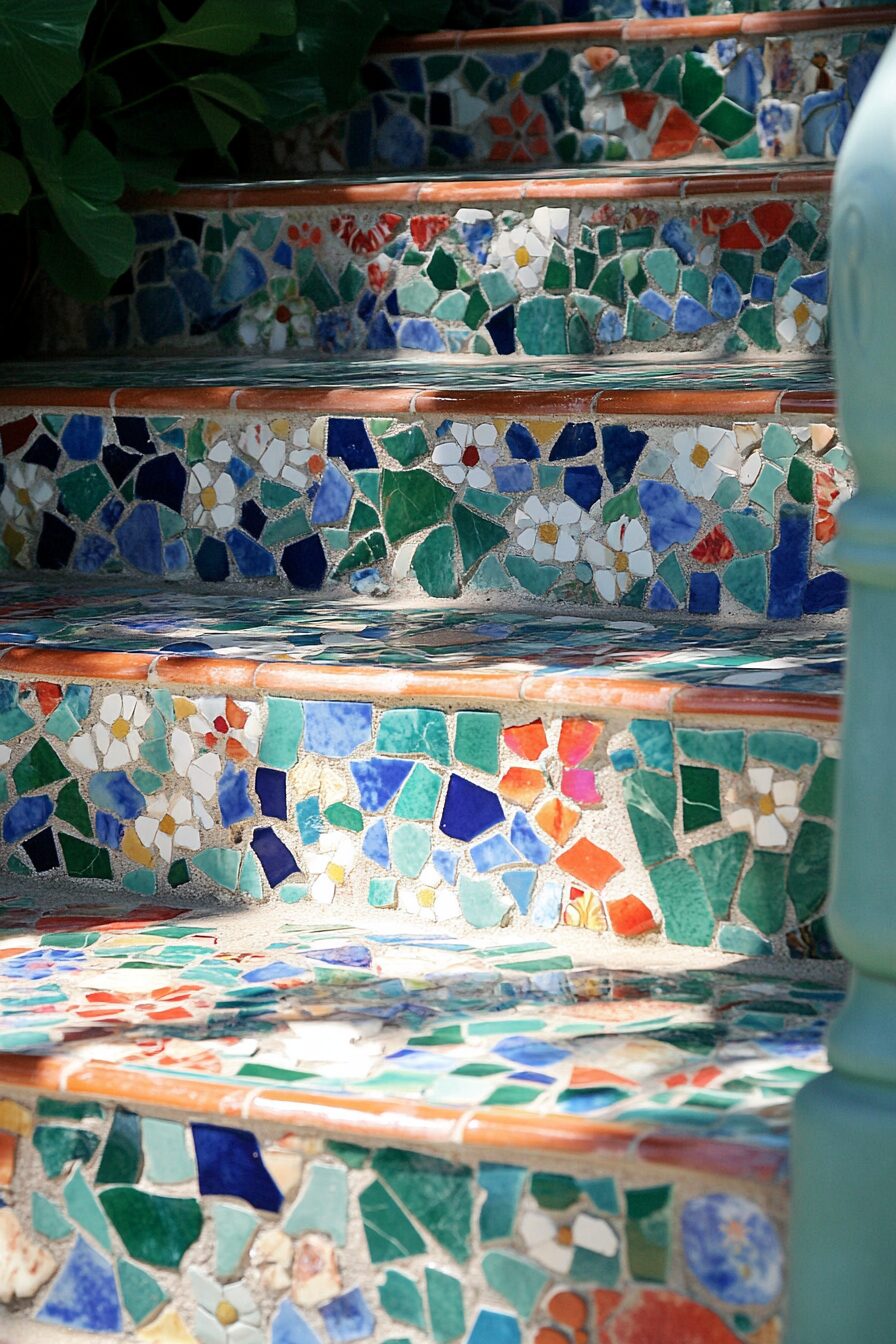
Faux Mosaic Tile Magic


Channel Mediterranean vibes without the expense of real mosaic tiles by creating painted faux mosaics on your pavers.
You can transform ordinary concrete pavers into what appears to be intricate tilework with this technique.
The secret to realistic-looking faux mosaics is in the details and color variations.
Begin by painting your entire paver with a base color that will represent your “grout” lines.
Light gray, tan, or white typically work well for this purpose.
Once dry, use a chalk pencil to draw your mosaic pattern – traditional Mediterranean patterns, flowers, or geometric designs all work beautifully.
Fill in your pattern with vibrant colors, adding subtle shading and highlights to create dimension.
To create realistic tile sections, vary your brush strokes and add subtle color variations within each “tile” area.
The beauty of this technique is that slight imperfections actually enhance the handcrafted, authentic look.
Seal your finished mosaic pavers with multiple coats of UV-resistant sealer to protect them from the elements.
These pavers make stunning accents around water features, as stepping stones, or as a decorative border around planting beds.
For a cohesive look, choose colors that echo elements already present in your garden or home exterior.

Mesmerizing Mandala Designs

Mandala designs bring a sense of tranquility and spiritual harmony to your outdoor space.
You can create these intricate circular patterns using simple dot painting techniques.
The symmetrical nature of mandalas makes them visually appealing and perfect for creating focal points in garden areas.
Begin with a clean paver painted with a solid background color – black, navy, or dark gray creates dramatic contrast for your mandala design.
Using the eraser end of a pencil, chopstick, or specialized dotting tools, create dots of various sizes to form your mandala pattern.
Start from the center and work outward in concentric circles for the most balanced design.
Experiment with different sized dotting tools to create varied dimensions in your pattern.
Traditional mandalas use vibrant colors like turquoise, magenta, and gold, but you can choose any palette that suits your space.
These pavers create stunning meditation spots when placed at the end of a garden path or under a favorite seating area.
For a cohesive look, create a series of mandala pavers with complementary designs and colors.
The detailed nature of mandala pavers makes them excellent conversation pieces and adds an artisanal quality to your outdoor area.
Find Your Room’s Color Palette
Tap a vibe — get a curated 5-color palette with hex codes you can copy ✨
Painted Faux Outdoor Rugs


Create the illusion of an expensive outdoor rug without worrying about fading, mildew, or replacement costs.
You can transform a plain paver patio into a stunning “carpeted” area that defines your outdoor living space.
The beauty of painted paver rugs is their permanence and weather resistance compared to fabric alternatives.
Begin by thoroughly cleaning your paver area and applying a primer formulated for exterior use.
Plan your “rug” dimensions and mark them clearly with chalk or painter’s tape.
Choose a base color for your rug background and apply it evenly to all pavers within your marked area.
Once dry, use painter’s tape to create borders, stripes, or geometric patterns typical of woven rugs.
Traditional Persian-inspired patterns, Southwestern motifs, or simple striped designs all translate well to this medium.

💭 I Wrote a Book About My Biggest Decorating Mistakes!
When I decorated my first home, I thought I knew what I was doing. Spoiler: I didn’t. 😅
💸 I bought a sofa way too big for my living room. Paint colors that looked amazing in the store but terrible on my walls.
For intricate patterns, create a stencil using contact paper or purchase ready-made stencils designed for floor painting.
Apply your design colors using a dabbing motion rather than brushing to prevent bleeding under stencils or tape.
When your design is complete, apply multiple coats of clear outdoor sealer to protect your work.
These painted rug pavers define conversation areas beautifully and create a sense of coziness in open outdoor spaces.
For maximum impact, position your painted paver rug under outdoor furniture groupings or dining sets.
The ability to customize dimensions makes this technique perfect for awkwardly shaped patios or uniquely configured outdoor spaces.
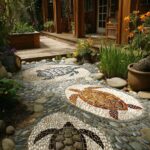
Stunning Nature-Inspired Scenes


Bring the beauty of nature directly onto your pavers with painted botanical and wildlife designs.
You can create a permanent garden that never needs watering with floral, leaf, and animal motifs.
These nature-inspired pavers blend seamlessly with garden environments and enhance your connection to the outdoors.
Choose imagery that reflects local flora and fauna for an authentic, regionally-appropriate design.
Ferns, local wildflowers, bird silhouettes, or butterfly motifs all make wonderful subjects for paver art.
Begin with a base coat in a natural tone like sage green, sky blue, or warm terracotta.
Use stencils for more complex designs or freehand simpler elements like leaves or grass blades.
Layer different colors to create depth and dimension in your nature scenes.
Lighter highlights and darker shadows help elements appear more realistic and three-dimensional.
These pavers work beautifully as stepping stones through garden beds or as accent pieces within larger patio areas.
For a unified look, choose motifs that appear in your actual garden plantings and repeat these elements on your pavers.
The natural imagery creates a harmonious transition between hardscaping and planted areas in your yard.
What’s Your Decor Personality?
5 questions · 30 seconds · Instant style match 🏡
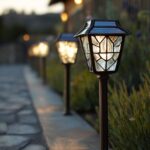
Magical Glow-in-the-Dark Pathways

Transform your garden into an enchanted nighttime wonderland with glow-in-the-dark painted pavers.
You can create pathways that absorb sunlight during the day and emit a soft, magical glow after dark.
This practical yet whimsical technique improves safety while adding an element of wonder to your outdoor space.
Begin with clean pavers and apply a white or light-colored base coat for maximum luminosity.
Purchase high-quality phosphorescent paint designed specifically for outdoor use.
Apply your glow paint in interesting patterns – stars, swirls, footprints, or simple dots all create lovely effects.
For maximum impact, consider how the pattern will look both in daylight and when glowing at night.
Some designs might appear as one image during the day but reveal a different pattern when glowing.
💭 Ever wondered what your room would actually look like rearranged?
I built a free tool that lets you drag furniture around a 2D floor plan. No signup, no catch.
See the Room Planner →Apply multiple coats of glow paint for the brightest effect, allowing each layer to dry completely.
Seal your finished pavers with a clear, non-yellowing outdoor sealer to protect the glow properties.
Position these pavers strategically along pathways, steps, or areas that benefit from nighttime illumination.
Remember that glow-in-the-dark paint needs exposure to light to “charge” – ensure your pavers receive adequate sunlight during the day.
These magical pavers are particularly wonderful for family gardens where children will delight in their nighttime transformation.
For a truly spectacular effect, combine glow pavers with fairy lights or subtle landscape lighting.
Personalized Family Legacy Pavers


Create meaningful outdoor spaces with pavers that tell your family’s story through personalized designs.
You can incorporate names, important dates, handprints, or symbols that represent family members and special memories.
These pavers transform ordinary outdoor areas into deeply personal spaces filled with significance and connection.
Start by brainstorming meaningful elements to include – children’s handprints, anniversary dates, pet names, or family mottos.
For handprints or footprints, apply paint directly to hands or feet and press onto the paver for an authentic imprint.
Use letter stencils for adding names and dates, ensuring clean, legible text that will stand the test of time.
Arrange these special pavers among standard ones to create unexpected moments of discovery throughout your yard.
For multi-generational appeal, involve family members of all ages in designing their own personal paver.
Use colors that coordinate with your home’s exterior while still allowing the personal elements to stand out.
Protect these meaningful creations with multiple coats of weather-resistant sealer to preserve them for years to come.
These pavers create a unique family legacy in your outdoor space that can be enjoyed and expanded upon over time.
The personal nature of these pavers creates an immediate emotional connection to your outdoor space for both family and visitors.
This or That?
Pick your fave — see what other readers chose! 👀
Interactive Game Board Pavers


Combine function and fun by turning your paver area into permanent outdoor game boards.
You can create chess, checkers, hopscotch, or custom game designs that invite outdoor play for all ages.
These interactive pavers transform passive spaces into entertainment zones that encourage outdoor activity.
Start by determining which games would best suit your family’s interests and available space.
Clean and prime your pavers before applying a base coat in a neutral color that will contrast with your game elements.
For chess or checkers, create alternating square patterns using painter’s tape and contrasting colors.
Hopscotch patterns require simple numbered squares that can be created with stencils or freehand.
Ensure your painted lines and spaces are appropriately sized for comfortable play.
Use exterior paint in bold, highly visible colors that clearly delineate game spaces and rules.
Seal your game board pavers thoroughly as they’ll receive more physical interaction than decorative pavers.
Position game pavers in shaded areas where people can comfortably play during various times of day.
For chess or checkers, consider creating a nearby storage solution for game pieces or paint additional pavers to serve as playing pieces.
These functional pavers transform waiting moments into play opportunities and encourage outdoor time for electronics-focused family members.
Sophisticated Ombré Gradient Effects


Create a contemporary, high-end look with pavers painted in gorgeous color gradients.
You can achieve a stunning ombré effect by blending colors from light to dark or transitioning between complementary hues.
This modern technique adds movement and visual interest to otherwise static paver installations.
Begin by arranging your pavers in the pattern they’ll be installed, numbering them lightly in pencil to maintain their order.
Select a color progression that complements your outdoor décor – blues transitioning to purples, or warm yellows fading to coral.
Mix slightly different paint ratios for each paver to create a smooth color transition across the installation.
For the most professional results, use a spray paint technique that allows for subtle blending between colors.
Alternatively, use a wet-blending technique with acrylic paints for a hand-painted gradient effect.
These pavers work particularly well for defining transitions between different outdoor zones.
The gradient effect creates a sense of movement that naturally draws visitors along pathways or toward focal points.
For maximum impact, choose colors that shift dramatically, like indigo to pale sky blue or deep forest green to bright lime.
Seal each paver with UV-resistant clear coat to prevent fading and maintain the integrity of your color transitions.
The sophisticated nature of ombré pavers pairs beautifully with modern architectural styles and contemporary outdoor furniture.
Quick Design Dilemma
Cast your vote — see what other readers think! 🤔
Charming Weathered Vintage Effects


Create instant character and timeworn appeal with pavers painted to look authentically aged and weathered.
You can achieve a French country, Tuscan villa, or rustic farmhouse aesthetic without waiting decades for natural aging.
These artificially distressed pavers add warmth and history to new landscapes that haven’t yet developed their own patina.
Begin with clean pavers and apply a base coat in a warm neutral like terracotta, slate blue, or warm beige.
Use dry-brushing techniques with lighter colors to create the appearance of worn edges and sun bleaching.
Apply dark washes in crevices and along edges to simulate the dirt accumulation of aged stones.
Add subtle hints of moss green or golden ochre to suggest organic growth and mineral deposits found on truly aged stone.
The key to realistic aging is subtle layering of colors rather than obvious distressing techniques.
For the most authentic look, study genuinely aged pavers or visit historic sites to observe how stone weathers naturally.
💭 I Wrote a Book About My Biggest Decorating Mistakes!
When I decorated my first home, I thought I knew what I was doing. Spoiler: I didn’t. 😅
💸 I bought a sofa way too big for my living room. Paint colors that looked amazing in the store but terrible on my walls.
These pavers pair beautifully with cottage gardens, herb patches, or Mediterranean-inspired plantings.
Create focal points by making some pavers appear more dramatically aged than others in your installation.
For a cohesive landscape, coordinate your artificially aged pavers with other intentionally distressed elements in your outdoor décor.
The charm of weathered pavers is their ability to make new outdoor spaces feel established and comfortably lived-in.
You can transform ordinary concrete into extraordinary art with just a few basic supplies and some creativity.
The best part about DIY paver painting is that you can always change or refresh your designs as your tastes evolve.
Remember to properly seal your finished work for longevity and enjoy the compliments that are sure to come your way!