Your foyer sets the tone for your entire home, and with the right modern design touches, you can create an entrance that’s both functional and absolutely stunning.
My contemporary ideas will help you craft an entryway that makes a powerful first impression while meeting all your practical needs.

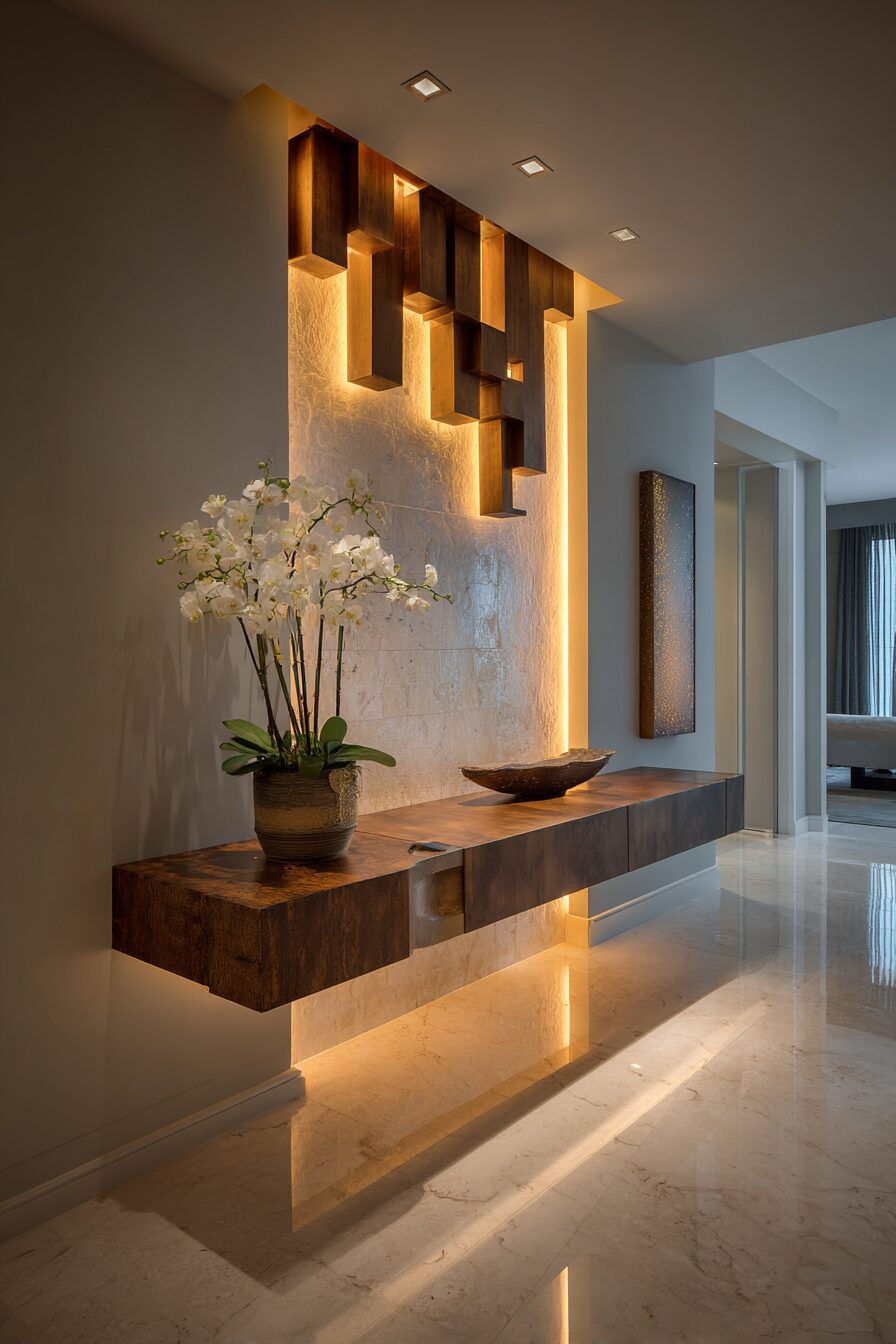
Floating Console with Dramatic LED Lighting


This floating console concept upgrades your entryway into a sophisticated space that immediately signals modern design sensibility.
You’ll want to mount a clean-lined console table directly to the wall, leaving the floor space completely open underneath for a weightless appearance.
The key lies in choosing a console with hidden mounting hardware and minimal visual bulk – think walnut, oak, or even a glossy white lacquer finish that complements your home’s color palette.
LED strip lighting installed beneath the console creates ambient illumination that makes the piece appear to hover while providing practical light for keys, mail, and daily essentials.
This lighting solution works especially well when you install it on a dimmer switch, allowing you to adjust the mood from bright and welcoming during the day to soft and atmospheric in the evening.
The wall behind your floating console becomes a canvas for artistic expression – you might choose a deep navy, charcoal gray, or even a textured material like natural stone or wood paneling.
Storage becomes both functional and beautiful when you add a few carefully chosen decorative boxes or small bowls for organizing everyday items like sunglasses, dog leashes, or charging cables.
You can enhance the floating effect by keeping the floor beneath completely clear, perhaps adding a simple runner or leaving the space open to showcase beautiful hardwood or polished concrete.
Statement Wall with Textured Materials


You’ll create maximum impact by dedicating one full wall to your chosen texture, allowing it to serve as both artwork and architectural feature.
Natural stone options like slate, travertine, or even dramatic black granite bring an organic elegance that works beautifully with clean-lined furniture and minimal accessories.
The installation process varies depending on your chosen material, but the investment pays off in creating a space that feels expensive and thoughtfully designed.
Reclaimed wood planks arranged in geometric patterns or natural configurations add warmth and character while maintaining the sleek aesthetic that defines modern style.
You might opt for weathered barn wood with its rich patina and subtle color variations, or choose smooth, newly finished planks in a consistent stain for a more refined appearance.
Concrete panels offer an industrial-chic alternative that pairs beautifully with metal accents, exposed lighting fixtures, and contemporary furniture pieces.
The texture becomes even more striking when you add strategic lighting – wall-mounted fixtures or track lighting can create shadows and highlights that emphasize the material’s natural beauty.
Color selection plays a crucial role in making your textured wall feel intentional rather than overwhelming – neutral tones like gray, beige, and white allow the texture to shine without competing with other design elements.
You can balance the strong visual weight of a textured wall by keeping other surfaces smooth and simple, letting your statement wall command attention without creating visual chaos.
Minimalist Bench with Hidden Storage


A sleek, low-profile bench transforms your entryway into a functional sitting area while secretly housing all the clutter that typically accumulates near your front door.
This design solution perfectly embodies modern principles by combining clean aesthetics with smart functionality, giving you a place to sit while putting on shoes and hiding storage space for seasonal items.
You’ll want to choose a bench with a streamlined silhouette – think straight lines, minimal ornamentation, and a height that feels proportional to your space without overwhelming the area.
Materials like light oak, walnut, or even upholstered options in neutral fabrics create visual interest while maintaining the sophisticated simplicity that defines contemporary design.
The hidden storage compartment becomes your secret weapon against entryway chaos, providing space for items like umbrellas, dog supplies, spare keys, or seasonal accessories that you need quick access to but don’t want visible.
Installation can be as simple as placing a freestanding piece or as integrated as building a custom bench into an alcove or corner space.
The top of your bench serves double duty as both seating and display space – you might add a small decorative object or leave it completely clear for maximum impact.
Cushions or pillows can soften the look while adding color or texture, but you’ll want to keep these minimal and cohesive with your overall design scheme.
The area around your bench becomes important for maintaining the clean aesthetic – you might add a simple coat hook on the adjacent wall or a small side table for keys and mail.
This design works particularly well in narrow entryways where traditional furniture might block traffic flow, as the low profile maintains open sight lines while providing essential functionality.
You can enhance the modern feel by choosing hardware-free designs where the storage compartment opens with a simple push mechanism rather than visible handles or knobs.
Bold Geometric Flooring Patterns


Your entryway floor becomes a work of art when you embrace geometric patterns that create immediate visual impact and establish a sophisticated design foundation for your entire space.
Modern geometric flooring transforms the practical necessity of durable entryway surfaces into an opportunity for artistic expression that welcomes guests with style and personality.
You’ll find countless options for creating these patterns, from traditional materials like marble and hardwood arranged in contemporary configurations to modern options like luxury vinyl planks or porcelain tiles.
Hexagonal patterns offer a classic geometric shape that feels both timeless and thoroughly contemporary, especially when executed in materials like large-format tiles or natural stone.
The scale of your pattern becomes crucial for achieving the right impact – larger geometric shapes tend to feel more sophisticated and less busy than smaller, intricate patterns.
Color contrast drives the visual drama in geometric flooring, and you might choose subtle variations like different shades of gray or bold contrasts like black and white for maximum impact.
Installation requires careful planning and skilled craftsmanship to ensure pattern alignment and clean transitions, but the results create a foundation that anchors your entire design scheme.
Herringbone patterns bring movement and energy to your space while maintaining the clean lines that define modern aesthetics, particularly when executed in materials like engineered hardwood or luxury vinyl.
You can extend the geometric theme beyond the floor by incorporating similar patterns in wall treatments, lighting fixtures, or decorative accessories that complement rather than compete with the flooring.
The durability factor becomes important in entryway applications, where your beautiful geometric floor needs to withstand daily traffic, moisture from wet shoes, and the occasional dropped package.
Maintenance requirements vary by material, but most modern flooring options designed for high-traffic areas can handle the demands of busy entryways while maintaining their stunning appearance.
Floor-to-Ceiling Mirrors

Mirrors stretching from floor to ceiling create an instant transformation that makes your entryway feel twice as large while adding a glamorous, modern element that catches and reflects light throughout the space.
This design approach works particularly well in smaller homes or apartments where maximizing the sense of space becomes crucial for creating a welcoming first impression.
You’ll want to choose mirrors with minimal frames or completely frameless options that maintain clean lines and don’t compete with other design elements in your entryway.
The placement of floor-to-ceiling mirrors requires careful planning to ensure they reflect attractive views rather than awkward angles or unappealing elements.
Strategic positioning allows your mirrors to bounce natural light from windows or doors deeper into your home, brightening not just the entryway but adjacent rooms as well.
Installation typically requires professional mounting to ensure safety and proper support, especially for larger mirror panels that can be quite heavy.
The reflective surface creates interesting visual effects when paired with lighting fixtures, artwork, or architectural features that become part of the mirrored composition.
You can enhance the modern aesthetic by choosing mirrors with subtle tinting or geometric shapes that add visual interest without overwhelming the space.
The practical benefits extend beyond aesthetics – floor-to-ceiling mirrors provide a full-length view that’s perfect for last-minute outfit checks before leaving the house.
Cleaning and maintenance become important considerations, as mirrors show fingerprints, dust, and water spots more readily than other wall treatments.
The psychological impact of large mirrors shouldn’t be underestimated – they create an immediate sense of openness and sophistication that makes guests feel welcome while showcasing your attention to design details.
Living Plant Wall or Greenery Display


A vertical garden or carefully curated plant display brings life and natural beauty into your modern entryway while improving air quality and creating a striking focal point that evolves with the seasons.
This biophilic design approach connects your indoor space with nature, creating a calming transition from the outside world to your home’s interior.
You’ll need to assess your entryway’s lighting conditions and choose plants that thrive in your specific environment, whether that’s bright natural light or lower-light conditions that require artificial supplementation.
Modern plant wall systems range from simple floating shelves arranged at different heights to sophisticated hydroponic installations that handle watering and nutrient delivery automatically.
The selection of plants becomes crucial for maintaining the clean, contemporary aesthetic – you might choose architectural species like snake plants, fiddle leaf figs, or sleek succulents rather than busy, flowering varieties.
Installation considerations include weight distribution, wall structure, and potential water damage, making it important to plan drainage and protection for surrounding surfaces.
The containers you choose play a major role in maintaining the modern aesthetic – sleek ceramic pots, geometric planters, or even built-in growing systems keep the focus on clean lines and intentional design.
Maintenance requirements vary significantly depending on your plant choices and installation type, but regular watering, occasional fertilizing, and periodic pruning keep your living wall looking fresh and healthy.
The visual impact changes throughout the year as plants grow and seasons shift, providing natural variation that keeps your entryway feeling dynamic and alive.
You can incorporate artificial lighting specifically designed for plant growth, ensuring your green wall thrives even in entryways with limited natural light.
The combination of natural textures and modern design elements creates a sophisticated balance that feels both contemporary and welcoming.
Industrial-Chic Coat Rack System

A sleek metal coat rack system transforms the practical necessity of hanging coats and bags into a sculptural design element that embodies modern industrial aesthetics.
This approach celebrates the beauty of functional design, where every element serves a purpose while contributing to the overall visual impact of your entryway.
You’ll find options ranging from wall-mounted systems with clean lines and minimal hardware to freestanding pieces that make bold architectural statements.
Materials like blackened steel, brushed stainless steel, or powder-coated aluminum provide durability while maintaining the sleek appearance that defines contemporary design.
The modular nature of many coat rack systems allows you to customize the configuration based on your specific needs and available wall space.
Installation can be surprisingly simple for wall-mounted systems, often requiring just a few strategically placed screws into wall studs for secure mounting.
The visual weight of metal coat racks works particularly well in entryways with high ceilings or substantial architectural features that can handle strong design elements.
You might choose systems with additional features like integrated shoe storage, umbrella holders, or small shelves for keys and accessories.
The industrial aesthetic pairs beautifully with other modern materials like concrete, exposed brick, or natural wood, creating interesting textural contrasts.
Color options have expanded beyond traditional black to include white, gray, and even bold accent colors that can complement your home’s overall palette.
The sculptural quality of well-designed coat racks means they look intentional and attractive even when not in use, unlike traditional closets that can appear empty or cluttered.
Sculptural Lighting Fixtures


A striking light fixture becomes the jewelry of your entryway, providing essential illumination while serving as a focal point that demonstrates your commitment to thoughtful design and artistic expression.
Modern lighting design has evolved far beyond simple functionality to embrace sculptural forms that blur the line between lighting and art installation.
You’ll want to choose a fixture that’s proportional to your space – oversized pendant lights work beautifully in entryways with high ceilings, while smaller spaces benefit from wall sconces or compact ceiling fixtures.
The shape and style of your lighting fixture should complement your overall design aesthetic while adding visual interest and personality to the space.
Installation requirements vary significantly depending on the fixture type and size, with some requiring additional electrical work or structural support for heavier pieces.
The quality of light becomes as important as the fixture’s appearance – you’ll want warm, welcoming illumination that creates a positive first impression for guests.
Materials like blown glass, sculpted metal, or even natural elements like wood or stone can create stunning focal points that anchor your entire design scheme.
The interplay between light and shadow created by sculptural fixtures adds depth and dimension to your entryway, especially when combined with textured walls or interesting architectural features.
Dimming capabilities allow you to adjust the mood and intensity of your lighting throughout the day, from bright and energizing in the morning to soft and welcoming in the evening.
The positioning of sculptural lighting affects both its visual impact and practical function – you’ll want to ensure adequate task lighting while creating dramatic ambient effects.
Contemporary options include smart fixtures that can be controlled via smartphone apps, allowing you to adjust color temperature, brightness, and even programming schedules.
Multi-Functional Mudroom Integration


Your entryway evolves into a highly organized command center when you integrate mudroom functionality that handles daily essentials while maintaining the clean aesthetic of modern design.
This approach transforms the often-chaotic entry area into a streamlined system that manages everything from coats and shoes to mail and keys with sophisticated efficiency.
You’ll want to zone different functions within your entryway space, creating designated areas for hanging items, storing shoes, and organizing daily necessities.
Built-in storage solutions work particularly well for this application, allowing you to customize compartments and features based on your family’s specific needs and habits.
The key to maintaining modern aesthetics lies in choosing materials and finishes that feel intentional rather than purely utilitarian – think sleek cabinetry rather than basic shelving.
Shoe storage becomes more sophisticated with options like pull-out drawers, ventilated cubbies, or even heated drying systems for wet boots and athletic shoes.
The integration of charging stations for phones and devices addresses modern needs while keeping technology organized and accessible.
Mail organization systems can be built into cabinetry or wall-mounted systems, creating designated spaces for incoming mail, outgoing items, and important documents.
The color palette becomes important for maintaining cohesion – neutral tones and consistent finishes help the functional elements blend seamlessly with your design aesthetic.
Hardware selection affects both functionality and appearance, with options like soft-close hinges and integrated handles maintaining clean lines while improving daily usability.
Gallery Wall with Modern Art


A carefully curated gallery wall transforms your entryway into a personal museum that showcases your artistic taste while creating an engaging visual experience for guests.
Modern gallery walls embrace clean lines, intentional spacing, and cohesive themes that demonstrate sophisticated curatorial sensibilities rather than random collections.
You’ll want to plan your layout carefully before hanging anything, using paper templates or digital tools to visualize different arrangements and find the most compelling composition.
The selection of artwork becomes crucial for maintaining modern aesthetics – you might choose abstract pieces, photography, or contemporary prints that share common elements like color palette or style.
Frame selection plays a major role in achieving cohesive design – matching frames create unity while varied frames in similar materials or colors can add visual interest without chaos.
The scale of individual pieces should vary to create dynamic visual rhythm, with larger anchor pieces balanced by smaller complementary works.
Lighting becomes essential for proper art appreciation – track lighting, picture lights, or strategically placed fixtures ensure your gallery wall receives adequate illumination.
The wall color behind your gallery affects how the artwork appears – neutral backgrounds allow colorful pieces to pop while darker walls can create dramatic contrast with lighter artworks.
Installation requires careful measurement and leveling to ensure professional-looking results that enhance rather than detract from your artistic collection.
The height of your gallery wall should allow comfortable viewing for people of different heights while maintaining proper proportions within your entryway space.
You can incorporate three-dimensional elements like small sculptures or decorative objects on floating shelves to add depth and variety to your display.


