As the leaves start changing colors and the air becomes crisp, it’s time to get into the fall spirit!
An easy way to decorate for the season is with fun, festive window paintings.
Window paintings are a simple way to add personality and seasonal cheer to your home, without a major time commitment.
Let’s take a look at some inspiring ways to turn your home’s windows into beautiful fall accents!
Maple Leaf Window

One of the quintessential signs of fall is the changing colors of the leaves.
Capture the beauty of autumn leaves with a Maple Leaf Window painting!
This easy window painting starts with an outline of a large maple leaf in the center of your window.
Use masking tape to mark out the shape if you want clean lines.
Fill in the leaf with brushstrokes of reds, oranges, and yellows to mimic the fall foliage colors.
Add in shading and details with darker paint.
For a cohesive look, paint a few smaller maple leaves in coordinating colors around the one large central leaf.
This bright and colorful window painting will remind you of the fall foliage at its peak!
To create the Maple Leaf Window painting, start by using masking tape to outline a large maple leaf in the center of the window.
Make sure the leaf is large enough to fill a good portion of the window for maximum impact.
Use reference photos of real maple leaves to capture the basic shape and veins accurately.
Once your outline is complete, it’s time to start filling it in with color!
Mix acrylic craft paints in shades of red, orange, and yellow to capture the colors of falling leaves.
Paint in sections, using angled brushstrokes to add texture and depth.
Blend the colors together so they flow in an ombre effect from yellow at the top to red at the base.
Be sure to leave some of the white window showing through the paint in areas to imitate the effect of light shining through real leaves.
Add veining details with a dark brown or black paint.
You can look at photos of real maple leaves for inspiration on the patterns and shapes of veins to recreate.
To finish off the design, paint a few smaller maple leaves in coordinating fall colors around the central leaf.
Cluster them together for an eye-catching fall focal point on your window!
Scarecrow and Pumpkins Window

Bring the spirit of the harvest season to your home with a Scarecrow and Pumpkins Window painting!
This design incorporates two iconic symbols of fall – pumpkins and a scarecrow.
Start by painting a simple pumpkin shape near the bottom of your window.
Use yellow, orange, and green paint to make the pumpkin look warm and realistic.
Add a black triangle nose, eyes, and mouth so the pumpkin has a friendly face.
Next, paint a scarecrow in overalls, plaid shirt, and hat near the top of the window.
His arms should be stretched out and his mouth smiling to appear warm and welcoming.
At the base of the scarecrow, paint more pumpkins spilling from a wheelbarrow, basket, or box.
Create pumpkins in different sizes and colors – mix in white, green, orange, yellow, and even blue for whimsical twists.
Add curly vines intertwining between the pumpkins for extra fall details.
For finishing touches, paint autumn leaves floating through the air around your scarecrow and pumpkins.
Use masks or tape to create clean edges between elements.
This folksy farm scene captures the nostalgic feelings of pumpkins, scarecrows, and fall harvest fun!
To craft the Scarecrow and Pumpkins scene, first paint your main pumpkin near the bottom using shades of orange and yellow acrylic paint.
While that layer dries, tape guidelines for the scarecrow’s body, arms, hat and other elements near the top so you can paint the figure accurately.
Use brown and red paints to capture the scarecrow’s overalls, plaid shirt, gloves, hat and boots.
Paint the face using tan paint for the head and black paint for simple eyes, nose and mouth details.
Next, paint a wheelbarrow, basket or box underneath the scarecrow using woody browns.
Fill the vessel with small pumpkins in classic shades of orange and yellow as well as fun colors like white, blue and green.
Use masking tape to create clean edges between pumpkins if desired.
Add curly vines between the pumpkins using dark green paint and a thin brush.
Outline the scarecrow and a few of the pumpkins with black paint to help them stand out.
Finally, use a splatter technique to add autumn leaves floating through the air around the scene.
Spritz thinned brown, yellow, red and orange paint from a brush for splatter effects.
Remove any masking tape once the painting is complete.
Draw the curtains and enjoy your seasonal Scarecrow and Pumpkins window!
Birch Trees Window

Create a woodsy autumn aesthetic with a Birch Trees Window painting.
This design depicts a cluster of white birch trees in their fall splendor.
Start by painting the tree trunks vertical up the window using Black and White paint.
Make some thicker and others more slender.
Add peeling white birch bark texture with scraggly black lines and strokes.
Next, use masking tape to block out the shape of the treetops and branches extending from the trunks.
Paint these shapes using yellow and orange paint to create golden fall foliage.
Remove the tape to reveal the striking black and white against bold fall colors.
To finish the look, paint the ground using tan, dark brown, and green to look like fallen leaves and earth.
Adding a critter or two, like a bird or squirrel, gives the scene an extra lively touch.
With its high-contrast colors yet organic design, this eye-catching birch trees painting adds striking autumn personality to your window!
Here are some step-by-step instructions to create the Birch Trees Window:
1.
Use a pencil to lightly sketch the outlines of the birch tree trunks on your window.
Draw them in different thicknesses and heights.
2.
Paint the trunks with black and white acrylic paint.
Use a dry brush technique to create texture that looks like peeling birch bark.
3.
Cut out leaf shapes from masking tape.
Tape these shapes to the ends of the branches to block them off.
4.
Use yellow, orange and red paint to fill in the leaf shapes.
This will create the fall foliage effect when you remove the tape.
5.
Paint the ground using blended shades of brown, tan, orange and green.
Use a crumpled plastic bag or sponge brush to dab on paint and texture.
6.
Remove all the masking tape to reveal the black and white tree trunks contrasting with the colorful leaves.
7.
Finally, use black paint to add birds resting on branches or small woodland creatures like squirrels or foxes (optional).
8.
Stand back and enjoy the eye-catching contrast and organic texture of your charming Birch Trees window painting!
Fall Farm Scene Window

Bring the colors and textures of the fall harvest to your window with a charming Fall Farm Scene painting.
Start by outlining a simple red barn on one side of the window.
Fill it in with bright red paint and add details like windows, doors, and a silo with black and white accents.
On the other side, paint bold yellow cornstalks standing in rows.
You can tape off stripes to keep the rows straight and clean.
In front of the corn, paint plump orange pumpkins growing on green vines that twist between the pumpkins.
For extra whimsy, add in a farmer carrying a pumpkin bucket and a happy pig or cow
Along the bottom, paint green grass accented with blooming fall flowers in yellow, purple, and red.
Finish it off by scattering colorful fallen leaves across the landscape.
The key is to use bright, saturated paint colors and fun farm motifs like tractors and animals.
This vivid window scene will capture the spirit of the fall harvest!
Follow these tips to paint your own detailed Fall Farm Scene:
– First sketch out the basic elements – barn, cornfield, pumpkins, animals – lightly in pencil.
– Paint the background first starting with the barn.
Use vivid red for the walls and black to outline the doors, windows and roof details.
– Add a gray silo with a black top beside the barn.
Leave some white space for windows.
– Paint tall yellow and green cornstalks in straight rows.
Use masking tape for clean stripes between rows.
– Outline pumpkins with an orange paint marker then fill them in with bright solid orange acrylic paint.
– Use a dark green paint to draw curly vines between the pumpkins.
– Paint a farmer character carrying a pumpkin pail to harvest the pumpkins.
– Add details like a cow, pig, tractor or hay bales for extra personality!
– Finish with grass, flowers, leaves and other fall textures using sponges for organic effects.
Fall Tree Silhouette Window

For an easy window painting that makes a statement, try creating a Fall Tree Silhouette.
Use black paint to trace the outline of a bare tree on one side of your window.
Paint sprawling branches that stretch across the glass to mimic the structure of a large oak or maple tree.
Leave the inside of the tree hollow for now.
Once the black outline is complete, fill the rest of the window with bright fall leaves.
Use red, orange, yellow and brown paints to dot on leaves of all sizes, scattering them across the glass.
For added dimension, trace a few leaves in black so they pop against the background.
The contrast between the dark tree silhouette and the colorful scattered leaves makes this painting bold and striking.
It’s sure to add seasonal style to your home each fall!
Follow these tips to create the perfect Fall Tree Silhouette:
– Start by using a projector or tracing a tree silhouette image onto your window with pencil first.
This helps get the proportions accurate before painting.
– Outline the entire tree using black paint and small brush.
Make sure the branches vary in thickness and have small offshoots.
– Fill around the tree with solid coats of bright yellow, orange, red and maroon paint.
Avoid adding too much brown.
– Use the back of a paintbrush to dot on random leaves in the solid colors.
Keep them small and scattered.
– Trace over a few of the leaf dots with black paint to make them stand out against the background.
– Paint the trunk and a few branches in black as well for definition.
– Step back and admire the striking silhouette tree contrasted with colorful fall leaves!
Wire pumpkins Window

Want to try a modern, geometric twist on standard fall window paintings?
Go for a Chicken Wirepumpkins design!
Start by using masking tape to create a grid pattern that resembles chicken wire across your entire window.
Paint the tape lines black so they stand out.
Then fill each grid section with the outline of a simple white pumpkin.
Some pumpkins can be whole and others sliced to reveal the inner orange “flesh” and seeds.
Once your pumpkin outlines are done, remove all the masking tape.
The black grid lines will remain crisp, making the white pumpkins look like they are sitting inside chicken wire cells.
For another unexpected element, paint a few of the pumpkins mint green, sky blue, or even bright pink!
The pumpkin patch palette gets taken in a fresh new direction.
This graphic black and white grid backdrop sets off the pop of color.
What a fun, artsy way to paint pumpkins for fall!
Follow these steps to create a striking Chicken Wire pumpkins window painting:
– First measure and place strips of masking tape vertically and horizontally across the window to create a grid pattern.
– Paint the masking tape strips black using acrylic craft paint and a small brush.
– In each grid cell, paint round white pumpkin shapes.
Make some whole and others sliced open.
– Paint the inner flesh of the sliced pumpkins orange and add seeds.
– Remove all the masking tape to reveal the black grid lines.
– Outline the pumpkins with black paint for definition.
– Paint a few pumpkins pastel colors like sky blue, mint green and soft pink.
– Finish by adding curly vines between pumpkins in dark green.
– Step back and enjoy this modern, geometric pumpkin patch!
Fall Sunset Window

Bring tranquil vibes and natural beauty to your window this fall with a painted Fall Sunset landscape.
Start by painting the sky.
Mix bright warm colors like orange, pink, yellow and purple and apply in blended stripes across the top third of the window.
It should resemble the changing evening light.
Below the sky, paint a grassy meadow using textured greens and yellows.
Use a stippling or dry brush effect to make it organic.
At the far edge of the grass, paint the darkened silhouette of a mountain range with grey and blue.
In front of that, paint the outline of a single large tree in black.
Fill its bare branches with yellow and red leaves that pop against the sky.
Finally, paint a pond or lake at the base using faded blues surrounded by darker earthy browns and greens.
The reflective colors and moody landscape elements combine to depict a serene autumn sunset scene.
This soothing, relaxing window painting will add joyful vibes and the beauty of nature to your home.
Here are some tips for painting your own stunning Fall Sunset window mural:
– First paint the sky using a range of yellows, oranges, pinks and purples blended vertically with a brush.
Make it bright and colorful.
– Below that, use textured greens and yellows to paint a grassy meadow area.
Use uneven brushstrokes.
– Paint a blue/grey mountain range silhouette along the back using painter’s tape for clean lines.
– In front of the mountains, paint the bare branches of a large tree extending across the window.
– Dot the branches with red and yellow leaves that pop against the sky.
Outline in black.
– Paint a lake at the base using blues and greys.
Surround with greens and browns.
– Stipple on yellow and white flowers in the grass for detail.
– Step back and admire your peaceful, hopeful fall sunset scene!
Fall Wreath Window

For natural seasonal style, paint an oversized Fall Wreath on your window!
Start by creating a large wreath shape that takes up most of the window using tape or a projector to trace the round outline.
Then paint bold fall colored leaves radiating from the top, sides, and bottom of the wreath in bright reds, oranges, and yellows.
Add depth by layering the leaves, painting some partially underneath others.
To make the leaves look more realistic, outline them in a darker version of the fill color.
Next, decorate the wreath by painting fall fruits, vegetables, and nuts.
Add apples, pears, pomegranates, mini pumpkins, acorns, and more winding between the leaves and within the center of the wreath.
You can paint some items whole and others sliced open.
Finally, finish with details like flowers, berries, and pine cones for texture.
The oversized scale makes this fall wreath eye-catching and dramatic!
Your windows will radiate autumnal style and colors with this natural, seasonal painting.
Follow these tips to paint a vibrant, oversized Fall Wreath on your window:
– Use a projector to trace a large wreath shape outline onto the window, or tape off a circle.
– Paint colorful fall leaves in warm hues of red, orange, yellow radiating from the wreath outline.
– Layer the leaves, painting some on top of others for depth and dimension.
– Outline each leaf in a slightly darker shade of the fill color for definition.
– Add fruits, gourds, nuts, and vines winding through the wreath for seasonal detail.
– Paint apples, pears, acorns, mini pumpkins and pomegranates.
Slice some open.
– Incorporate berries, pine cones, and fall flowers for extra texture.
– Step back and enjoy the oversized scale and fall bounty of your window wreath!
Fall Animals Window

For a playful, woodland-creature themed window painting, opt for a Fall Animals design!
Paint your favorite fall critters in fun fall scenarios across the window.
For example, paint a fox and a raccoon peeking out from behind colorful leaves.
Add an owl perched on a tree branch framed by the full moon.
Put squirrels or chipmunks gathering acorns into a little wagon.
For more ideas, consider deer walking through the forest, geese flying in a “V” formation, or a hedgehog curled up with leaves.
Use white or light-colored paints for the animals so they stand out.
But don’t forget to add fall details like leaves, berries, pumpkins, hay bales, etc.
around your animals to root the scene in the season.
Get creative with the animal poses, expressions, and interactions with autumn objects.
The possibilities are endless!
This playful window painting will add a touch of whimsy and nature to your home for fall.
Here are some tips for painting fun Fall Animals on your window:
– Sketch animal figures and poses lightly in pencil first to plan out your composition.
– Paint the animals with white or light colored fur/feathers so they stand out against the background.
– Add fall details to root them in the season – leaves, pumpkins, berries, etc.
– Paint animals interacting – a pair of squirrels gathering acorns, geese flying together, fox peeking from leaves.
– Keep facial expressions playful and whimsical with big eyes and smiles.
– Use bright fall foliage colors as a background – oranges, yellows, reds.
– Incorporate woodland elements like trees, forests, hay bales, the moon.
– Outline animals and details in black paint pen to make them pop.
– Step back and enjoy the playful autumn woodland creatures frolicking on your window!
Halloween Haunted House Window

For a window painting that’s festive and spooky, paint an intricate Halloween Haunted House scene!
Start with the outline of a large Victorian style house.
Fill it in using shades of black, grey, and blue for a moody look.
Add details like shudders, rails, widow’s walk, and towers to make it look extra creepy and haunted.
Next, paint bare tree silhouettes surrounding the house.
In the foreground, paint creepy critters like bats, spiders, black cats, owls, and crows perched and flying around the house and yard.
Finally, make it distinctly Halloween by adding pumpkins, both whole and carved jack-o-lanterns placed around the walkway and yard.
For extra drama, paint a full moon in the background.
Use white paint pens to add highlights and make details like moon, windows, and pumpkins shine.
Layering textures and details makes your haunted house painting eerie and enticing!
Place some battery operated candles in the window to create a spooky Halloween glow.
Follow these tips to paint a delightfully spine-tingling Halloween Haunted House:
– Start by sketching the outline of a 3-story Victorian style mansion, mapping out rooflines, towers, windows.
– Paint the house in shades of black, gray, and blue.
Add texture with brush strokes.
– Paint details like widow’s walks, fencing, and elaborate trim using straight edges or masking tape.
– Surround the house with spindly, bare tree silhouettes branching across the sky.
– Add creepy creatures like bats, spiders, cats, owls, and crows scattered around the scene.
– Paint carved jack-o-lanterns and whole pumpkins along the walkway to the house.
– Include dead plants, vines, gravesites, and a ghost or two!
– Finish with a giant full moon in the background and white highlights.
– Insert mini string lights or battery candles to create a spooky glowing scene.
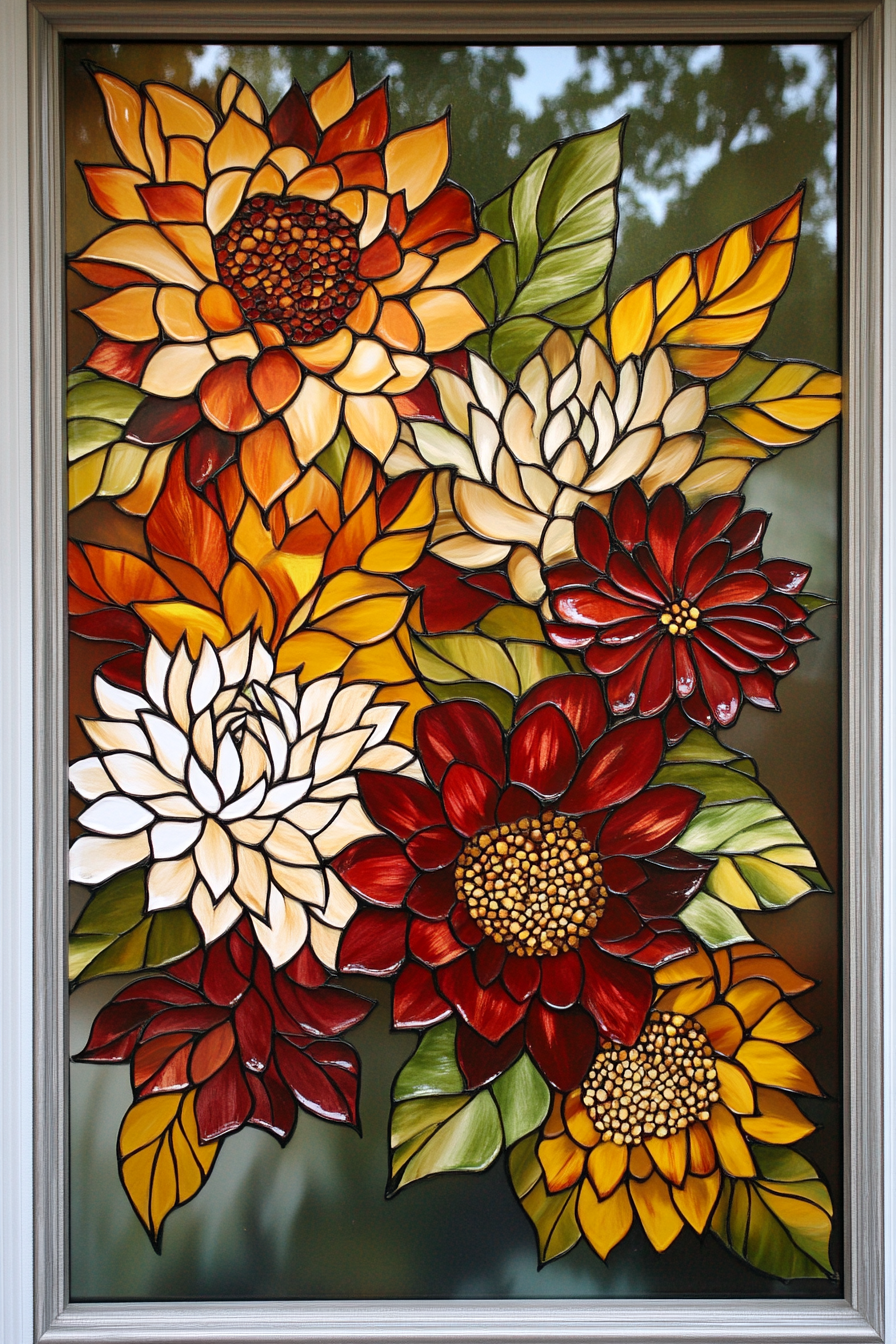
Florals Window

What better way to welcome the fall season than with vibrant flowers?
Paint a stunning Fall Florals design featuring gorgeous blooms in autumnal colors.
Start by outlining large floral shapes like mums, sunflowers, hydrangeas and dahlias across your window.
Fill the flowers in with brilliant warm colors like yellow, burnt orange, crimson and plum.
Use white paint to add highlights and details to the petals and leaves for dimension.
Next, paint cascading ivy vines between the flowers to connect the composition.
Finally, take some artistic liberty to paint a bumblebee, ladybug, butterfly or hummingbird visiting the flowers.
The combination of fall blooms and seasonal critters creates a welcoming celebration of autumn.
Anyone passing by will be cheered by this joyful window full of nature’s beauty!
Follow these tips and techniques for painting pretty Fall Florals:
– Start by using chalk or light pencil to sketch the outlines of flowers like mums, dahlias, and hydrangeas.
– Fill flowers in with rich acrylic paints in sunset hues – yellow, orange, red, plum, rust.
– Use green and brown paints for stems and leaves.
Add texture and shading.
– Outline petals in darker shades and dry brush white paint for highlights and details.
– Connect the blooms by painting trailing ivy vines between the flowers.
– Add whimsical critters like hummingbirds, bees, butterflies, and ladybugs.
– Paint a natural background with greens, blues and browns for a meadow, sky, or leaves.
– Step back to admire your vibrant floral celebration of the fall season!
With so many ways to get creative, window painting is a fun fall craft that adds personality to your home.
The beautiful colors and imagery of these fall window paintings will delight your family and impress your guests.
Display your artwork proudly and it will lift your spirits as you admire it from inside the home too.
If you’re feeling stuck, try browsing photos online or nature walks for inspiration.
The ideas are endless when it comes to what you can paint.
So grab some brushes and acrylic paints from your local craft store.
Decorate those windows and let the festive spirit of fall shine through!


