still remember the day I shoved a sad, dollar-store cork board above my desk and called it “organized.”
It was crooked.
It had three pins in it — two grocery lists and a birthday card I forgot to mail.
And every single time I sat down to work, it just… stressed me out.
That’s when I realized a cork board isn’t just a utility thing.
It can be one of the coziest, most personal little corners of your whole home.
So I started experimenting, rearranging, and honestly getting a little obsessed — and what came out of it completely changed how I felt about my space.
Why Cork Boards Deserve Way More Credit Than We Give Them

Okay, so here’s my hot take.
Cork boards have been living in the shadow of pegboards and floating shelves for way too long.
And I think it’s because most people only ever see them used in the most boring, functional way possible.
But a cork board?
It’s basically a living, breathing mood board that hangs on your wall and grows with you.
You can change it on a Tuesday because you feel like it.
You can make it soft and romantic, or clean and editorial, or wild and colorful.
There are no rules, and that’s sort of the whole magic of it.
When I finally started treating my cork board like a design element instead of a chore organizer, everything shifted.
The whole corner of my office started to feel warm and intentional.
Like it actually said something about me.
And that feeling — that’s what I want for you too.
Tap to Explore These Beauties
See my ideas in action 👇 Tap any image to explore full details.
Paint Your Cork Board First (Yes, Really)


This is the single tip I wish someone had told me before I spent years looking at that raw, beige cork texture.
Paint it.
Just grab some chalk paint or even leftover wall paint and give your cork board a solid base color.
I did mine in a dusty sage green and I’m still not over how good it looked.
The cork still holds pins just fine — I was nervous about that too, don’t worry.
But now the whole board has this intentional, styled look instead of that “I bought this at an office supply store” vibe.
You can go soft and neutral — creamy white, warm taupe, blush.
💭 Ever wondered what your room would actually look like rearranged?
I built a free tool that lets you drag furniture around a 2D floor plan. No signup, no catch.
See the Room Planner →Or you can go bold — deep navy, terracotta, forest green.
If I had a tiny studio apartment, I’d do a rich emerald green board and frame it in brass.
Honestly, the paint trick alone upgrades the entire piece by about a thousand percent.
It’s one of those small changes that makes guests stop and say, “Wait, did you get new art?”
And you just smile and say nothing.
Frame It Like a Piece of Art


Speaking of art — the frame situation matters so much more than people realize.
Most basic cork boards come with this thin, flimsy wood edge that makes the whole thing look cheap.
What I did was remove the original frame entirely and hot-glued chunky wood trim I grabbed from the craft store around the edges.
I painted it matte black.
The transformation was kind of insane.
You can also find beautiful ready-made frames at thrift stores and simply swap out whatever was inside them for a piece of cork sheet — you can buy cork rolls by the yard, and it’s way more affordable than you’d think.
A chunky gold frame with a painted blush cork interior looks genuinely like something you’d see in a boutique hotel room.
And a distressed white frame with raw, natural cork feels so French farmhouse and cozy.
The frame sets the whole tone, so think of it as choosing the personality of the board before you even put a single pin in it.
Find Your Room’s Color Palette
Tap a vibe — get a curated 5-color palette with hex codes you can copy ✨
Turn It Into a Menu Board for Your Kitchen

This one honestly changed my weeknight life and I don’t even think that’s dramatic.
I hung a medium-sized cork board inside my kitchen pantry door — painted white, framed in thin black trim — and every Sunday I pin our week of dinners on it.
Little handwritten cards, one for each night.
It sounds so simple but the act of physically pinning a card makes me feel like I actually have a plan.
The visual of seeing “Tuesday: pasta, Wednesday: tacos” is so much more satisfying than a note on my phone that I forget to check.
You can get creative with the cards too — use kraft paper for a rustic feel, or little index cards with washi tape borders.
I also pin a small “grocery needs” strip on the side where anyone in the house can pin a little note when we run out of something.
It’s functional, it’s cute, and honestly, it makes the kitchen feel a little more pulled together.
If I had a bigger kitchen, I’d do a massive floor-to-ceiling cork wall for this.
But even the pantry door version hits different.

💭 I Wrote a Book About My Biggest Decorating Mistakes!
When I decorated my first home, I thought I knew what I was doing. Spoiler: I didn’t. 😅
💸 I bought a sofa way too big for my living room. Paint colors that looked amazing in the store but terrible on my walls.
Make a Cozy Memory Wall With It

Okay this is the section where I get a little sentimental, so bear with me.
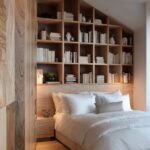
One of my all-time favorite things I’ve ever done with a cork board was turning it into a memory display in my bedroom.
Not a digital photo frame.
Not a printed canvas.
Just… a cork board covered in printed photos, little notes, ticket stubs, a dried flower from a birthday bouquet, a postcard from a trip.
It’s messy in the best possible way.
Every single thing pinned to it has a story.
And in the morning when I’m still half asleep and not fully ready to face the day, I look at that board and I feel this little wave of warmth.
Like a visual hug.
The key is to let it be imperfect and layered.
Overlap your photos.
Mix sizes.
Add some handwritten notes or little quotes that mean something to you, not just pretty quotes that look good on Pinterest.
This kind of board doesn’t need to match your decor.
It needs to match your life.
What’s Your Decor Personality?
5 questions · 30 seconds · Instant style match 🏡
Use It as a Vision Board That You Actually See Every Day

I’ve done the vision board thing before — cut up magazines, glued everything to a poster, rolled it up and shoved it under the bed by February.
Classic.
But then I started using a cork board for my vision board and everything changed because it’s always in front of me.
I hung it right across from my desk where I look up constantly.
And I didn’t fill it all at once.
I added things slowly, as I found images or words that genuinely resonated.
A torn magazine page of a kitchen I want someday.
A handwritten word that feels like a mantra.
A color swatch that represents a feeling I’m chasing.
It’s sort of alive — I take things off, I add new things, I rearrange.
And because it’s a cork board, there’s zero commitment.
Nothing is glued.
Nothing is permanent.
And weirdly, that makes it feel more intentional, not less.
Create a Kids’ Art Gallery (That Stays Organized)

If you have little ones at home, you already know the struggle of what to do with the absolutely endless stream of artwork that comes home from school.
My solution has been a dedicated cork board art gallery wall in our hallway, and honestly, it’s one of my favorite spots in the whole house.
I hung three matching cork boards side by side, painted in soft white, with thin gold frames.
Each kid gets their own board.
They choose what goes up.
They swap things out when they have something new they’re proud of.
And because it’s their space, they actually care about it.
The hallway used to feel like a transition zone — just a place you walk through.
Now it feels intentional and warm and kind of wonderful.
It also teaches kids that their creativity matters enough to be displayed properly.
Not shoved in a drawer.
Not stuck to the fridge with a magnet that falls off every two days.
Properly framed, properly displayed, properly celebrated.
That means something.
Style a Linen-Wrapped Cork Board for the Bedroom

This one is for the soft, cozy aesthetic lovers — and honestly, that’s me every single day.
Take your cork board and wrap the cork surface with a piece of linen or light cotton fabric before you frame it.
Use a staple gun on the back to secure it.
The linen mutes the texture just slightly, gives it this warm, European, lived-in quality, and makes the whole board feel like a design piece rather than office supply.
You can still pin things through the fabric — it works perfectly.
And because linen comes in so many gorgeous natural tones — oatmeal, warm white, flaxen beige — it blends into bedroom decor so beautifully.
I did this for my bedside nook and I pin little things there that I want to see before I sleep.
A quote.
A photo.
A little to-do list for tomorrow.
It feels so much more intentional than a notebook or a phone.
And because it looks beautiful, I actually use it every day instead of ignoring it.
This or That?
Pick your fave — see what other readers chose! 👀

Build a Rotating Seasonal Display

This one is genuinely so fun and I look forward to it every single season.
My entryway cork board lives right by the front door and I redecorate it completely every few months.
Fall?
Dried orange slices, pressed maple leaves, a little handwritten “welcome” card, some kraft paper and twine.
Winter?
Evergreen sprigs, a dusting of silver ribbon, cozy quotes about staying in and drinking tea.
Spring?
Pressed wildflowers, pastel ribbon, seed packets pinned with little labels.
Summer?
Polaroid-style photos from our latest trip, a menu from a restaurant we loved, some pressed fern leaves.
It takes maybe thirty minutes to switch out and it makes the whole entryway feel fresh and intentional.
Guests always notice it.
And honestly?
It makes me notice the season.
It’s a little ritual, and I’m kind of obsessed with how much joy it brings me.
Use Corkboard Tiles for a Custom Installation

If you’re not married to the idea of a traditional framed cork board, cork tiles are the move and I will die on this hill.
You can buy them in packs, and they’re self-adhesive or easy to mount with simple pins.
This means you can create any shape you want.
A giant rectangle above your desk.
An irregular cluster of squares in your home office.
A floor-to-ceiling column in a narrow hallway.
I used cork tiles to fill an entire small wall in my laundry room and it became my command center — grocery lists, schedules, notes, ideas, all of it in one spot.
It doesn’t look like a cork board.
💭 I Wrote a Book About My Biggest Decorating Mistakes!
When I decorated my first home, I thought I knew what I was doing. Spoiler: I didn’t. 😅
💸 I bought a sofa way too big for my living room. Paint colors that looked amazing in the store but terrible on my walls.
It looks like a design feature.
Especially if you mix in a few chalkboard tiles or a small whiteboard section.
The customization potential is genuinely limitless, and the cost is way, way lower than you’d expect for the impact you get.
Quick Design Dilemma
Cast your vote — see what other readers think! 🤔
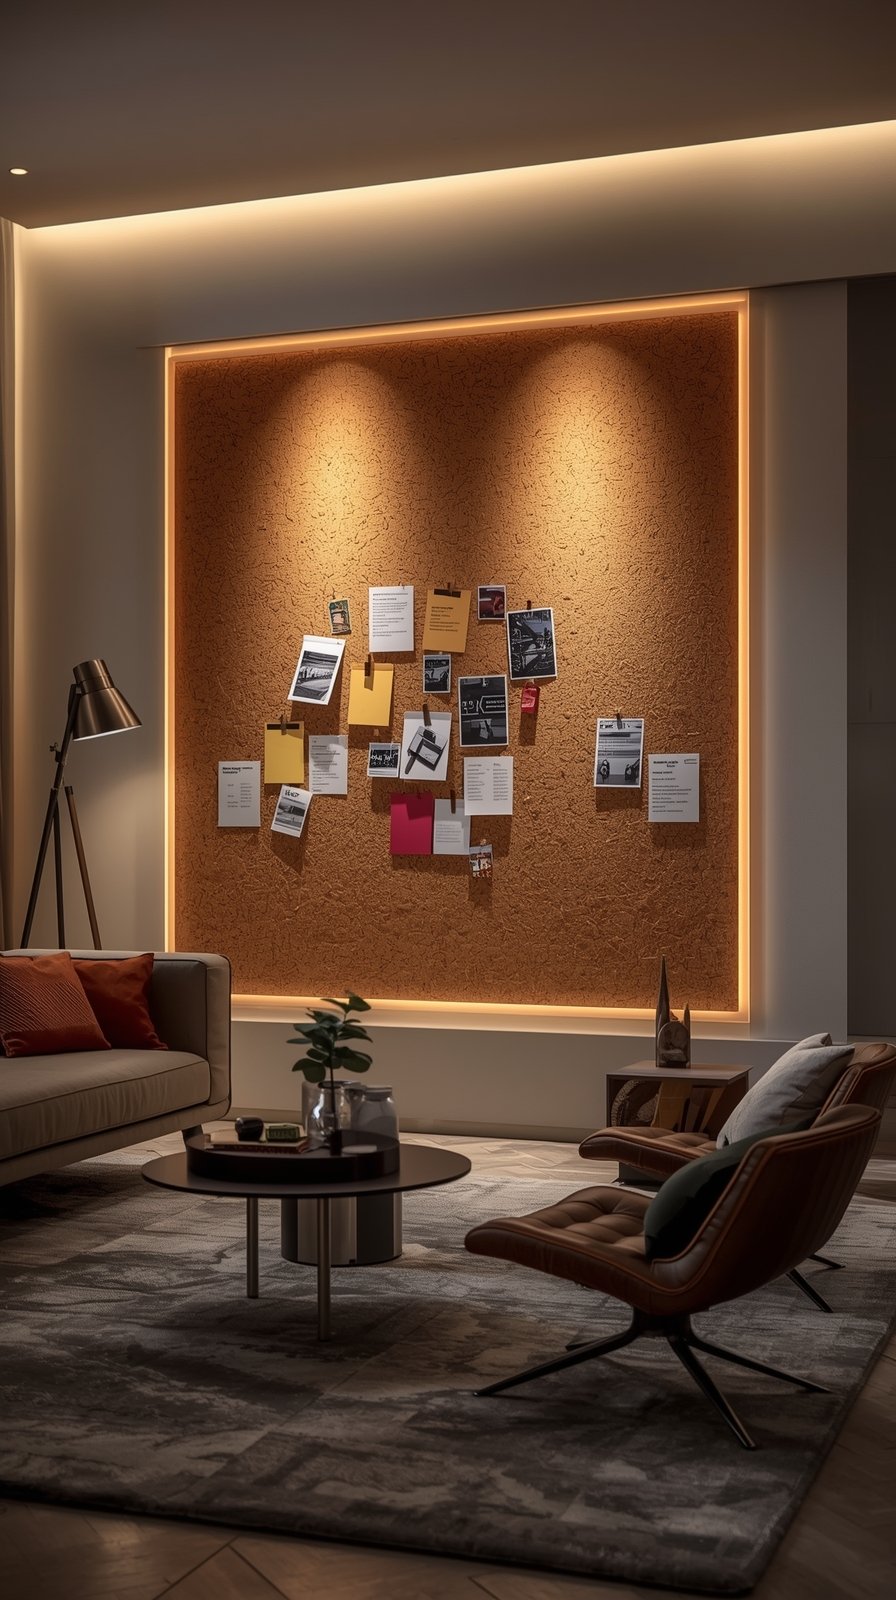
Add Lighting to Make It a Real Focal Point

And finally — the thing that elevates the whole situation from “cute” to genuinely stunning.
Light your cork board.
I have a small clip-on picture light above mine in the office, and the warm amber glow it throws over the whole board makes it look like a gallery installation.
I’m not even joking.
You can also use LED strip lighting tucked behind the frame for a soft backlight effect.
Or drape a set of warm fairy lights around the board for something more whimsical and cozy.
The light draws the eye.
It signals that what’s on this board matters.
And in the evening especially, when everything else in the room gets a little dim and quiet, a lit cork board becomes this glowing, warm little world on your wall.
It’s the kind of thing that makes you actually love being in the room.