never thought much about cinder blocks until I moved into my first apartment.
I was fresh out of college, broke, and staring at a completely empty living room.
Furniture shopping was out of the question—my budget barely covered groceries.
Then, during one of my endless Pinterest scrolls, I stumbled across a photo of a cinder block couch.
It was simple, practical, and, most importantly, cheap.
The next day, I went to the local hardware store, loaded up on cinder blocks, and got to work.

That table became not just a conversation starter, but the foundation of my love for creative, DIY cinder block-ish furniture.
Now, I use cinder blocks for nearly everything—indoors and outdoors—and I’m constantly amazed at how versatile they are.

If you’re ready to ditch expensive furniture and embrace your resourceful side, let me share my incredible DIY cinder block furniture ideas with you.
Let’s get started!

Cinder Block Couch

One of the most functional and stylish pieces you can create is a cinder block couch.
It’s perfect for a living room, patio, or even a cozy corner in your backyard.
To start, you’ll need enough cinder blocks to support the weight of a seat and some sturdy wooden planks.
Arrange the cinder blocks in two rows, parallel to each other, with enough space in between to hold your planks.

Stack the blocks depending on how high you want your seating area to be.
Most people find 2–3 blocks per column work best, but you can adjust it based on your height preferences.

Once the base is set, slide your wooden planks into the open slots of the cinder blocks to form the seat.
The planks should fit snugly to prevent wobbling.
If you want a polished look, sand and stain the wood before assembling.
Now comes the fun part: cushions!
Pick thick, comfy cushions or even an old mattress topper to create a cozy seating area.
Cover the cushions with fabric that matches your decor style—bright prints for a playful vibe or neutral tones for something more modern.

You can even add throw pillows for extra comfort and personality.
This couch isn’t just budget-friendly; it’s also incredibly durable.
It’s a lifesaver for outdoor spaces where traditional furniture might not hold up against the elements.

Plus, the industrial look of the cinder blocks adds a trendy, minimalistic edge to your space.
Tap to Explore These Beauties
See my ideas in action 👇 Tap any image to explore full details.
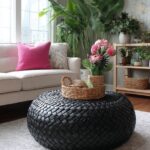
Cinder Block Coffee Table

Every seating area needs a good coffee table, and cinder blocks make this project a breeze.
For this design, all you need are cinder blocks, a piece of wood or glass for the tabletop, and some creativity.
Start by arranging four or six cinder blocks in a rectangular or square base, depending on the size of your table.

You can stack one or two layers of blocks for a taller table—just make sure the structure feels stable.
If you’re going for an industrial look, leave the blocks raw.
But if you want to soften the design, consider painting the blocks in a color that matches your decor.
White, black, or even pastel shades work great for a modern touch.

Next, place your tabletop material on top of the cinder blocks.
Wood works well if you’re aiming for a rustic vibe, while glass gives a sleek, contemporary feel.
Secure the tabletop with adhesive or just let it rest on the blocks if it feels stable enough.

If you’re using wood, you might want to sand and stain it beforehand to make it smooth and splinter-free.
What’s awesome about a cinder block coffee table is that the open slots in the blocks can double as storage.

Slide in some books, magazines, or even small potted plants to make the most of the space.
This project is not only cost-effective but also super customizable.

You can adjust the size, color, and materials to fit your room perfectly.
And the best part?

If you ever decide to change things up, disassembling the table is as easy as taking apart a LEGO set.
Outdoor Cinder Block Bench

If you love spending time outdoors, a cinder block bench is a no-brainer.
It’s easy to build, sturdy, and can withstand all kinds of weather.
For this project, you’ll need at least 12 cinder blocks and a few wooden beams.

Start by stacking the blocks in two columns, about 4–5 blocks high, to create the base on each side of the bench.
You can secure the blocks together with strong construction adhesive if you want added stability.
Once the bases are set, slide the wooden beams through the holes of the cinder blocks.
Three beams usually work best for a balanced and comfortable seat.

Make sure the beams are long enough to fit snugly into the blocks while leaving extra space for seating.
For a polished look, you can sand and stain the beams or paint them in a weatherproof color.
Add cushions or an outdoor bench pad for comfort, and you’ve got yourself a stylish, functional seating area.
This bench is perfect for a patio, garden, or even a fire pit area.
You can also customize it further by painting the cinder blocks or adding potted plants in the open slots.
The best part?
It’s incredibly sturdy and can hold up even during backyard barbecues or big family gatherings.
Plus, it’s much cheaper than buying a ready-made outdoor bench from the store.
Cinder Block Shelf

Everyone can use a little extra storage, and a cinder block shelf is as practical as it gets.
This design is ideal for a living room, bedroom, or even a garage.
To build your shelf, you’ll need cinder blocks and wooden planks.
The number of each depends on how tall and wide you want the shelf to be.

Start by placing two blocks on the floor as the base.
Lay a wooden plank across the top, making sure it’s evenly balanced.
Repeat this process for as many levels as you need.

Find Your Room’s Color Palette
Tap a vibe — get a curated 5-color palette with hex codes you can copy ✨
💭 I Wrote a Book About My Biggest Decorating Mistakes!
When I decorated my first home, I thought I knew what I was doing. Spoiler: I didn’t. 😅
💸 I bought a sofa way too big for my living room. Paint colors that looked amazing in the store but terrible on my walls.
For added stability, you can secure the blocks to the planks with adhesive, but this step isn’t always necessary.
The open slots in the cinder blocks can also be used for extra storage or decorative purposes.

Slide in baskets, books, or small plants to fill the spaces and make the shelf more visually appealing.
One of the great things about this design is its flexibility.
You can make the shelf as tall or as wide as you want, depending on your storage needs and available space.
It’s also easy to disassemble and reconfigure if you ever need to move or change the layout.
Cinder Block Planters

If you’re looking for a unique and affordable way to showcase your plants, cinder block planters are a game-changer.
They’re not only functional but also add a modern, industrial vibe to your outdoor or indoor space.
To create your own cinder block planters, start by selecting the number of blocks you need.
You can use as few as one or as many as you like, depending on the size of your garden or display area.

Cinder blocks with open slots work perfectly for this project because they naturally serve as plant holders.
Arrange the blocks in a pattern that suits your space—it could be a straight line, pyramid shape, or even a staggered wall.
Once you’ve got your layout, it’s time to prep the blocks.
If you’re keeping them outdoors, make sure they’re clean and free of debris.
For a pop of personality, you can paint the blocks in bold colors or soft pastels to match your aesthetic.
To plant, line the interior of the block holes with landscaping fabric or plastic to prevent soil from leaking out.
Fill each slot with soil, leaving enough space to add your plants.
Succulents, flowers, herbs, or even small vegetables work wonderfully in these planters.

Make sure the plants you choose are suited for your lighting conditions.
One of the best things about cinder block planters is how customizable they are.
You can rearrange the blocks whenever you feel like changing up your space, and adding new plants is as simple as swapping them in.
These planters are also durable and weather-resistant, making them perfect for long-term use.
Cinder Block Bar

If you’re dreaming of a home bar but don’t want to splurge on expensive furniture, cinder blocks are here to save the day.
This DIY project is not only affordable but also endlessly customizable to fit your space and style.
To build your home bar, start by deciding on its size.

You’ll need enough cinder blocks to create two sturdy columns for the base, plus a countertop to serve as the bar’s surface.
For a standard bar height, stack your cinder blocks 3–4 high.
Align the blocks carefully to ensure stability, and use construction adhesive if you want the bar to be permanent.

Next, choose a countertop material.
A wooden plank, butcher block, or even a piece of smooth laminate can work well.
Make sure the countertop is long enough to span the distance between the two cinder block columns, with a little extra overhang on each side for style and functionality.
Secure the countertop to the cinder blocks with adhesive or brackets to keep it firmly in place.
Now, it’s time to add some personality to your bar.
Paint the cinder blocks in a color that matches your decor, or leave them raw for an industrial look.
You can also use the open slots in the blocks for storage.

Slide in wine bottles, bar tools, or even baskets to keep everything organized.
Consider adding a decorative backsplash behind the bar or some string lights to create a cozy, inviting atmosphere.
Your DIY cinder block home bar is perfect for entertaining guests or enjoying a quiet drink at home.
It’s sturdy, stylish, and completely unique—no one else will have a bar quite like yours!
What’s Your Decor Personality?
5 questions · 30 seconds · Instant style match 🏡
Kid’s Cinder Block Play Table

If you have kids, you know how quickly they can outgrow furniture.
That’s what makes a DIY cinder block play table such a smart and affordable idea.
It’s sturdy, customizable, and easy to take apart when they no longer need it.
To create a play table, start with two stacks of cinder blocks for the base.
Each stack should be about 2–3 blocks tall, depending on the height that’s comfortable for your child.
These will serve as the table legs.
Next, choose a tabletop material.
Plywood or a sturdy wooden board works best, but you can also repurpose an old tabletop if you have one lying around.
Make sure the tabletop is large enough to provide ample play space but not so heavy that it’s difficult to lift or move.
Sand the edges of the wood to prevent splinters, and consider painting or sealing it for extra durability.
Place the tabletop securely on the cinder blocks, and you’re almost done.
For added stability, you can use construction adhesive to attach the tabletop to the blocks, but it’s not always necessary.
Now comes the fun part: customizing the table for your child.
You can paint the blocks in bright, playful colors or even let your kids help decorate them with stickers or stencils.
Add storage bins or baskets in the open slots of the cinder blocks to hold toys, art supplies, or books.
This play table is perfect for everything from building LEGO sets to hosting tea parties.
And when your kids outgrow it, you can easily repurpose the cinder blocks for another project.
It’s a win-win for both your budget and your family’s needs.
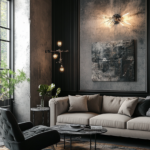
Stacked Cinder Block Side Table

Every living room or bedroom needs a reliable side table, and cinder blocks can make a surprisingly chic version.
This project is as simple as it gets, but the results are both functional and stylish.
Start by selecting 2–4 cinder blocks, depending on how tall you want your side table to be.
If you’re aiming for a modern, minimalist look, leave the blocks in their natural gray color.
For something more personalized, consider painting them to match your room’s decor.
Stack the blocks on top of each other, making sure they’re aligned and stable.
You can use construction adhesive to secure them in place, but if the table feels sturdy, it’s not a requirement.
If you’d like a smoother surface on top, place a small piece of wood or glass on the uppermost block.
This not only creates a polished finish but also makes the surface more practical for holding items like lamps, books, or drinks.
The open slots in the cinder blocks are perfect for additional storage.
You can use them to hold small baskets, magazines, or even decorative items like candles or plants.
This side table is incredibly durable and can handle the wear and tear of everyday use.
It’s also easy to move around, so you can switch up your room’s layout whenever you feel like it.
Cinder Block Kitchen Island

If your kitchen could use a little extra counter space, a cinder block kitchen island might be the perfect solution.
This project is not only budget-friendly but also completely customizable to fit your space and needs.
Start by measuring the area where you want to place the island.
Once you know the dimensions, gather enough cinder blocks to form the base.
For a standard kitchen island, you’ll need at least two stacks of blocks for the legs, spaced far enough apart to support the tabletop.
Stack the blocks to your desired height, making sure they’re stable and aligned.
You can leave the blocks raw for an industrial look, or paint them to match your kitchen’s color scheme.
Next, choose a tabletop material.
Wood, butcher block, or even a slab of granite can work, depending on your budget and aesthetic preferences.
Secure the tabletop to the cinder block base with adhesive for added stability.
The open slots in the cinder blocks can be used for storage.
Slide in baskets to hold utensils, cookbooks, or pantry items.
You can even add hooks or rods to the sides of the blocks for hanging towels or pots and pans.
This kitchen island is not only practical but also a great conversation piece.
It’s perfect for small apartments or homes where traditional islands might be too expensive or bulky.
Plus, the durability of cinder blocks means this island will stand up to years of cooking and entertaining.
This or That?
Pick your fave — see what other readers chose! 👀
Cinder Block Fire Pit Seating

There’s nothing better than gathering around a fire pit with friends and family, and a DIY cinder block seating area can make your outdoor space even more inviting.
This project is perfect for those who want to create a cozy, durable seating arrangement without breaking the bank.
To start, you’ll need enough cinder blocks to create the base for your seating.
The amount will depend on how many seats you want around your fire pit.
For each seat, plan on using at least 8–10 cinder blocks.
Begin by stacking two rows of blocks for each seat, creating a rectangular or square base.
You can stack them 2–3 blocks high, depending on how elevated you want the seating to be.
For added stability, use construction adhesive to secure the blocks together, especially if you’re planning to keep the seating permanent.
Once the base is built, it’s time to add a wooden seat.
Cut wooden planks to fit across the top of the cinder block base.
💭 I Wrote a Book About My Biggest Decorating Mistakes!
When I decorated my first home, I thought I knew what I was doing. Spoiler: I didn’t. 😅
💸 I bought a sofa way too big for my living room. Paint colors that looked amazing in the store but terrible on my walls.
Sand the wood thoroughly to prevent splinters, and then stain or paint it with weatherproof sealant to ensure it lasts outdoors.
Place the wooden planks on top of the cinder blocks, securing them with adhesive if needed.
To make your fire pit seating extra comfortable, add outdoor cushions or seat pads.
Choose materials that are weather-resistant and easy to clean, so they can handle the outdoor elements.
You can also use the open slots in the cinder blocks for storage.
Slide in firewood, blankets, or even small potted plants to make the space both functional and visually appealing.
This seating is perfect for any outdoor gathering.
The industrial look of the cinder blocks pairs beautifully with the natural warmth of a fire pit, creating a cozy and stylish vibe.
Plus, this project is incredibly sturdy and long-lasting, making it a worthwhile investment for your backyard.
Cinder Block Outdoor Kitchen

If you love cooking and entertaining outdoors, a cinder block outdoor kitchen is the ultimate DIY project.
It’s durable, budget-friendly, and can be customized to fit your cooking needs.
Start by planning the layout of your outdoor kitchen.
Decide where you want to place the cooking station, prep area, and storage.
Once you have a plan, gather enough cinder blocks to build the base for each section.
For the cooking station, stack the blocks to create a sturdy platform for your grill or stovetop.
Make sure the base is level and stable to support the weight of your equipment.
For the prep area, create a cinder block base and top it with a weatherproof countertop material, such as granite, stainless steel, or sealed wood.
This will give you a durable surface for chopping, mixing, and plating.

The open slots in the cinder blocks can be used for storage.
Slide in baskets to hold utensils, cutting boards, or grilling tools.
You can also add hooks or rods to the sides of the blocks for hanging towels or pots.
To complete your outdoor kitchen, consider adding shelves or a backsplash made from cinder blocks.
Paint or seal the blocks for a polished look, or leave them raw for a rustic, industrial vibe.
This project is perfect for anyone who loves hosting backyard barbecues or outdoor dinner parties.
It’s a practical and stylish addition to any patio or garden, and it’s built to withstand the elements for years to come.
Quick Design Dilemma
Cast your vote — see what other readers think! 🤔
Cinder Block Wine Rack

If you’re a wine lover, a cinder block wine rack is a stylish and practical way to store your collection.
This project is incredibly simple but looks sophisticated enough to impress your guests.
Start by gathering cinder blocks with open slots.
The number of blocks you need will depend on how many bottles you want to store.
Each open slot can hold one or two bottles, depending on the size of the block and the arrangement.
Begin by stacking the cinder blocks in a pattern that suits your space.
A pyramid shape works well for larger collections, while a simple vertical stack is perfect for smaller spaces.
Make sure the blocks are stable and aligned to prevent wobbling.

If you’re building a tall wine rack, secure the blocks with adhesive for added stability.
To give your wine rack a polished look, consider painting the cinder blocks or wrapping them in decorative contact paper.
You can also place the wine rack on a wooden or metal base to elevate it off the floor.
This not only adds style but also makes it easier to clean underneath.
The open slots in the cinder blocks are perfect for holding wine bottles horizontally, which is ideal for keeping the corks moist and preserving the wine’s quality.
This wine rack is a great addition to any kitchen, dining room, or home bar.
It’s functional, stylish, and surprisingly affordable—plus, it’s easy to expand as your wine collection grows.
Cinder Block Stepping Stones

Cinder blocks aren’t just for furniture—they can also add a unique touch to your garden or yard as stepping stones.
This project is both practical and decorative, providing a durable path while enhancing your outdoor space.
To create cinder block stepping stones, start by deciding on the layout of your path.
Measure the area and mark where each block will go using stakes or chalk.
Once the layout is planned, prepare the ground by clearing away grass, rocks, or debris.
Make sure the surface is level so the blocks will sit evenly.
Next, place the cinder blocks in the desired pattern.
You can lay them flat for a traditional stepping stone look or stand them on their sides for a more textured, modern design.
If you want to get creative, consider painting the blocks in bright colors or decorating them with mosaic tiles.
This adds a fun, artistic element to your garden path.
For added stability, you can secure the blocks in place with landscape adhesive or bury them slightly in the ground.
This ensures they won’t shift over time.
Cinder block stepping stones are incredibly durable and weather-resistant, making them perfect for high-traffic areas.
They’re also easy to rearrange if you ever want to change your garden’s layout.